Advanced Gated Content Forms Using Pardot
- March 17, 2022
- Form Handlers, Pardot Forms, Pardot Integrations, Salesforce Ben | The Drip

Gated content is offered exclusively for a specific audience. In other words, it’s content that prospects can’t access openly on your website, kept behind some type of “gate”. This is almost always a form that requires prospects to fill out their contact information before they can access the content. It could be simple, like an email newsletter signup, or more comprehensive lead magnet.
Marketing was a one-way street in the past – you produced content and distributed it via email to prospects in the hope that they would engage – but Leads are getting more difficult to find as people shift their attention away from traditional methods.
As an effective form of inbound marketing, gated content offers an opportunity for your prospects to interact by reading or watching something you created specifically for them. You can take advantage of the data that prospects submit via your webforms to personalize gated content, and help you to stand out in the crowd.
Gated Content: How, Why, and When
If done correctly, gated content can result in a significant boost to your lead generation efforts. There are two components effective gated content:
- Create a gated content offer: You’ll need to decide what type of offer you want to provide and what a prospect should expect to get out of it.
- Write the gated content: While primarily the content offers something of value, it should also serve as an introduction to who you are and what your company does.
You should consider gated content if and when:
- If you offer a high-value product or service.
- Gate your content early in the buyer’s cycle to capture their data – but not too early, otherwise prospects may not have acknowledged they have a challenge to solve.
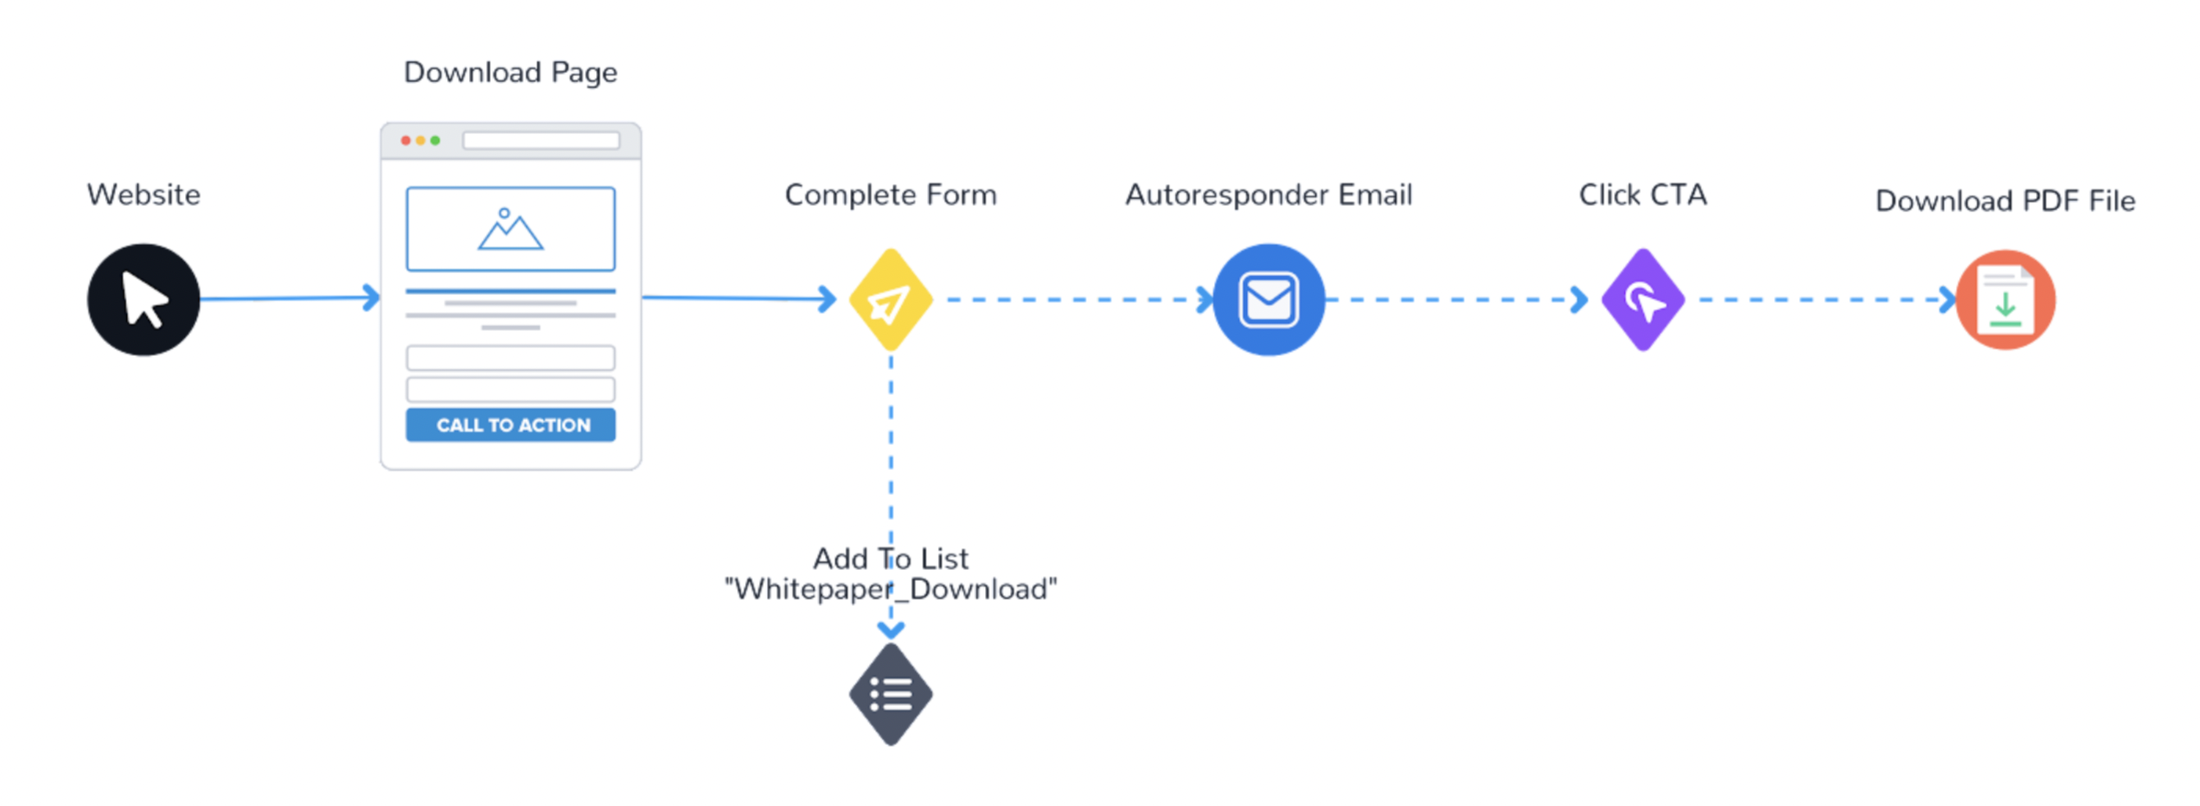
Gated Content Examples Using Pardot
Multiple Pardot assets come together for a typical gated content flow, as you can see it the diagram below:
- Landing page
- Form
- List
- Autoresponder
- PDF file
Writing Copy for Gated Content
Great copy is key, so invest time in writing to create a solid asset. Here are five tips for creating great content:
- Provide a clear introduction
- Keep it concise
- Include an offer at the end
- Add some visuals
- Experiment with different types of content
Take Gated Content to the Next Level
Now that you know how a standard Pardot gated content flow works, and what makes create great copy – how can you improve your gated content, and be memorable to prospects? Let’s see how your prospects can receive ultra-personalized content.
Here is how the user and data flow works at a high-level: we’ll use Pardot, DropContact API, Clearbit API, Integromat and Google Slides and to completely automate the process. The Pardot Form will push data to Integromat, then Integromat handle DropContact API, Clearbit API, Google Slides and then send back data to Pardot through a Pardot Form Handler.
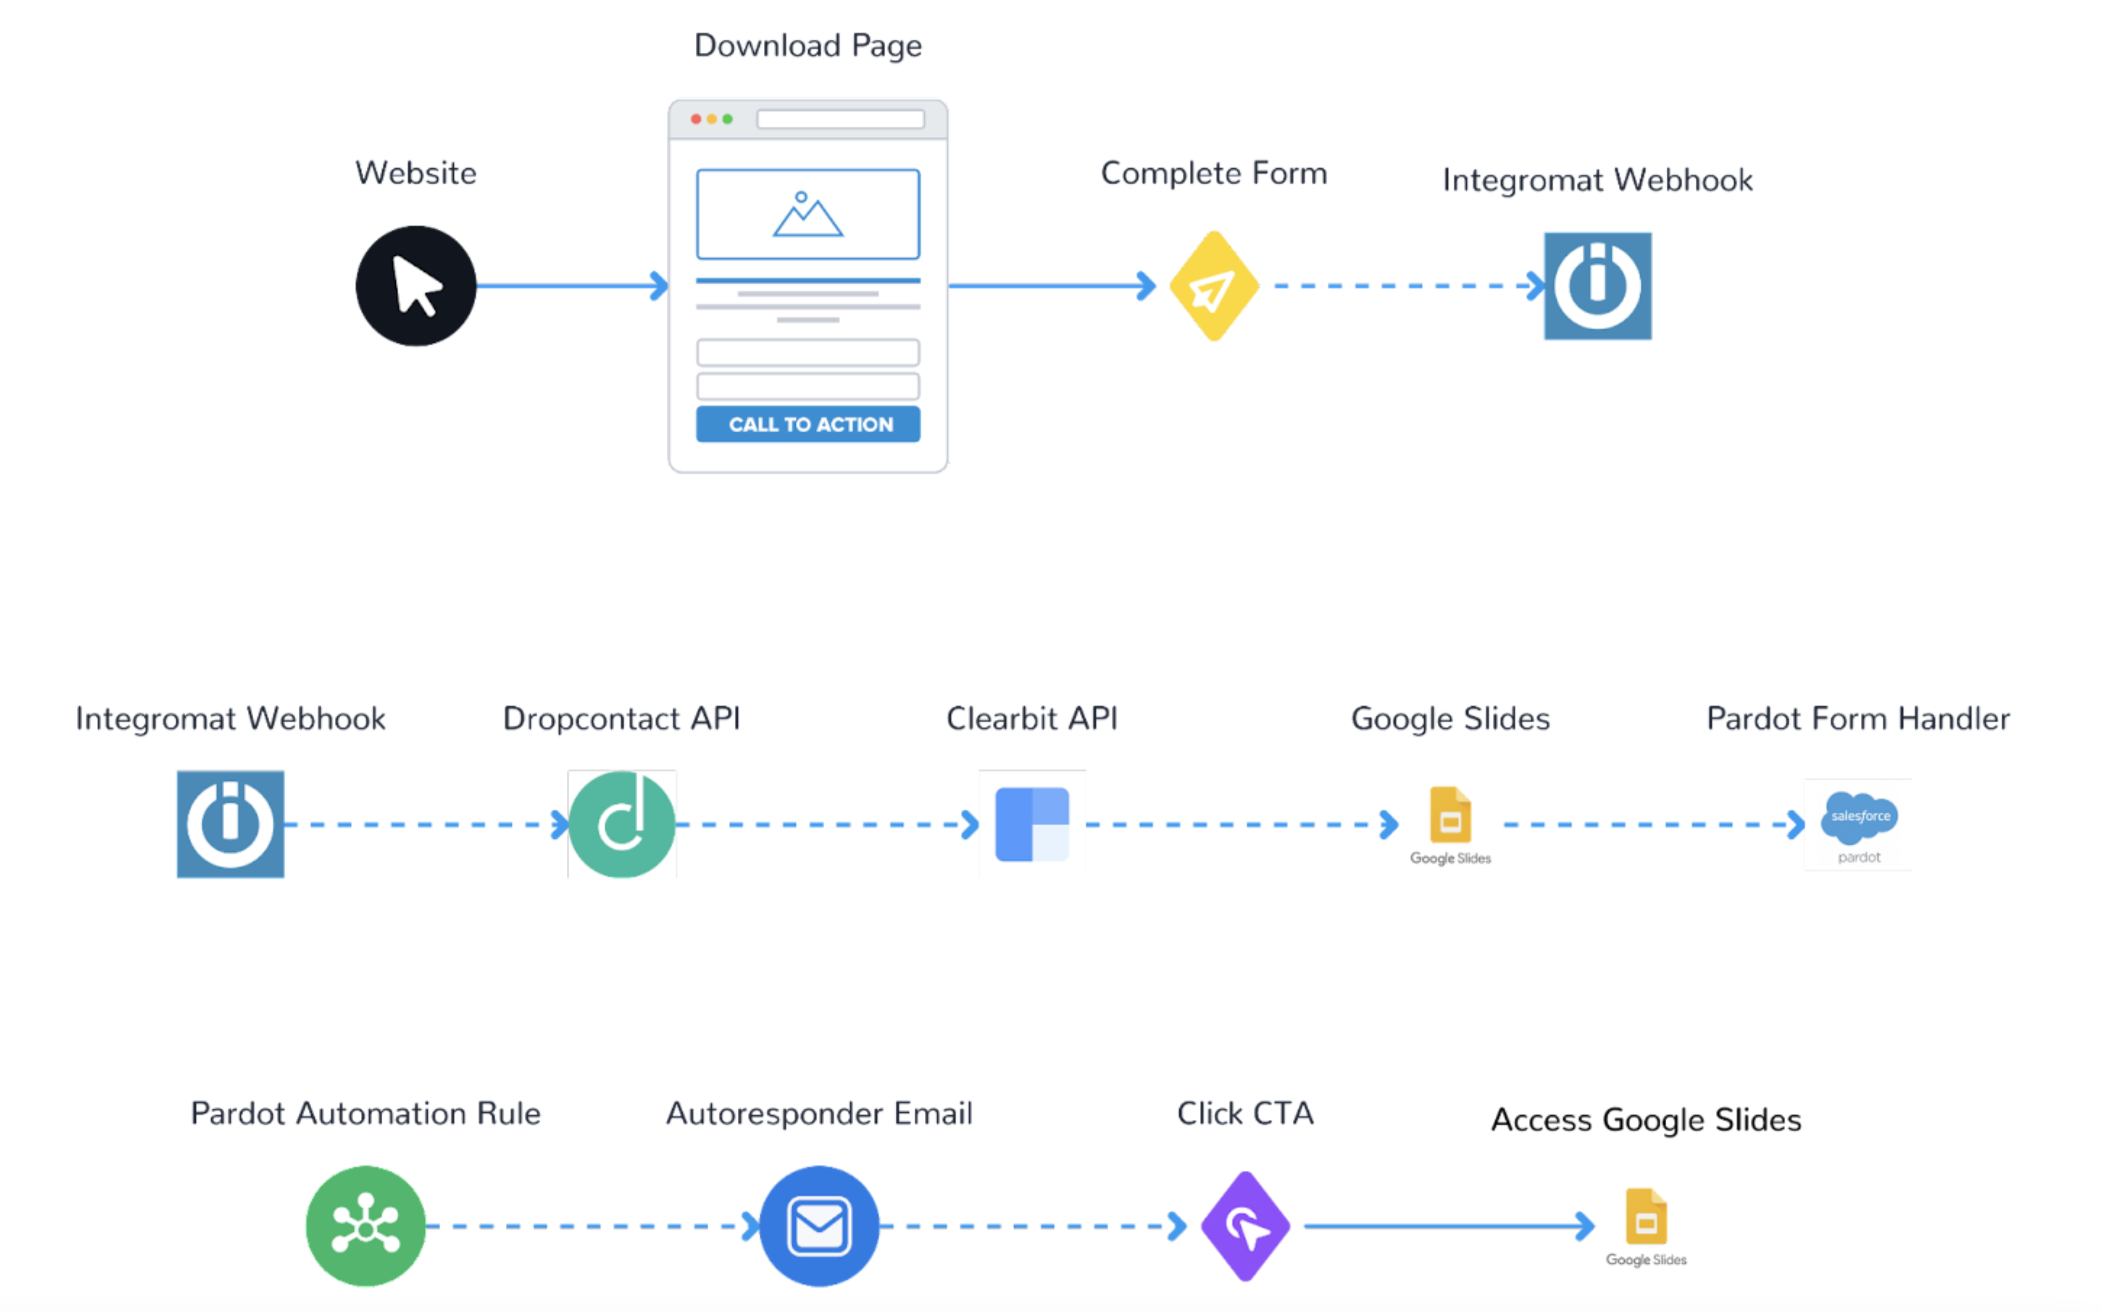
All Pardot Licenses are supported ✌🏻
What is Integromat?
Integromat is a powerful integration platform that allows you to visualize, design and automate your work in minutes.
What is DropContact?
The essential solution to automate B2B contact enrichment:
- Search and validate email addresses. You only need first name, last name and the website.
- Enrich business telephone numbers
- Merge duplicate contacts
- Standardize and correct data
- Add civility
- Add the LinkedIn profile of the contact, and their company,
- Add company information: sector of activity, NAF code, SIREN, SIRET, postal address, last published turnover, VAT number, staff numbers…
- 100% GDPR compliant: DropContact does not have databases to enrich your contacts and does not sell contacts: only the prospect files already in your possession are enriched and cleaned.
Step 1: Create Google Slides Template
Considering that you have created a simple Google Slides Template with {{company}} and {{logo}} variables inside:

Step 2: Add DropContact Fields as Pardot Custom Fields
We’ll need to have some prospect fields to record enriched data inside Pardot. Here are the custom prospect fields you need to create in Pardot. (Note: you don’t need to map these fields with Salesforce fields).

Step 3: Create Prospect Custom Field
Create a Pardot Prospect Custom Field to store Gated Content Customized URL:
- Field Type: Text
- Field Name: Custom_deck_url
Step 4: Create an Email Template and an Automation Rule
Create a Pardot Email Template with Custom_deck_url field as URL in your CTA link.
Then create an automation rule to handle email send with the custom Gated Content URL on the CTA of your email template:

Step 5: Integromat Setup (First Module)

First Module: Configure the Pardot Webhook
This is where you will create the scenario.
- Start will be “Webhooks” → “Custom Webhook” → Add new.
- Advanced settings: Maximum number of results: 1
- Copy address to clipboard and paste it on the Pardot Form Thank You Code and save your Pardot Form (on next step)
Step 6: Add the Integromat Webhook to the Pardot Form
There is currently no standard integration with Pardot forms to enrich prospect data. Let’s see how the DropContact API works with a Pardot form. Say you have a Pardot form with these standard fields (note: these are required by DropContact API, except for the email field):
- First Name
- Last Name
- Company
On the Thank You Code tab, paste JavaScript code calling the Integromat Webhook:

JavaScript code (with webhook Url from step 2):
<script type=”text/javascript”>
var email = encodeURIComponent(‘%%email{js}%%’)
document.write(‘<iframe
src=”YOUR_INTEGROMAT_WEBHOOK_URL?email=’ + email + ‘&first_name=%%first_name%%&last_name=%%last_name%%&company=%%company%%” height=”1px” width=”1px” />’);
</script>
Considerations:
- This method will not work if the “Redirect the prospect instead of showing the form’s Thank You Content” setting is enabled on the form (as it skips the Thank You code which is required to run the script).
- Make sure that “Always display form after submission” is marked on the Pardot Form that you use.
- If you have a completion action on your Pardot Form to send an autoresponder email with gated content, delete it.
Step 7: Edit Integromat Setup (First Module)

Edit First Module: Configure the Pardot Webhook
This is where you will edit the scenario to determine the data structure.
- Click on button “Re-determine data structure”
- Send a Pardot Form submission from the Pardot Form with Thank You code linked with the Integromat Webhook
Step 8: Create the Pardot Form Handler
Here’s how to create a Pardot form handler.
- Open the Form Handlers page by navigating to: Content → Form Handlers. Then, click + Add Form Handler.
- Name the Form Handler (in line with your naming convention), and select the appropriate folder and campaign.
- Check the checkbox to enable Kiosk/Data Entry Mode.
- Set the Success Location & Error Location options to Referring URL.
Add form handler completion actions: Tag your prospect, or add a specific process if necessary
Map Form Fields
Repeat these steps for each field on your form to be enriched by DropContact
- Click + Add New Field.
- Enter the External Field Name. Remember, the External field name is case-sensitive!
- Select the prospect field from the dropdown list, and save your changes.
The following fields can be returned in Integromat by the DropContact API and mapped with Pardot Form Handler fields (with Pardot custom fields created at step 2):

You also need to map the Prospect Field : Custom_deck_url, created on step 3.
You now have your specific Pardot Form Handler created, ready to enrich your Prospect data and ready to receive data with your newly customized Gated Content URL.
Step 9: Edit Integromat Scenario (Additional Modules)
Second Module: Configure the POST Dropcontact
To do this, add an HTTP – Make a request module in Integromat to be able to link DropContact, and configure the module as follows:
- URL: https://api.dropcontact.io/batch
- Method: POST
- Headers:
- Name: Content-Type | Value : application/json
- Name: X-Access-Token | Value: The DropContact API key, to be found in the “My account” tab, at the top.)
- Body type: RAW
- Content type: JSON (application/json)
- Request content: Copy and paste the following code and replace the “data types” with the variables from your Custom Webhook.
{
“data”: [
{
“first_name”: “Alexandre”,
“last_name”: “Ruiz”,
“email”:”[email protected]”,
“company”: “Carrenet”,
“website”:””
}
],
“siren”:true
}
💡 If your file contains French companies, add the siren information, adding the line “siren”: true.
- Parse response: check
- ⚠️ Time out: 45 (remember to open the advanced options)
💡 Launch a run each time you add a module to test as you go.
Third Module: Add a delay between GET and POST
Then add a ‘tools’ Integromat type (Action) Sleep. To maximize the success rates of Dropcontact, you need to set a delay of 50 seconds*.
⚠️ Why the 50-second delay? Dropcontact does not have a stored and nominative database, but enriches your data thanks to algorithms and proprietary servers. This is the reason why Dropcontact is the only 100% GDPR-compliant solution.
Fourth Module: Configure the GET of Dropcontact
Add an HTTP – Make a request module in Integromat to finalize the integration of Dropcontact.
- URL: https://api.dropcontact.io/batch/{your-request-id}: The variable {your-request-id} is available in the drop-down menu of HTTP 3 – Make request> “Data”> “request_id”
- Method: GET
- Headers:
- Name: Content-Type | Value: application/json
- Name: X-Access-Token | Value: Your API Key (the same as used in the previous POST module)
- Body type: RAW
- Content type: JSON (application/JSON)
Parse response: YES
Fifth Module: Configure the Deck creation
To do this, add a Google Slides – Create a Presentation From a Template module in Integromat, and configure the module as follows:
- Title: Title of your file (with variables if needed)
- Copy a Presentation: By Dropdown
- Choose a Drive: My Drive
- Presentation ID: ID of Template
- Values:
company: company | logo: empty - New Drive Location: My Drive
- New Document’s Location: My Drive/ a folder
- Show advanced settings: Shared (important to be publicly available for sharing)
Sixth Module: Configure the Deck customization
To do this, add a Google Slides – Upload an Image To a Presentation module in Integromat, and configure the module as follows:
- Choose a Presentation: By Mapping
- Presentation ID: {{Google Slides – Create a Presentation From a Template OUTPUT.id}}
- Select the Method: Upload an Image by Replacing Text Tag
- Values:
- Tag: logo | Image URL: https://logo.clearbit.com/{{website}}
- The variable {website} is available in the drop-down menu of HTTP 4 – Make request> “Data”> “Data”> “Website”.
Seventh Module: Configure Pardot Form Handler Module
Add an HTTP – Make a request module in Integromat to finalize the integration of Pardot.
- URL:
- YOUR_PARDOT_FORM_HANDLER_URL?email={email}&Custom_deck_url=https://docs.google.com/presentation/d/{Custom_deck_url}
- The variable {email} is available in the drop-down menu of HTTP 5 – Make request> “Data”> “email” (Need to be the same email address to be used as an ID for the Pardot Form Handler)
- The variable {Custom_deck_url} is available in the drop-down menu of Google Slides – Create a Presentation From a Template > “Data”> “Presentation ID”
You can map all DropContact results to your Pardot Form Handler External Field directly on the URL as variables that are available in the drop-down menu of HTTP 4 – Make request> “Data”> “Data”.
- Method : GET
- Headers : No need
- Body type : No need
- Parse response : No need
Pardot Form Handler handles Prospect duplicate issue natively.
The following fields can be returned by DropContact API and mapped with Pardot Form Handler Fields:

Here is the Gated Content final result sent to your prospect, personalization is limitless!

Summary
Gated content is a proven way to generate more leads for your business. Generating leads can be difficult, but it’s not impossible. Gated content is one way to get your message in front of potential customers and drive conversion rates. It is a strategy that many businesses are using to drive traffic to their websites and capture contact information of potential customers.
Although gating your content can seem like a daunting task, it can actually be an inexpensive and effortless process if you follow the right steps. The key to success with gated content is to create compelling, useful and valuable content to your target market. If you do this, you will have the best chance of generating the leads that your business needs.
We’ve seen how to easily customize and send Gated Content by using Pardot, Integromat, DropContact API, Clearbit API and Google Slides! If you have any questions or comments to improve the process, feel free to send me a DM on LinkedIn: Alexandre Ruiz!
You can find the recording of Dubai Pardot Group event where I presented this solution here, or on YouTube here.
Thanks again to Said Bachiri for inviting me as a speaker!
Also, if you need the blueprint (Integromat scenario import file) for this integration, just let me know 😉
This Pardot article written by:
Salesforce Ben | The Drip
Lucy Mazalon is the Head Editor & Operations Director at Salesforceben.com, Founder of THE DRIP and Salesforce Marketing Champion 2020.
Original Pardot Article: https://www.salesforceben.com/the-drip/advanced-gated-content-forms-using-pardot/
Find more great Pardot articles at www.salesforceben.com/the-drip/
Pardot Experts Blog
We have categorized all the different Pardot articles by topics.
Pardot Topic Categories
- Account Based Marketing (ABM) (8)
- Business Units (13)
- ChatGPT / AI (3)
- Completion Actions (5)
- Connectors (10)
- Custom Redirects (4)
- Demand Generation (8)
- Dynamic Content (5)
- Einstein Features (11)
- Email Delivery (18)
- Email Open Rates (3)
- Pardot A/B Testing (2)
- Email Mailability (16)
- Do Not Email (1)
- Double Opt-in (2)
- Opt Out / Unsubscribe (14)
- Email Preferences Page (6)
- Engagement Studio (14)
- Industries (1)
- Non Profit (1)
- Landing Pages (10)
- Lead Generation (1)
- Lead Management (12)
- Lead Routing (2)
- Lead Scoring (15)
- Leads (3)
- Marketing Analytics – B2BMA (9)
- Marketing Automation (1)
- Marketing Cloud (2)
- Marketing Cloud Account Engagement (4)
- New Pardot Features (6)
- Opportunities (2)
- Optimization (3)
- Pardot Admin (62)
- Duplicates (1)
- Marketing Ops (1)
- Pardot Alerts (1)
- Pardot API (2)
- Pardot Automations (3)
- Pardot Careers (12)
- Pardot Certifications (4)
- Pardot Consulting (1)
- Pardot Cookies (3)
- Pardot Custom Objects (3)
- Pardot Email Builder (7)
- Pardot Email Templates (9)
- HML (6)
- Pardot Events (16)
- Pardot External Actions (1)
- Pardot External Activities (4)
- Pardot Forms (27)
- Form Handlers (7)
- Pardot Integrations (21)
- Data Cloud (1)
- Slack (1)
- Pardot Lead Grading (5)
- Pardot Lead Source (2)
- Pardot Lightning (1)
- Pardot Migration (1)
- Pardot Nurture / Drip Campaigns (1)
- Pardot Personalization (3)
- Pardot Profiles (1)
- Pardot Releases (19)
- Pardot Sandboxes (2)
- Pardot Segmentation (4)
- Pardot Strategy (7)
- Pardot Sync (2)
- Pardot Sync Errors (1)
- Pardot Tracker Domains (5)
- Pardot Training (3)
- Pardot Vs Other MAPs (4)
- Pardot Website Tracking (2)
- Reporting (22)
- Salesforce and Pardot (29)
- Marketing Data Sharing (2)
- Pardot Users (3)
- Salesforce Automation (4)
- Salesforce Flows (1)
- Salesforce Campaigns (20)
- Salesforce CRM (3)
- Record Types (1)
- Salesforce Engage (3)
- Salesforce Queues (2)
- Security and Privacy (1)
- Tags (3)
- The Authors (483)
- Cheshire Impact (9)
- Greenkey Digital (47)
- Invado Solutions (37)
- Jenna Molby (9)
- Marcloud Consulting (6)
- Nebula Consulting (53)
- Pardot Geeks (38)
- Salesforce Ben | The Drip (235)
- SalesLabX (2)
- Slalom (2)
- Unfettered Marketing (45)
- Uncategorized (1)
- Website Tracking (2)
- Website Search (1)
More Pardot Articles
See all posts

This Pardot article written by:
Salesforce Ben | The Drip
Lucy Mazalon is the Head Editor & Operations Director at Salesforceben.com, Founder of THE DRIP and Salesforce Marketing Champion 2020.
Original Pardot Article: https://www.salesforceben.com/the-drip/advanced-gated-content-forms-using-pardot/
Find more great Pardot articles at www.salesforceben.com/the-drip/