4 HML Tricks for Advanced Pardot (Account Engagement) Personalization
- December 14, 2022
- HML, Pardot Personalization, Salesforce Ben | The Drip

Pardot introduced HML in late 2019 as the way to add personalization to Pardot (Account Engagement) assets. In short, HML is an update from the old %%Mergetag%% language in Pardot with a new format of double curly brackets or “handlebars” {{ }}.
Let the video, and the article that follows, serve to demystify what HML is and inspire you to take it further!
What is HML?
HML is a newer way to add personalization to Pardot marketing assets – at the most basic level, it involves replacing %% %% with {{ }}. Field names take on a much more “Salesforce-based flavor” (if you’re accustomed to Salesforce formula fields).
%%First_Name%% becomes {{Recipient.FirstName}}, %%prospect_account.name%% becomes {{Recipient.Account.Name}}, and so forth. There is nearly a 1:1 relationship between the old fields and the new ones, with a few notable exceptions:
- Account Description is dropped.
- Address One and Address Two fields are now a single field.
- The Pardot HTML Signature has been dropped. This is likely due to the retirement of the Pardot login system and gradual transitioning of Pardot user management to Salesforce.
- New fields for {{Current_Day}}, {{Current_Month}}, and {{Current_Year}}.
- A new {{Resubscribe}} Option.
The most exciting feature of HML is the ability to use conditional logic to display content – the focus of most of the tricks I will be showing you. First, let’s look at enabling HML…
Enable Pardot HML
Don’t Be Scared, Just Push the Button
If you haven’t updated your Pardot account to Handlebar Merge Language (HML) yet, you’re probably getting one of Pardot’s famous big-green-button-notifications inviting you to enable it. Relax, you can push the button – I promise nothing bad will happen!

The conversion takes only a few minutes and everything in your account will still work, but now you have access to a lot of cool new features.
Pardot Email Templates when you Enable HML
One effect you will notice first when you upgrade is that when you open an existing email template, Pardot will automatically upgrade that template’s merge tags to HML. After it’s saved, you will notice a green checkbox in the template’s list view that shows it’s been HML upgraded.
The key thing here is that you do not have to upgrade your existing templates if you don’t want to or need to (they will continue to work as before). But the moment you edit one, Pardot will do the update. So over time, many of your templates will migrate to the updated format.
Now let’s get look at the HML tricks.
Trick #1: Allow Prospect Resubscribe
…on Form Handlers and Operational Emails
HML enables prospect resubscribe feature. The resubscribe message automatically pops up on a Pardot form for cookied prospects that are opted out, inviting them to resubscribe.
First things first, to use this trick, you must fully enable the feature in your account setup, including creating a resubscribe email template. Pardot helpfully includes a boilerplate resubscribe email at the end of the set of prebuilt email templates.
This trick uses the {{Resubscribe}} merge tag that’s part of this capability.
As you may know, if an unsubscribed person submits a form or form handler in Pardot, an autoresponder will still send even if they are unsubscribed. This is to avoid a bad user experience – when your prospect requests something you want to make sure they get it regardless of opt-in status.
So the key here is to incorporate that {{Resubscribe}} merge tag, but only if the person is actually opted out.
To do this, we have to build two automations to flag people who have opted out with a custom field that we use as the basis for showing our resubscribe message.
- Create a custom field to hold this information, call it something like “Is Opted Out”
- The automation will look for Prospect Email Status > Is > Opted Out
- Then Change “Is Opted Out” to Yes
This will only run once.

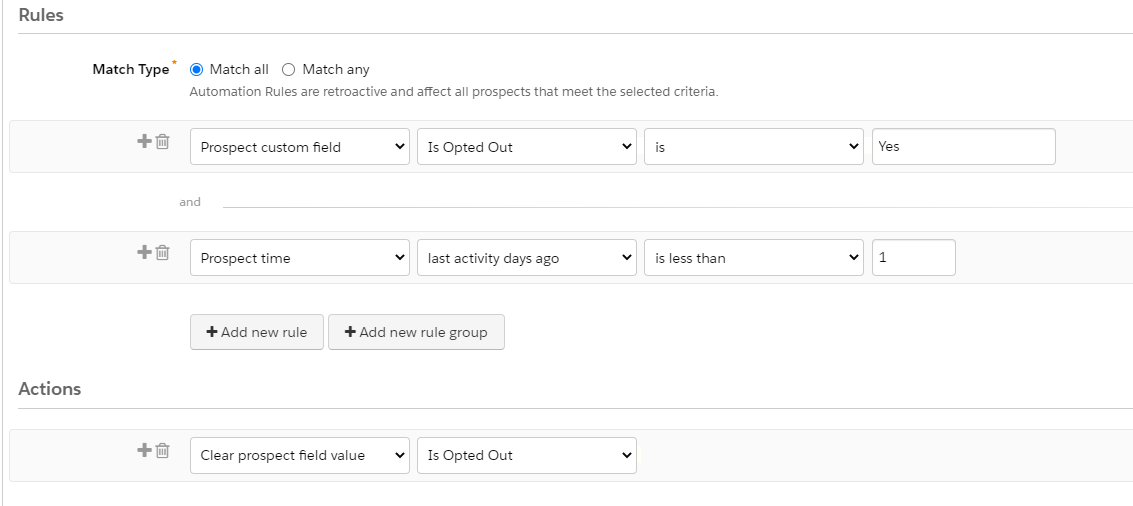
The second automation clears this field after they opt back in. This one needs to be set to repeat, but it doesn’t really need to run against everyone every day, so it needs a time parameter.
- The automation will look for Prospect Email Status > Isn’t > Opted Out
- And Prospect Time > Last activity days ago > is less than 1
- Then Clear the field “Is Opted Out”

Now, to our resubscribe tag. This code shows the message on your autoresponder email only if the person’s Is Opted Out custom field contains yes, otherwise it shows nothing:
{{#if Recipient.Is_Opted_Out}} You have opted out of our emails! Click here to resubscribe! {{Resubscribe}}{{else}}{{/if}}
Note: Clearing the field is very important to understand in the context of HML’s conditionality. Conditional content is based on the presence of data vs blank. The “Is Opted Out” field containing a value is the “switch” to show the message. If it’s blank, nothing shows.

You can of course use the Pardot link tool in the email builder to include the {{Resubscribe}} as a link on the text instead of showing the whole URL. Just choose {{Resubscribe}} from the link type dropdown.
So the basic pattern of the If/Else HML content is:
{{The_Field_We_Are_Checking}}
The primary message we are showing if the field we are checking has something in it. We can also display {{The_Field_We_Are_Checking}} as well as {{Other Fields}} as we wish.
{{else}}
The alternative message and {{other fields}} we are checking if the field we are checking is blank.
{{/if}}

Trick #2: Show a Variable List of URLs
You want to show your email recipient a particular URL, so this trick assumes you have created a custom field to store that URL. Suppose you have several different products and you want to show links to the user manual for each, but only if the person has purchased that product. If you don’t own the product, the field is blank.
Once again, if you own the product, we’re going to populate the field with a URL for the manual so we can show the link. Here’s the code:
{{#if Recipient.Product1}} {{{Recipient.Product1}}} {{else}} {{/if}}
<br>{{#if Recipient.Product2}} {{{Recipient.Product2}}} {{else}} {{/if}}
<br>{{#if Recipient.Product3}} {{Recipient.Product3}}} {{else}} {{/if}}
<br>{{#if Recipient.Product4}} {{Recipient.Product4}}} {{else}} {{/if}}
So if I owned product 1 and 3, I would see 2 URLs here, because the content in the field is a URL.
Note: Using triple brackets will render the URL exactly as it exists in the field (absolute). Depending on your URL format you may have to experiment with the double or triple bracket options.
Variations for you to try out:
- You can just display the link as the HML pattern shown above would do, or use the email builder to create a link over text saying “Product 1 Manual”. How you do this depends on how you want to store the link.
- If you don’t want to track clicks on these elements, then store the entire link in your custom field including https:// and use the <other> link protocol. The url is your {{Recipient.Product.1}} merge tag.
- If you do want to track clicks, then only store the part after https:// and use the https:// protocol and the {{Recipient.Product.1}} as the URL and Pardot will build a trackable link in the email.
Be careful about how you store your original value in your custom field, the two patterns shown above work only one way depending on how you stored the link.
Trick #3: Display Salesperson Information
…to assigned prospects, otherwise display ‘request a demo’
Does the prospect have an assigned user yet? If yes, it shows the assigned user’s contact information. If they are not assigned, it shows a link offering a demo to the prospect that’s (presumably) waiting to be qualified.
{{#if Recipient.Owner.Name}}
<br>Your Sales Rep is:<br>{{Recipient.Owner.Name}}
<br>{{Recipient.Owner.Phone}}
<br>{{Recipient.Owner.Email}}
<br>{{else}}
<br>Want to Schedule a demo?
Click here.{{/if}}
If there is no ‘owner name’ (not assigned), then that field is blank, so the alternate content is shown. Note also that the contact information in the HML merge fields is now coming from the Salesforce user profile, so make sure your sales team have those fields populated.
Trick #4: Use a Form Handler as a Custom Link with HML
The first thing to understand that a form handler is (at its core) just a really fancy link. So we can use a form handler in a Pardot email just like any other link, except that a form handler means we get a form submission and the possibility to add completion actions.
Why would you want to do this? You might want to send information in a comment and collect some data that you don’t want to store in Pardot as a field.
For this example, I will call this the “event with a vegan lunch” technique. I have an upcoming event and I want to know who is coming, and who needs a special meal; however, I don’t really want to create a custom field for someone’s lunch preference, but instead, I want to collect the information in an email.
So I construct 3 links in my event confirmation email that feeds a form hander something to my Pardot comments that indicates if my attendee is simply coming, or is coming (link 1) and wants a vegan (link 2) or a gluten-free lunch (link 3):
https://go.pardot.com/l/4772/5okjnkm?email={{Recipient.Email}}&comments=RSVP
https://go.pardot.com/l/4772/5okjnkm?email={{Recipient.Email}}&comments=RSVP Vegan_Lunch
https://go.pardot.com/l/4772//5okjnkm?email={{Recipient.Email}}&comments=RSVP_GF_Lunch
The result is you have a list of all attendees, and two lists for special dietary requirements. Plus a backup in the comments so your sales team can see their customers’ RSVPs and know if they’ve requested the dietary requirements.
You could also accomplish the same thing (with different completion actions) using custom redirects and get the same result – that’s if you didn’t want to give the option for prospects to put anything in the comments. The point here is that if you use form handers you can get the added impact of what amounts to a secondary form submit. A really powerful reason for this is you might want to concatenate multiple field’s information in a single field, or into the comments.
https://go.pardot.com/l/4772/5okjnkm?email={{Recipient.Email}}&combined_field
{{Custom_Field_1}}%20{{Custom_field_2}}
Finally, you can use this concept with HML’s if/else functionality to alternatively display different form handler based links depending on a condition of the controlling field. For example, if someone had a customer ID, you perhaps show one version of the form handler, and if not, a second one.
Summary
Handlebar Merge Language is more than simply a replacement for the old merge tag formatting, the addition of the conditional statements means it adds a basic form of dynamic content to all Pardot account plans, and it opens up a whole new range of options for how you can customize your content to more effectively market to your prospects and serve your customers.
Let us know which ones you’ve tried out in the comments below!
This Pardot article written by:
Salesforce Ben | The Drip
Lucy Mazalon is the Head Editor & Operations Director at Salesforceben.com, Founder of THE DRIP and Salesforce Marketing Champion 2020.
Original Pardot Article: https://www.salesforceben.com/the-drip/4-hml-tricks-for-advanced-pardot-personalization/
Find more great Pardot articles at www.salesforceben.com/the-drip/
Pardot Experts Blog
We have categorized all the different Pardot articles by topics.
Pardot Topic Categories
- Account Based Marketing (ABM) (7)
- Business Units (14)
- ChatGPT / AI (3)
- Completion Actions (5)
- Connectors (10)
- Custom Redirects (4)
- Data Cloud (3)
- Demand Generation (8)
- Dynamic Content (7)
- Einstein Features (11)
- Email Delivery (17)
- Email Open Rates (3)
- Pardot A/B Testing (2)
- Email Mailability (16)
- Do Not Email (1)
- Double Opt-in (2)
- Opt Out / Unsubscribe (14)
- Email Preferences Page (6)
- Engagement Studio (16)
- Industries (1)
- Non Profit (1)
- Landing Pages (9)
- Lead Generation (1)
- Lead Management (13)
- Lead Routing (3)
- Lead Scoring (16)
- Leads (3)
- Marketing Analytics – B2BMA (9)
- Marketing Automation (1)
- Marketing Cloud (3)
- Marketing Cloud Account Engagement (4)
- Marketing Cloud Growth (2)
- New Pardot Features (6)
- Opportunities (2)
- Optimization (2)
- Pardot Admin (65)
- Duplicates (1)
- Marketing Ops (1)
- Pardot Alerts (1)
- Pardot API (2)
- Pardot Automations (3)
- Pardot Careers (12)
- Pardot Certifications (4)
- Pardot Consulting (1)
- Pardot Cookies (4)
- Pardot Custom Objects (3)
- Pardot Email Builder (8)
- Pardot Email Templates (10)
- HML (6)
- Pardot Events (17)
- Pardot External Actions (1)
- Pardot External Activities (4)
- Pardot Forms (29)
- Form Handlers (8)
- Pardot Integrations (21)
- Data Cloud (2)
- Slack (1)
- Pardot Lead Grading (5)
- Pardot Lead Source (2)
- Pardot Lightning (1)
- Pardot Migration (1)
- Pardot Nurture / Drip Campaigns (2)
- Pardot Personalization (3)
- Pardot Profiles (1)
- Pardot Releases (18)
- Pardot Sandboxes (2)
- Pardot Segmentation (5)
- Pardot Strategy (7)
- Pardot Sync (2)
- Pardot Sync Errors (1)
- Pardot Tracker Domains (5)
- Pardot Training (3)
- Pardot Vs Other MAPs (4)
- Pardot Website Tracking (2)
- Reporting (22)
- Salesforce and Pardot (31)
- Marketing Data Sharing (2)
- Pardot Users (3)
- Salesforce Automation (5)
- Salesforce Flows (2)
- Salesforce Campaigns (22)
- Salesforce CRM (3)
- Record Types (1)
- Salesforce Engage (3)
- Salesforce Queues (2)
- Security and Privacy (1)
- Tags (3)
- The Authors (540)
- Cheshire Impact (9)
- Greenkey Digital (55)
- Invado Solutions (37)
- Jenna Molby (9)
- Marcloud Consulting (6)
- Nebula Consulting (67)
- Pardot Geeks (44)
- Salesforce Ben | The Drip (242)
- SalesLabX (16)
- Slalom (4)
- Unfettered Marketing (51)
- Uncategorized (1)
- Website Tracking (2)
- Website Search (1)
More Pardot Articles
See all posts
This Pardot article written by:
Salesforce Ben | The Drip
Lucy Mazalon is the Head Editor & Operations Director at Salesforceben.com, Founder of THE DRIP and Salesforce Marketing Champion 2020.
Original Pardot Article: https://www.salesforceben.com/the-drip/4-hml-tricks-for-advanced-pardot-personalization/
Find more great Pardot articles at www.salesforceben.com/the-drip/


