How to Send an Email in Pardot: A Recipe
- December 8, 2022
- Pardot Email Builder, Salesforce Ben | The Drip

Email is core to marketing automation – the ‘bread and butter’. Sending an email from Pardot (Account Engagement) often comes first with new accounts.
How do you send an email in Pardot? The process differs from one marketing automation platform to the next, and with Pardot, you will want to ensure that you have all of the correct “ingredients” ready. So, here’s the recipe – a step by step guide to “cook up” your first email campaign.
Note: There are two email builders in Pardot; the now legacy “Classic” email builder, and the Lightning email builder which offers more features with drag-and-drop functionality. This guide will refer to both.
Before You Begin: Prepare Your Kitchen
Prepare a few items in advance before you start cooking. Like a clean and organized kitchen, these will ensure that your email is prepared smoothly (and served safely):
- Email authentication: Achieve better email deliverability when sending emails via Pardot (Account Engagement). Adding DKIM and SPF records to your domain is essential. You don’t want anyone getting food poisoning.
- Folder structure: Know where to store your goods! Pardot folders allow you to store and organize your assets in some sort of system. To help other team members find email templates, organized folders are highly recommended. Folders also apply to images and other assets. If you are using the Classic builder, arrange your images logically into folders; for the Lightning email builder, organize folders in Salesforce CMS, for example, by theme or campaign.
- Campaign: Salesforce Campaigns are the central workspace for relating emails, forms, landing pages, and other assets involved in that campaign – including recording their performance. Treat this as your Yelp or Tripadvisor page, you want everything related there to understand how you are performing.
- Send list: Simply, the list/s of prospects you want to send the email to. You can add prospects to lists from a Salesforce campaign, by using automation rules, run a dynamic list, or importing from an external file into Pardot. You can also exclude prospects by using a list that will be added as a suppression list before you send the email.
Decide on Your Method
There are two email builders in Pardot; the now legacy “Classic” email builder, and the Lightning email builder which offers more features with drag-and-drop functionality.
There was a period, following the Lightning email builder release where the two builders were not on parity; however, most consultancies are enabling their clients with the Lightning email builder as default. Here’s an overview of the differences:
| Lightning Builder | Classic Builder | |
|---|---|---|
| User experience | Salesforce Lightning. Cleaner user experience. | Pardot Classic. Unfamiliar for those who haven’t used Pardot Classic. |
| Campaigns | Select the campaign at the end of the email build. | You must select the campaign at the start of the email build. |
| Add rows | Drag and drop “layouts”. | Need to use HTML code. |
| Components | Button, rich text, and custom components available to build or install. | Doesn’t follow a component way of working. |
| Image storage | Salesforce CMS. | Pardot files. |
| Image responsiveness | More flexibility, e.g. to adjust the image to a % width. | Less user friendly (i.e. edit the source code). |
| Dynamic content | Insert dynamic content by pasting the code into the builder (involves leaving the builder). | Insert dynamic content straight from the builder, using the lightning icon. |
| Preview options | Switch between desktop and mobile views. | Run rendering tests, using the Litmus functionality inside Pardot. These take a few minutes to generate. |
| Sender options | General user (free to type), a specific user (a user in your Pardot account), assigned user (prospect record) and account owner (Salesforce account). Account CRM user custom field, prospect CRM user custom field (we’ll explain the differences later). | General user (free to type), a specific user (a user in your Pardot account), assigned user (prospect record) and account owner (Salesforce account). |
| Template usage | Use templates for list emails. To use templates for autoresponders and in Engagement Studio, you need to click “Activate for automations”. | Use templates for list emails. autoresponders and in Engagement Studio. |
Step 1: Enter the Kitchen (Pardot Email Builder)
Email templates are the baseline ingredients you prepared beforehand – like pastry you can add a filling to. From the Pardot Lightning app, navigate to your email builder of choice:
- Lightning Builder, navigate to: Email Templates → New Email Template. Pardot Lightning comes with out-of-the-box templates that are mobile responsive. Emails built in this builder will be mobile-ready, with a responsive design for any device coded as standard.
- Classic Builder, navigate to: Pardot Email → Templates → Add Email Template. Pardot comes with out-of-the-box templates, some are mobile responsive.
Templates are like the foundation you can use to base email sends for a particular campaign. For example, you have one newsletter template, but want to use different content each month.
Now that the crusty foundation is set, we can add the particular filling for this meal (email content for this campaign).
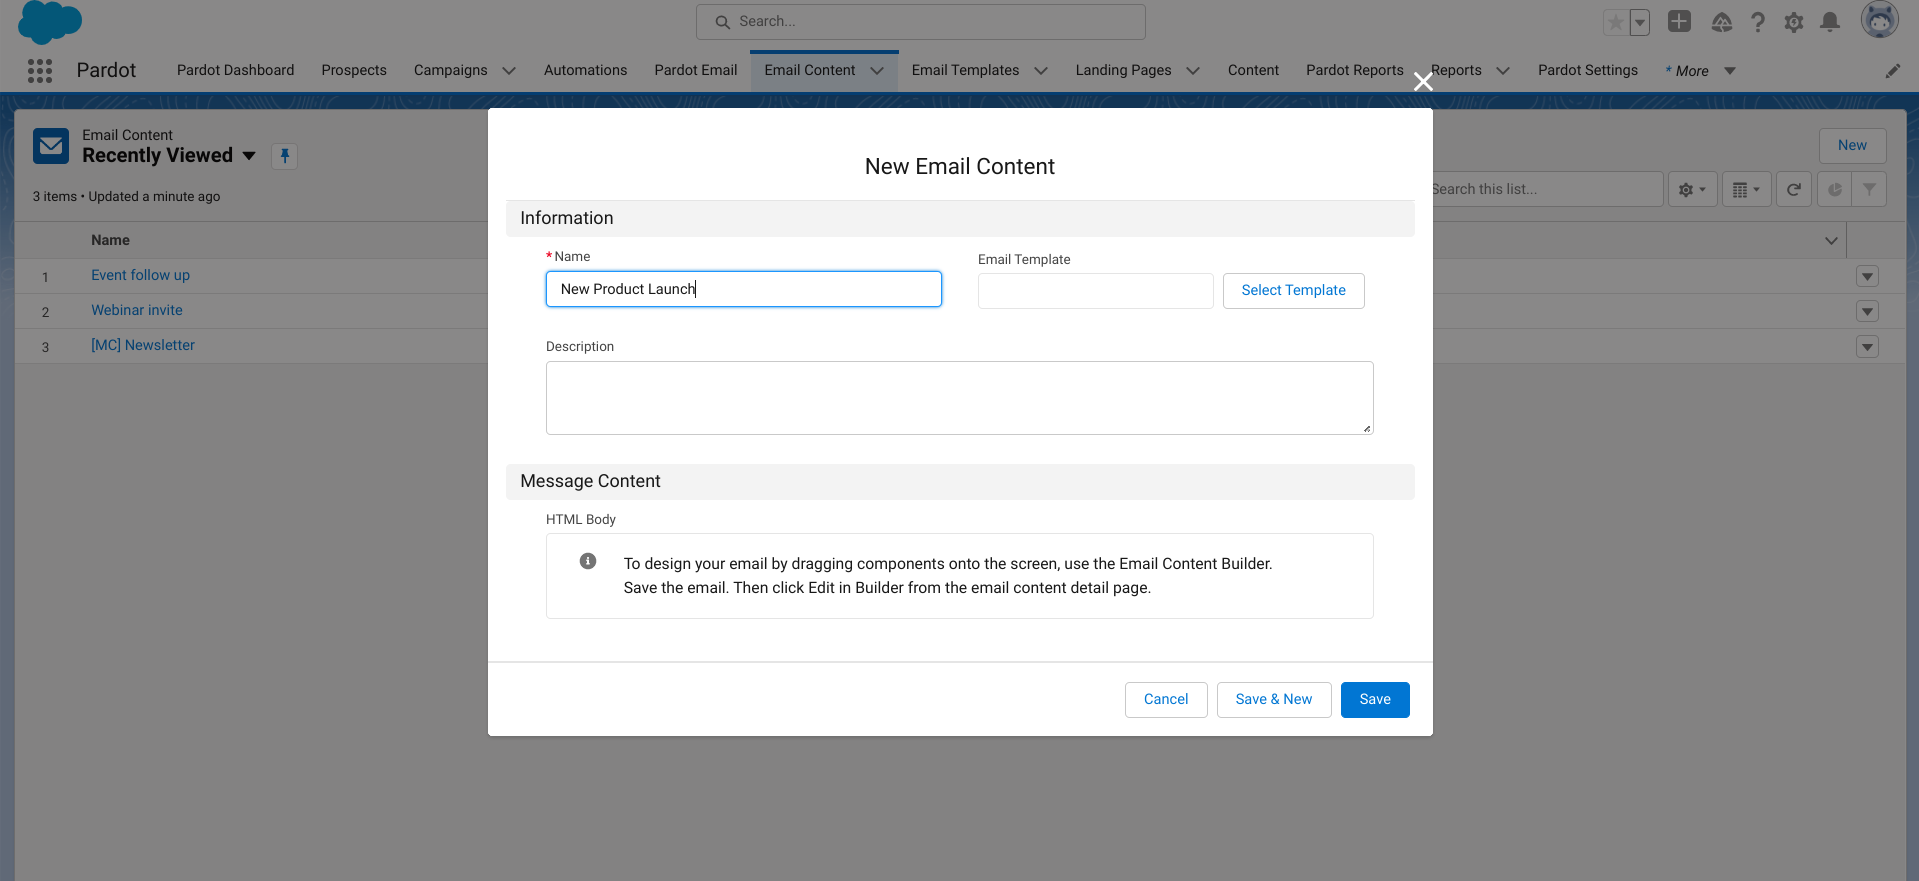
- Lightning builder, navigate to: Email Content → New.
- Classic builder, navigate to: Pardot Email → Drafts → Send New List Email.
Step 2: Add Details
In the Lightning builder add the following details:
- Email name: Follow a naming convention (seasoning like grandma/nonna taught you).
- Select a template.
- (Optional) Add a description for the other chefs to pick up where you left off.

In the Classic builder:
- Email name: Follow a naming convention (seasoning like grandma/nonna taught you).
- Select a folder and campaign: Thankfully, your kitchen was organized before you started, and the folder is readily prepared.
- Choose whether you want an HTML email, or just text.
- In the next step, select a layout template. Choose from your menu of pre-prepared pastries.

Step 3: Stir in the Ingredients
Add in the ingredients for this particular email.
In the Lightning builder:
- Components: You have components on the left-hand side. Create a button, or add images (more detail coming), rich text, and any HTML blocks.
- Layout: You can separate your email template with rows. For example, by dragging the two column (3:1) row onto the email, you’re not determining the whole email take on that ratio, only the row. Take a newsletter, which would take advantage of multiple row components. Following that, you can add rows using other aspect ratios. Compared to the Classic email builder, you don’t need to code HTML to do this.
- Image blocks: You likely want to add a banner (hero) image at the top of your email. These are stored in Salesforce CMS. When clicking Select from CMS folders are presented to you. If you prepared your “kitchen” then folders in Salesforce CMS will be organized neatly (e.g. by theme or campaign). From there, link the image, add alt text, merge fields, etc.

- Position options: Add margins (space between the image and the block boundaries) by typing numbers for top, bottom, left, right.

In the Classic builder:
- Content blocks: Click on a content block to edit text, double-click on an image to adjust, replace or upload a new one.
Step 4: Add a Pinch of Personalization
You can merge field data from prospect, account, and user records into Pardot emails.
In the Lightning builder:
- Merge fields: From the rich text component, click Merge Fields at the bottom of the box. This opens up the HML merge picker. For example, drop in first name as a merge field. These are identified by {{.

- Unsubscribe/Manage Preferences: In the merge picker Other section, find the merge field for your organization’s unsubscribe link and email preference center. Your email must have at least one in order to save your email.
- View online: The same applies for the View online link, which is typically placed in the email header to give the prospect the option to view the email within their browser instead of within their email client.

In the Classic builder:
- Merge fields/variable tags: For example, drop in first name as merge field. Have you enabled HML? (If not, why not?) Click the Merge Fields button to open the HML merge picker (identified by {{ ). Click Variable Tags if you don’t have HML enabled (identified by %% ).

- Unsubscribe/Manage Preferences: The merge picker Other section, find the merge field for your organization’s unsubscribe link and email preference center. Without HML enabled, find the links in the variable tags list (shown below). Your email must have at least one in order to save your email.
- View online: The same applies for the View online link, which is typically placed in the email header to give the prospect the option to view the email within their browser instead of within their email client.

Step 5: Hyperlinks – Make It a Tasting Menu
Select the text you’d like to hyperlink, then click the link icon. This is shown in the Classic builder below (also available in the Lightning builder).

Step 6: Whisk up the Text Version and Subject Line
Don’t forget to generate your text version. This helps to improve deliverability a) for ISPs to “read” the contents of the email more easily when filtering for spam, and b) if the recipient can’t load HTML at the time.
In the Lightning builder:
- Click save. You will be taken to the email content record. Click to edit, then Sync from HTML. It will look a bit whisked up, so neaten this up by deleting the spaces.
- Add a subject line. If you want to make irresistible emails, use merge fields to add in personalization.
In the Classic builder:
Under the Text tab, click Sync from HTML. It will look a bit whisked up, so neaten this up by deleting the spaces.
On the Sending tab, add a subject line. If you want to make irresistible emails, use the Advanced Subject Line Composer to add in personalization.


Step 8: Taste Your Dish
No good chef would serve food without tasting the dish. If the favors aren’t balanced, the recipient will be turned off from their food. There are different ways to test Pardot emails.
In the Lightning builder:
Switch between desktop and mobile views. Don’t get caught out by editing the mobile preview, or the desktop version will be changed. The purpose of the mobile view is to show you what it looks like on mobile.

Having said that, if it looks rubbish on mobile, you can use that view as a baseline to get it looking better, then toggle between the two views to reach a reasonable compromise.
Note: These ‘quick’ preview options haven’t removed the need for custom tags, i.e. desktop vs mobile sizing for responsiveness, entirely. Templates need HTML code specific to the size of the screen that the email is being viewed on.
- On the email content record, click the drop down menu (top right), and click Test. You can send test emails to your inbox from the send screen. Alternatively, create a Test list (a new Pardot list with the Test checkbox selected) and add your colleagues as prospect records, then into the test list.

- You will be able to send and resend the email content faster, and in a less messy way (no need to clone the list email in order to resend). This is a great way to test sends to different lists and/or prospect segments.
In the Classic builder:
- On the Testing tab, you can send test emails to your inbox. Alternatively, create a Test list (a new Pardot list with the Test checkbox selected) and add your colleagues as prospect records, then into the test list.
- Create a rendering test* which will show how the email will look in different email clients and devices (* available for Plus edition and above).
Step 9: Invite the Guests (Pardot List)
You prepared a send list earlier. You can also exclude prospects by adding a list as a suppression list. Note: If someone is on both lists, they won’t be dining with you.
In the Lightning builder:
- On the email content record, click the drop down menu (top right), and click Send.
- Add the campaign and select the domain you would like the links within the email to use.

- Add the Recipient lists, and optionally, any suppression lists to exclude prospects.

- Send and reply options: Choose from a general user (free to type), a specific user (a user in your Pardot account), assigned user and account owner. Account CRM user custom field, prospect CRM user custom field.

- Completion actions: Actions that fire each time a prospect makes an activity on an email – namely opens, clicks (any links or on a specific link), unsubscribes. Due to the changes in how cookies function with Pardot, for completion actions to fire, a prospect must already have been identified (cookied with your Pardot tracking code) on the particular browser they are using. Using email opens for completion actions is no longer considered best practice – opening an email doesn’t signal engagement with the contents of the email, and mail privacy protection (MPP) has made this metric inaccurate.

In the Classic builder:
- On the Sending tab, add your send list that you prepared earlier (Send to), and optionally, any suppression lists (Don’t send to).
- Send and reply options: Choose from a general user (free to type), a specific user (a user in your Pardot account), assigned user and account owner.
- Completion actions: Actions that fire each time a prospect makes an activity on an email – namely opens, clicks (any links or on a specific link), unsubscribes. Due to the changes in how cookies function with Pardot, for completion actions to fire, a prospect must already have been identified (cookied with your Pardot tracking code) on the particular browser they are using. Using email opens for completion actions is no longer considered best practice – opening an email doesn’t signal engagement with the contents of the email, and mail privacy protection (MPP) has made this metric inaccurate.

Account CRM user and prospect CRM user custom fields
In the Lightning email builder, you have two additional options that aren’t available in the Classic builder:
- Account CRM user custom field.
- Prospect CRM user custom field.
These give you more flexibility. Salesforce and Pardot records can only have one owner, namely the prospect (Lead or Contact), and Account. Use these options if you want the email to be ‘from’ a user that isn’t the prospect (Lead or Contact) or Account owner, nor do you want it to appear ‘from’ the same user for every recipient (ruling out the general user and specific user options). For example, customer success manager – prospects will likely have different customer success managers. A lookup field (custom) on the Account record to the dedicated customer success manager will enable Pardot to grab that information.
Step 10: Time to Plate Up (Send and Schedule)
On the right hand side, a final preview will appear with the send options below: Send now, Send later, and Einstein optimized* (*available with Pardot Advanced and Premium editions).
Pardot then takes care of extra for formatting and batching email sends in the background.
Summary
Bon appetit, grub’s up – however you announce that the meal is ready.
Like a clean and organized kitchen, the steps in this guide will ensure that your email is prepared smoothly (and served safely).
There are two email builders in Pardot; the now legacy “Classic” email builder, and the Lightning email builder which offers more features with drag-and-drop functionality. There was a period, following the Lightning email builder release where the two builders were not on parity; however, most consultancies are enabling their clients on with the Lightning email builder as default.
This Pardot article written by:
Salesforce Ben | The Drip
Lucy Mazalon is the Head Editor & Operations Director at Salesforceben.com, Founder of THE DRIP and Salesforce Marketing Champion 2020.
Original Pardot Article: https://www.salesforceben.com/the-drip/how-to-send-an-email-in-pardot-account-engagement/
Find more great Pardot articles at www.salesforceben.com/the-drip/
Pardot Experts Blog
We have categorized all the different Pardot articles by topics.
Pardot Topic Categories
- Account Based Marketing (ABM) (7)
- Business Units (14)
- ChatGPT / AI (3)
- Completion Actions (5)
- Connectors (10)
- Custom Redirects (4)
- Data Cloud (2)
- Demand Generation (8)
- Dynamic Content (6)
- Einstein Features (12)
- Email Delivery (17)
- Email Open Rates (3)
- Pardot A/B Testing (2)
- Email Mailability (16)
- Do Not Email (1)
- Double Opt-in (2)
- Opt Out / Unsubscribe (14)
- Email Preferences Page (6)
- Engagement Studio (16)
- Industries (1)
- Non Profit (1)
- Landing Pages (9)
- Lead Generation (1)
- Lead Management (13)
- Lead Routing (3)
- Lead Scoring (16)
- Leads (3)
- Marketing Analytics – B2BMA (9)
- Marketing Automation (1)
- Marketing Cloud (3)
- Marketing Cloud Account Engagement (4)
- Marketing Cloud Growth (2)
- New Pardot Features (6)
- Opportunities (2)
- Optimization (2)
- Pardot Admin (64)
- Duplicates (1)
- Marketing Ops (1)
- Pardot Alerts (1)
- Pardot API (2)
- Pardot Automations (3)
- Pardot Careers (12)
- Pardot Certifications (4)
- Pardot Consulting (1)
- Pardot Cookies (3)
- Pardot Custom Objects (3)
- Pardot Email Builder (8)
- Pardot Email Templates (9)
- HML (6)
- Pardot Events (16)
- Pardot External Actions (1)
- Pardot External Activities (4)
- Pardot Forms (29)
- Form Handlers (8)
- Pardot Integrations (20)
- Data Cloud (1)
- Slack (1)
- Pardot Lead Grading (5)
- Pardot Lead Source (2)
- Pardot Lightning (1)
- Pardot Migration (1)
- Pardot Nurture / Drip Campaigns (1)
- Pardot Personalization (3)
- Pardot Profiles (1)
- Pardot Releases (18)
- Pardot Sandboxes (2)
- Pardot Segmentation (5)
- Pardot Strategy (7)
- Pardot Sync (2)
- Pardot Sync Errors (1)
- Pardot Tracker Domains (5)
- Pardot Training (3)
- Pardot Vs Other MAPs (4)
- Pardot Website Tracking (2)
- Reporting (22)
- Salesforce and Pardot (31)
- Marketing Data Sharing (2)
- Pardot Users (3)
- Salesforce Automation (5)
- Salesforce Flows (2)
- Salesforce Campaigns (20)
- Salesforce CRM (3)
- Record Types (1)
- Salesforce Engage (3)
- Salesforce Queues (2)
- Security and Privacy (1)
- Tags (3)
- The Authors (504)
- Cheshire Impact (9)
- Greenkey Digital (51)
- Invado Solutions (37)
- Jenna Molby (9)
- Marcloud Consulting (6)
- Nebula Consulting (60)
- Pardot Geeks (44)
- Salesforce Ben | The Drip (235)
- SalesLabX (3)
- Slalom (4)
- Unfettered Marketing (46)
- Uncategorized (1)
- Website Tracking (2)
- Website Search (1)
More Pardot Articles
See all posts
This Pardot article written by:
Salesforce Ben | The Drip
Lucy Mazalon is the Head Editor & Operations Director at Salesforceben.com, Founder of THE DRIP and Salesforce Marketing Champion 2020.
Original Pardot Article: https://www.salesforceben.com/the-drip/how-to-send-an-email-in-pardot-account-engagement/
Find more great Pardot articles at www.salesforceben.com/the-drip/


