Create Campaign Member Statuses Automatically with Salesforce Flow
- May 5, 2022
- Salesforce Ben | The Drip, Salesforce Campaigns
Salesforce campaign member statuses are hugely important but are often overlooked, or not used properly. The breakdown of which prospects are interacting, and when, will give you insight into how your campaigns are performing.
Pardot (oops, I mean Marketing Cloud Account Engagement) can update Salesforce campaign member status based on a prospect’s engagement with each asset/campaign by using completion actions.
The hurdle commonly faced here, is that the campaign member statuses must exist on the Salesforce campaign, to appear in Pardot. Only those status values will be available to select in automations (e.g. completion actions).
Read more: 7 Tips for Working with Salesforce Campaign Member Status
If you’re familiar with campaign member statuses, you will know that campaigns are created with two default statuses “Sent”, “Responded” (and Connected). However, these offer little insight. If someone is listed as responded, how did they respond?
Not all campaigns are the same; you’ll probably want a different set of statuses for a webinar compared to an email campaign. For many marketers, editing campaign member statuses is a manual process, which of course, comes with the risk of human error.
Statuses can be forgotten about or even neglected. Luckily, we can automate how campaign member statuses are created based on the campaign type and by leveraging Salesforce Flow.
Prep Work: Plan Campaign Member Statuses
First off, plan what statuses you want for each campaign type.
This step doesn’t need to be complex. Take a spreadsheet or word doc, find the list of the available Campaign Types (picklist field values) and which campaign member statuses you want for each type.
Further tips for planning campaign member statuses can be found here.
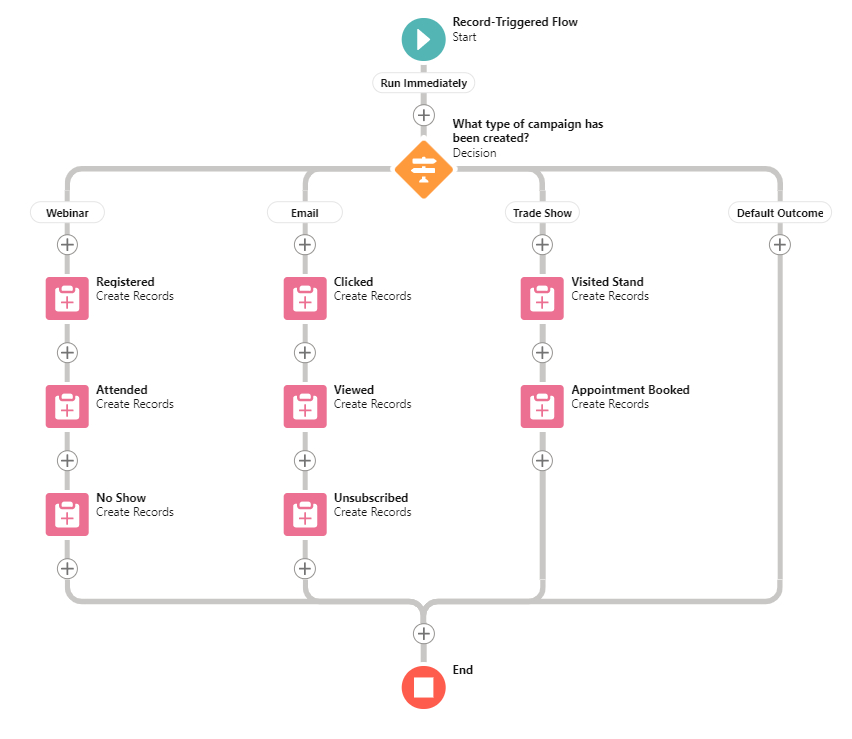
In this example, I’ve decided to use the following statuses, in addition to the default statuses:
- Webinar – Registered, Attended, No Show
- Email – Clicked, Viewed, Unsubscribed
- Trade Show – Visited Stand, Appointment Booked
The Salesforce Flow Overview
The Salesforce Flow (pictured below) is relatively simple. The Flow is triggered by a new campaign being created. We then decide what type of campaign we are dealing with and from there, add the campaign member statuses relevant to that campaign.
For this example, I’ll focus on the webinar path (the setup process is the same for the other paths).

Read more: Introduction to Salesforce Flow
Step 1: Configure the Trigger
We are only concerned with taking this action when a campaign record is created. Follow the screenshot below, and make sure you optimize the Flow for “Actions and Related Records”.

Step 2: Edit the Decision
We now need to decide what type of campaign we have created using a Decision.
- Set the Label to Webinar (the API name will auto populate).
- Ensure all condition are met (AND).
- In the resource field, scroll down to find $Record (Campaign), then select Type → Equals → Webinar.
- Click the + button next to Outcome Order on the left, and repeat these steps for the remaining campaign types.
- Click Done when you’re finished.

Step 3: Edit the Path
You’ll now see the flow has opened up a number of paths for us to work with.
- In the webinar path, click the + button and select Create Records.

- Label the Create Record component.
- Under “How many records to create”, select One.
- Select the option to Use separate recourse and literal values.
- Next, select Campaign Member Status as the object.
- In the first field, select CampaignID from the campaign. Ensure the value selected is the campaign record and the ID, so we are updating the Campaign record that started this whole process.
- HasResponded, select either True or False. In this example, for the status “Registered”, I’ll categorize this as a responded value. Select $GlobalConstant.True
- IsDefault, I’ve selected $GlobalConstant.False. This is the same for them all as none of these I want as my default status
- Label, which is what you’ll see in your campaign member status list.

Step 4: Repeat for the other Campaign Statuses, by Type
Repeat these steps for the remaining statuses, for the other campaign types you have created paths for (you added these in the Decision, in step 2).
Tip: on the canvas, click the element you have just created and click Copy Element. When you click the + button after this element, you can just paste the copied element and just update the label (and other fields).
Summary
Now that’s complete, every time a campaign is created, you’ll have more meaningful member statuses straight away that you can use in Pardot (sorry, Account Engagement!) for Completion Actions and Automation Rules.
If you need help in your campaign management, then we would love to hear from you.
This Pardot article written by:
Salesforce Ben | The Drip
Lucy Mazalon is the Head Editor & Operations Director at Salesforceben.com, Founder of THE DRIP and Salesforce Marketing Champion 2020.
Original Pardot Article: https://www.salesforceben.com/the-drip/create-campaign-member-statuses-automatically-with-salesforce-flow/
Find more great Pardot articles at www.salesforceben.com/the-drip/
Pardot Experts Blog
We have categorized all the different Pardot articles by topics.
Pardot Topic Categories
- Account Based Marketing (ABM) (7)
- Business Units (14)
- ChatGPT / AI (3)
- Completion Actions (5)
- Connectors (10)
- Custom Redirects (4)
- Data Cloud (2)
- Demand Generation (8)
- Dynamic Content (6)
- Einstein Features (12)
- Email Delivery (17)
- Email Open Rates (3)
- Pardot A/B Testing (2)
- Email Mailability (16)
- Do Not Email (1)
- Double Opt-in (2)
- Opt Out / Unsubscribe (14)
- Email Preferences Page (6)
- Engagement Studio (16)
- Industries (1)
- Non Profit (1)
- Landing Pages (9)
- Lead Generation (1)
- Lead Management (13)
- Lead Routing (3)
- Lead Scoring (16)
- Leads (3)
- Marketing Analytics – B2BMA (9)
- Marketing Automation (1)
- Marketing Cloud (3)
- Marketing Cloud Account Engagement (4)
- Marketing Cloud Growth (2)
- New Pardot Features (6)
- Opportunities (2)
- Optimization (2)
- Pardot Admin (64)
- Duplicates (1)
- Marketing Ops (1)
- Pardot Alerts (1)
- Pardot API (2)
- Pardot Automations (3)
- Pardot Careers (12)
- Pardot Certifications (4)
- Pardot Consulting (1)
- Pardot Cookies (3)
- Pardot Custom Objects (3)
- Pardot Email Builder (8)
- Pardot Email Templates (9)
- HML (6)
- Pardot Events (16)
- Pardot External Actions (1)
- Pardot External Activities (4)
- Pardot Forms (29)
- Form Handlers (8)
- Pardot Integrations (20)
- Data Cloud (1)
- Slack (1)
- Pardot Lead Grading (5)
- Pardot Lead Source (2)
- Pardot Lightning (1)
- Pardot Migration (1)
- Pardot Nurture / Drip Campaigns (1)
- Pardot Personalization (3)
- Pardot Profiles (1)
- Pardot Releases (18)
- Pardot Sandboxes (2)
- Pardot Segmentation (5)
- Pardot Strategy (7)
- Pardot Sync (2)
- Pardot Sync Errors (1)
- Pardot Tracker Domains (5)
- Pardot Training (3)
- Pardot Vs Other MAPs (4)
- Pardot Website Tracking (2)
- Reporting (22)
- Salesforce and Pardot (31)
- Marketing Data Sharing (2)
- Pardot Users (3)
- Salesforce Automation (5)
- Salesforce Flows (2)
- Salesforce Campaigns (20)
- Salesforce CRM (3)
- Record Types (1)
- Salesforce Engage (3)
- Salesforce Queues (2)
- Security and Privacy (1)
- Tags (3)
- The Authors (504)
- Cheshire Impact (9)
- Greenkey Digital (51)
- Invado Solutions (37)
- Jenna Molby (9)
- Marcloud Consulting (6)
- Nebula Consulting (60)
- Pardot Geeks (44)
- Salesforce Ben | The Drip (235)
- SalesLabX (3)
- Slalom (4)
- Unfettered Marketing (46)
- Uncategorized (1)
- Website Tracking (2)
- Website Search (1)
More Pardot Articles
See all posts
This Pardot article written by:
Salesforce Ben | The Drip
Lucy Mazalon is the Head Editor & Operations Director at Salesforceben.com, Founder of THE DRIP and Salesforce Marketing Champion 2020.
Original Pardot Article: https://www.salesforceben.com/the-drip/create-campaign-member-statuses-automatically-with-salesforce-flow/
Find more great Pardot articles at www.salesforceben.com/the-drip/

