Customizable MQL Reporting (Beyond the Pardot Lifecycle Report)
- February 8, 2023
- Lead Management, Reporting, Salesforce Ben | The Drip

Lifecycle reporting is fundamental to Marketing Ops. Knowing how many marketing qualified leads (MQL) and sales qualified leads (SQL) you have captured in a specific period of time are KPIs that improve sales and marketing alignment and demonstrate shared success.
It’s not always plain sailing. I’m sure many marketers envy teams with a seamless, conflict-free lead lifecycle. There are reasons why organizations end up in a mess – what counts as an MQL or SQL isn’t clearly defined, there’s a lack of structure in the hand-off process, the appropriate reports don’t exist, and countless other causes.
Marketers, it’s ok – your leads probably don’t suck. It’s more likely that they are just misunderstood.
We want to inform Salesforce and Pardot (Account Engagement) what our MQL and SQL checkpoints actually are.
This guide will show you how to do this – a relatively light-weight solution that will improve your marketing reporting – and finally set the record straight on how many MQLs and SQLs are being generated.
Pardot Lifecycle Report
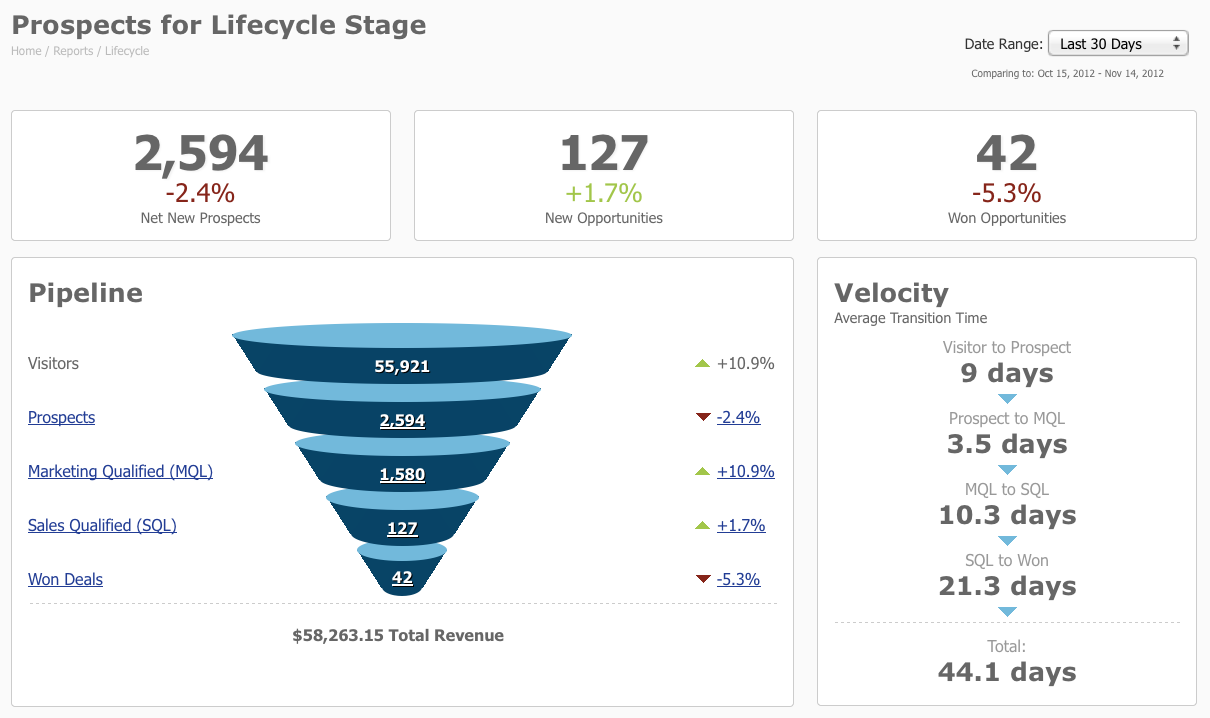
Pardot comes with a Lifecycle Report, out-of-the-box. This ‘velocity’ report is designed to show the speed prospects have progressed through your sales cycle. You can view the totals for MQL, SQL, and Won Customers. Great!
You probably rushed to check this out in your own Pardot account, only to panic when you saw something like this:
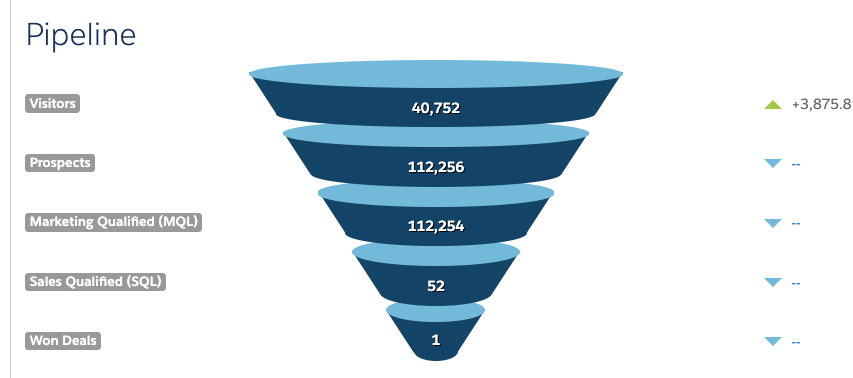
My first piece of advice: Don’t use these numbers without fully understanding how they are calculated. How do you know if they are misleading?
This is how Pardot defines MQL / SQL:
- MQL: The date when the prospect is assigned to a Salesforce user.
- SQL: The date the Salesforce Opportunity was created.
This setup works if you use those exact definitions. Instead, lead generation and qualification is a complex web of lead entry points and tracked touch points:
- Data sources: You have lead data entering Salesforce from sources other than Pardot, for example, Leads and Contacts entered manually into Salesforce.
- Sync to Salesforce: You assign all new prospects straight away, so that records sync to Salesforce for reporting benefits, or early qualification.
- Point of SQL: An Opportunity stage (not the first stage) later in the pipeline is used as the ‘sales-qualified’ point.
This is not an exhaustive list, with other reasons I haven’t mentioned – however, I hope that this has got you thinking deeper about how your own funnel operates.
Step 1: Define What Marketing Qualified Means to You
One size doesn’t fit all. The guide below will help you through the process of defining what a Marketing Qualified Lead (MQL) is to your organization:
READ MORE:
Marketers, Your Salesforce Leads Do Suck – How To Define Marketing Qualified Leads (MQLs)
Step 2: Create Checkbox Fields
Create four fields on both the Salesforce Lead object and on the Contact object (so, eight fields in total):
- MQL (type = checkbox),
- MQL Date (type = date),
- SQL (type = checkbox),
- SQL Date (type = date).
Learn how to create Salesforce custom fields.
Tips:
- Field Mapping: Don’t forget to map Lead fields to their counterparts on the Contact object. This will mean that data is carried across when the Lead is converted into a Contact. Learn how to map Lead fields.
- Field Access: Think twice about who should see and edit these fields. Avoid unnecessary clutter on your pages, and rouge users editing these fields. You will be able to use the fields in reports without them being added to the page layout.
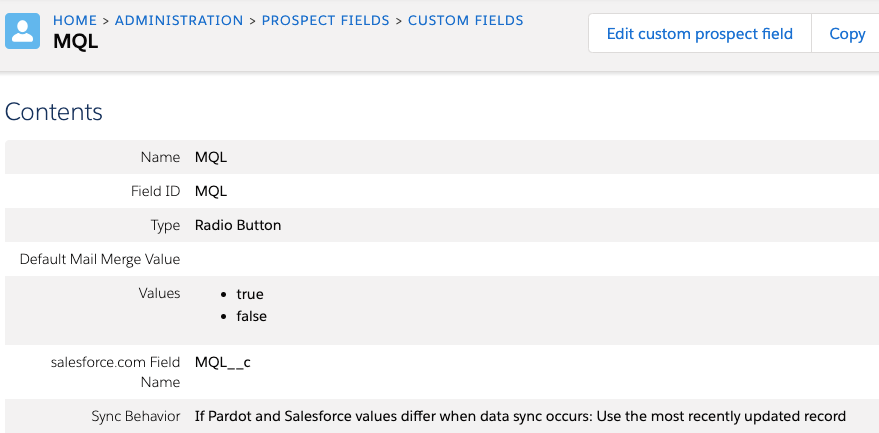
Step 3: Create Prospect Fields
Create the same fields on the prospect object that you created on Leads and Contacts in step 1. The way that Pardot and Salesforce checkbox fields work together is quirky; instead of checkboxes, the Pardot equivalent is “radio button”:
- MQL (type = radio button)
- SQL (type = radio button)
The ‘MQL Date’ and ‘SQL Date’ fields remain as date fields. Map to the fields on the Salesforce side before saving each prospect field.
Tips:
- Sync Behavior: Choose the ‘most recently updated record’. I advise this because your MQL trigger points may be set off from either the Salesforce or Pardot side.
- API Name Trap: Don’t fall into this trap.
Step 4: Create the Velocity Field
The velocity field will capture the time a prospect took to go from MQL to SQL: one qualification checkpoint to the next.
A Salesforce formula field will do the trick. On the Lead and Contact objects create a custom field:
- Name: Days from MQL to SQL
- Field type: Formula
- Formula Return Type: Number
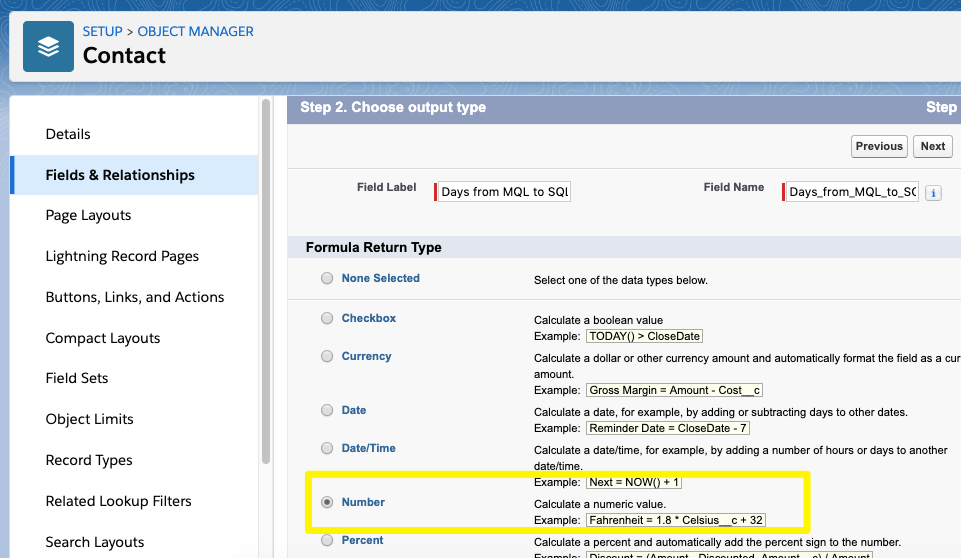
- Enter this formula in the editor box: DATEVALUE(“SQL_Date__c”) – DATEVALUE(“MQL_Date__c”)
- Decimal places: 0

Step 5: Create the MQL / SQL Trigger Points and Time Stamps
If you skipped Step 1 (yes, I’m looking at you!), now is the time to revisit your definitions of MQL and SQL in your organization before going any further.
Once everyone is onboard with the definitions, let’s look at our options for automating the checkpoint triggers:
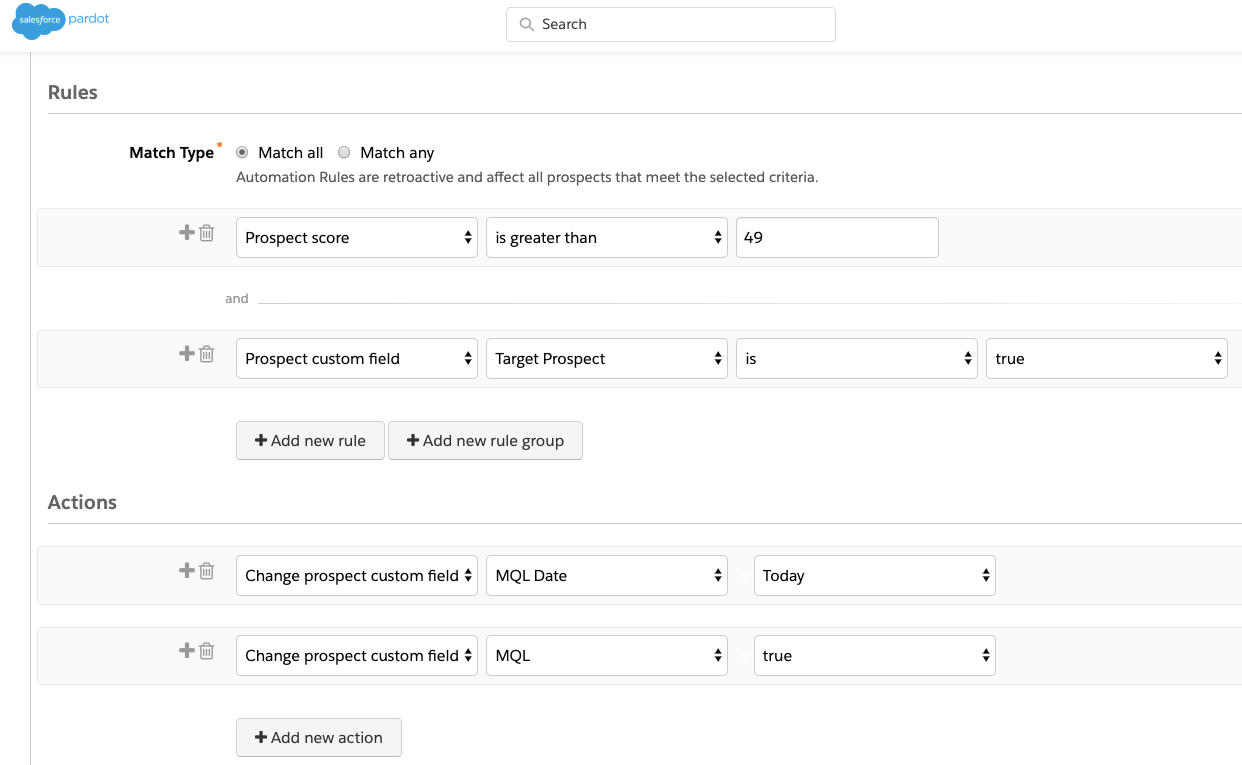
Option 1 – Pardot Automation Rules
Automation rules are the simplest option to use, see an example below. Reasons to not use this option are:
- If you’ve reached your Automation rule limit.
- Leads can cycle back through qualification multiple times.
Option 2 and 3 – Salesforce Automations
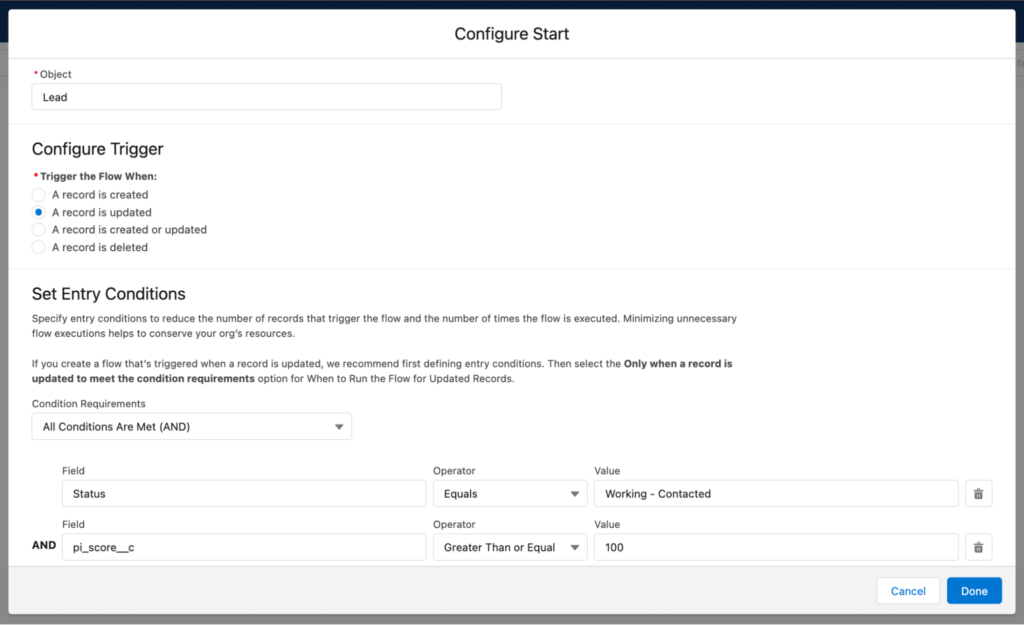
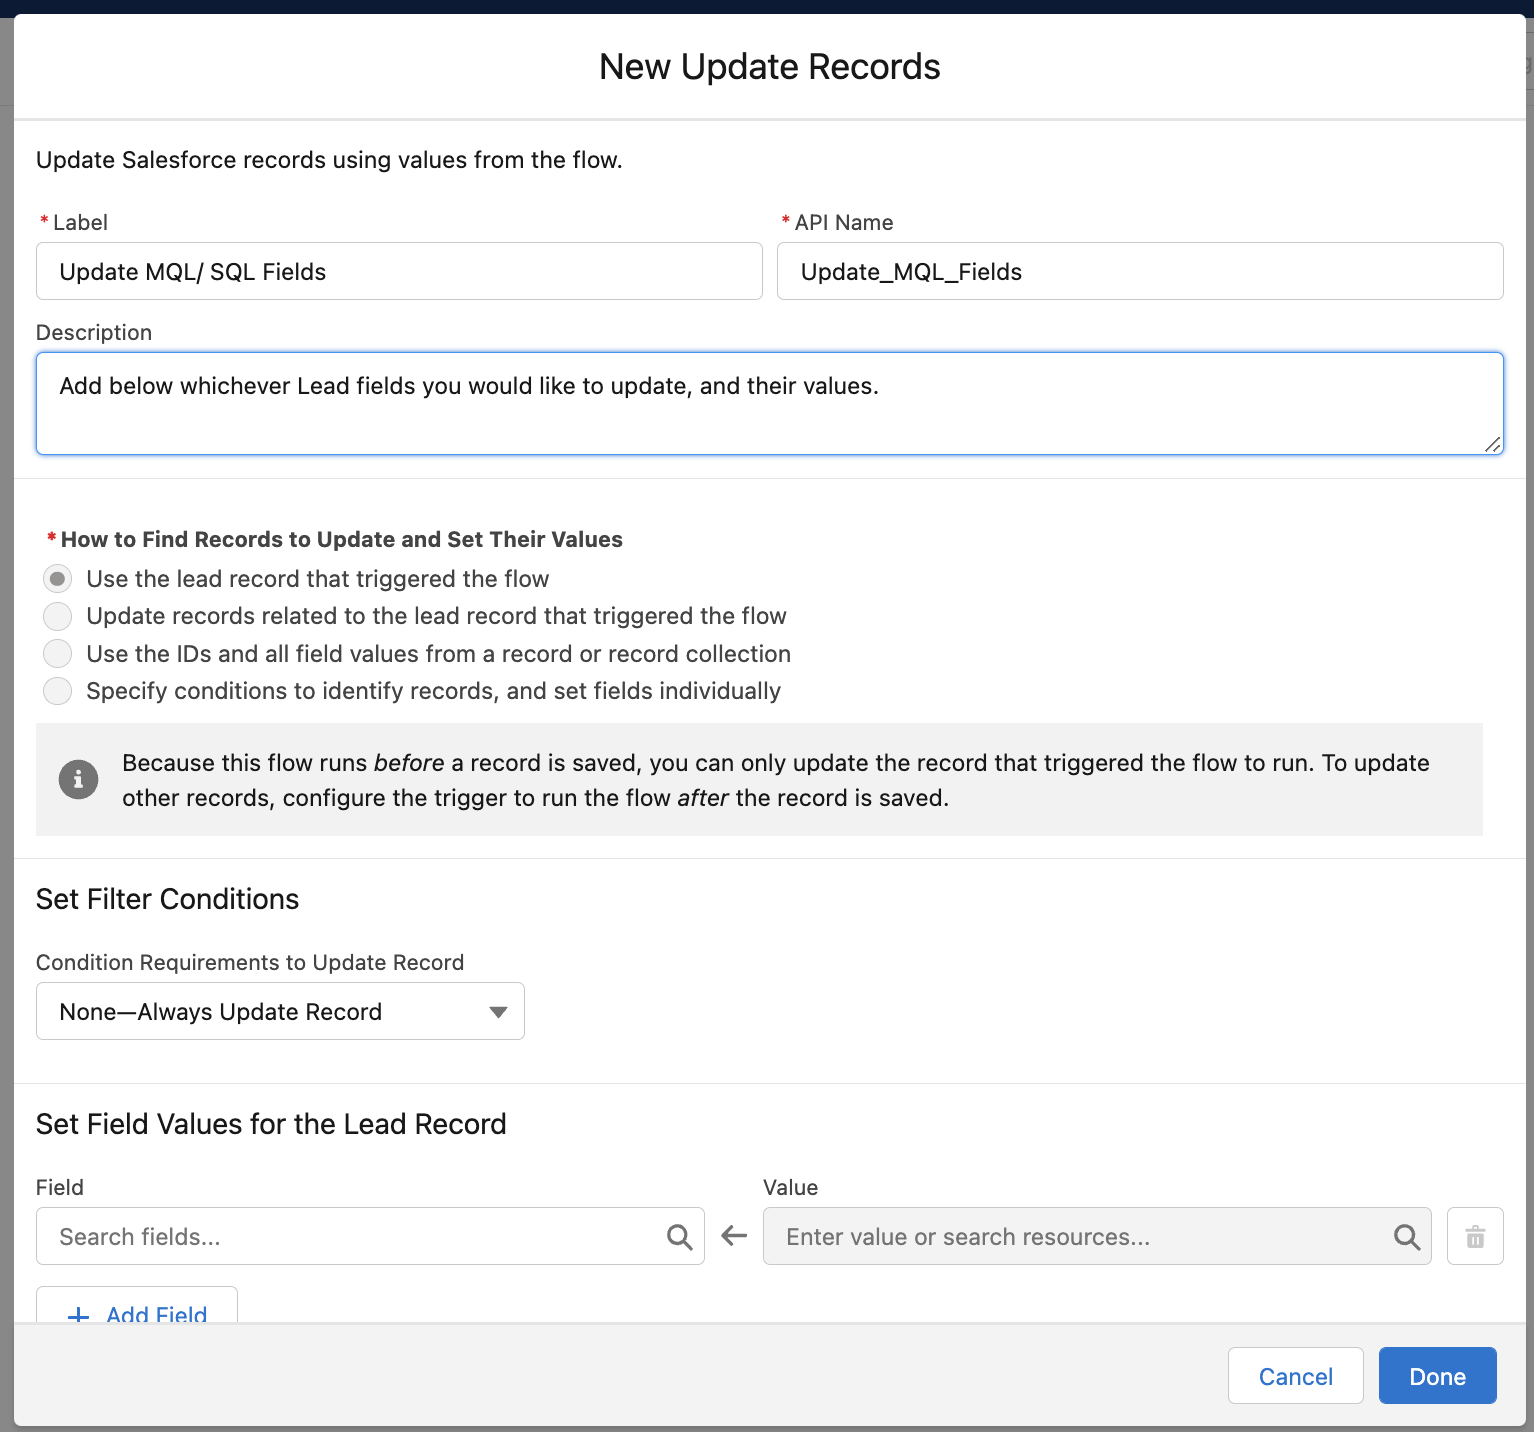
Option 2 – Salesforce Record-Triggered Flow:
Flows are great for updating MQL/SQL fields if the trigger is also on the Lead/Contact . For example, when a Lead’s score reaches at least 100 and the Lead Status is ‘Contacted’, then update the Lead fields you wish, such as the MQL Date or checkbox.
Option 3 – Triggers:
You will need a developer to code Apex triggers when you run out of point-and-click options for certain use cases. For example, to update a contact’s SQL status and date based on an opportunity status change*. You can point them to this article.
Note: the Contact needs to be related to the Opportunity as a Contact Role, so get into good habits adding them to Opportunities!
Finishing Touches
Now you have set up the fields and automation, you will have some great reporting to explore – even by using standard Salesforce reports and dashboards.
Plus, if you did decide to add the fields to the page in Step 2, then you would end up with something like this:
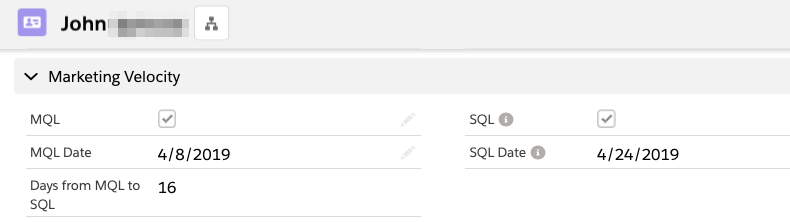
Rikke’s Velocity Calculation
This tutorial has enabled you to define MQL/SQL checkpoints in line with how your organization operates. It’s a relatively light-weight solution that’s easy to set up.
You may need to go further, for more robust reporting. Rikke’s popular solution involves a velocity custom object, and should be something you consider before building anything.
Summary
Knowing how many marketing qualified leads (MQL) and sales qualified leads (SQL) will help improve sales and marketing alignment and demonstrate shared success.
Your Leads don’t suck – they’re just misunderstood. You need to inform Salesforce and Pardot (Account Engagement) what your MQL and SQL checkpoints actually are, finally set the record straight on how many MQLs and SQLs are being generated.
This Pardot article written by:
Salesforce Ben | The Drip
Lucy Mazalon is the Head Editor & Operations Director at Salesforceben.com, Founder of THE DRIP and Salesforce Marketing Champion 2020.
Original Pardot Article: https://www.salesforceben.com/the-drip/customizable-mql-reporting-beyond-pardot-lifecycle-report/
Find more great Pardot articles at www.salesforceben.com/the-drip/
Pardot Experts Blog
We have categorized all the different Pardot articles by topics.
Pardot Topic Categories
- Account Based Marketing (ABM) (7)
- Business Units (14)
- ChatGPT / AI (3)
- Completion Actions (5)
- Connectors (10)
- Custom Redirects (4)
- Data Cloud (3)
- Demand Generation (8)
- Dynamic Content (7)
- Einstein Features (11)
- Email Delivery (17)
- Email Open Rates (3)
- Pardot A/B Testing (2)
- Email Mailability (16)
- Do Not Email (1)
- Double Opt-in (2)
- Opt Out / Unsubscribe (14)
- Email Preferences Page (6)
- Engagement Studio (16)
- Industries (1)
- Non Profit (1)
- Landing Pages (9)
- Lead Generation (1)
- Lead Management (13)
- Lead Routing (3)
- Lead Scoring (16)
- Leads (3)
- Marketing Analytics – B2BMA (9)
- Marketing Automation (1)
- Marketing Cloud (3)
- Marketing Cloud Account Engagement (4)
- Marketing Cloud Growth (2)
- New Pardot Features (6)
- Opportunities (2)
- Optimization (2)
- Pardot Admin (65)
- Duplicates (1)
- Marketing Ops (1)
- Pardot Alerts (1)
- Pardot API (2)
- Pardot Automations (3)
- Pardot Careers (12)
- Pardot Certifications (4)
- Pardot Consulting (1)
- Pardot Cookies (4)
- Pardot Custom Objects (3)
- Pardot Email Builder (8)
- Pardot Email Templates (10)
- HML (6)
- Pardot Events (17)
- Pardot External Actions (1)
- Pardot External Activities (4)
- Pardot Forms (29)
- Form Handlers (8)
- Pardot Integrations (21)
- Data Cloud (2)
- Slack (1)
- Pardot Lead Grading (5)
- Pardot Lead Source (2)
- Pardot Lightning (1)
- Pardot Migration (1)
- Pardot Nurture / Drip Campaigns (2)
- Pardot Personalization (3)
- Pardot Profiles (1)
- Pardot Releases (18)
- Pardot Sandboxes (2)
- Pardot Segmentation (5)
- Pardot Strategy (7)
- Pardot Sync (2)
- Pardot Sync Errors (1)
- Pardot Tracker Domains (5)
- Pardot Training (3)
- Pardot Vs Other MAPs (4)
- Pardot Website Tracking (2)
- Reporting (22)
- Salesforce and Pardot (31)
- Marketing Data Sharing (2)
- Pardot Users (3)
- Salesforce Automation (5)
- Salesforce Flows (2)
- Salesforce Campaigns (22)
- Salesforce CRM (3)
- Record Types (1)
- Salesforce Engage (3)
- Salesforce Queues (2)
- Security and Privacy (1)
- Tags (3)
- The Authors (547)
- Cheshire Impact (9)
- Greenkey Digital (55)
- Invado Solutions (37)
- Jenna Molby (9)
- Marcloud Consulting (6)
- Nebula Consulting (67)
- Pardot Geeks (44)
- Salesforce Ben | The Drip (249)
- SalesLabX (16)
- Slalom (4)
- Unfettered Marketing (51)
- Uncategorized (1)
- Website Tracking (2)
- Website Search (1)
More Pardot Articles
See all posts


This Pardot article written by:
Salesforce Ben | The Drip
Lucy Mazalon is the Head Editor & Operations Director at Salesforceben.com, Founder of THE DRIP and Salesforce Marketing Champion 2020.
Original Pardot Article: https://www.salesforceben.com/the-drip/customizable-mql-reporting-beyond-pardot-lifecycle-report/
Find more great Pardot articles at www.salesforceben.com/the-drip/