How to Add Toggles to Your Pardot Email Preferences Page
- June 24, 2021
- Email Preferences Page, Jenna Molby

Looking for a way to spice up your Pardot email preferences page? Try using toggles instead of checkboxes. In this tutorial, I’ll show you how to create a preferences page that uses toggles instead of checkboxes. With a bit of HTML and some CSS, you can transform your preferences page in four easy steps.
Demo
Here’s an example of what we’ll be creating in this tutorial.
See the Pen
Pardot Preferences Page With Toggles by Jenna Molby (@jennamolby)
on CodePen.
Step 1: Style your preference page
This post does not cover the basics of styling your Pardot preferences page. Click here to learn how to customize your page from scratch.
Step 2: Update the preferences page template
To make the toggles work, you will need to edit the form section of your layout template. Navigate to the layout template and click on the form tab. Replace the content with this HTML.
|
<form accept–charset=“UTF-8” method=“post” action=“%%form-action-url%%” class=“form” id=“pardot-form”>
%%form–opening–general–content%%
%%form–if–thank–you%%
%%form–javascript–focus%%
%%form–thank–you–content%%
%%form–thank–you–code%%
%%form–end–if–thank–you%%
%%form–if–display–form%%
%%form–before–form–content%%
%%form–if–error%%
<p class=“errors”>Please correct the errors below:</p>
%%form–end–if–error%%
<ol class=“switches”>
%%form–start–loop–fields%%
<li class=“form-field %%form-field-css-classes%% %%form-field-class-type%% %%form-field-class-required%% %%form-field-class-hidden%% %%form-field-class-no-label%% %%form-field-class-error%% %%form-field-dependency-css%%”>
%%form–if–field–label%%
<label class=“field-label” for=“%%form-field-id%%”>%%form–field–label%%</label>
%%form–end–if–field–label%%
%%form–field–input%%
%%form–if–field–description%%
<span class=“description”>%%form–field–description%%</span>
%%form–end–if–field–description%%
<div id=“error_for_%%form-field-id%%” style=“display:none”></div>
%%form–field–if–error%%
<p class=“error no-label”>%%form–field–error–message%%</p>
%%form–field–end–if–error%%
%%form–end–loop–fields%%
%%form–spam–trap–field%%
<!— forces IE5–8 to correctly submit UTF8 content —>
<input name=“_utf8” type=“hidden” value=“☃” />
<p class=“submit”>
<input type=“submit” accesskey=“s” value=“%%form-submit-button-text%%” %%form–submit–disabled%%/>
%%form–after–form–content%%
%%form–end–if–display–form%%
%%form–javascript–link–target–top%%
<!— Update the HTML using jQuery to create toggles —>
<script src=“https://code.jquery.com/jquery-latest.min.js”></script>
<script type=“text/javascript”>
$( document ).ready(function() {
$(‘label’).contents().each(function() {
if (this.nodeType == 3 && $.trim(this.nodeValue) != ”) {
$(this).wrap(‘<span class=”label-wrapper”></span>’);
$(‘.label-wrapper’).after(‘<span></span>’);
|
What’s changed?
- Instead of placing the form fields in a paragraph, the form fields are placed in an ordered list with a class named “switches”.
- Some jQuery is added to update the HTML markup of the preferences form.
Step 3: Upload icons into Pardot
There are two icons that will need to be uploaded in Pardot, a checkmark icon and a “x” icon. Download the images and then upload the images into the content library within Pardot.
Step 4: Add the CSS for the toggles
Add this CSS to your layout template. Update the first couple of lines to include the image paths to the icons you uploaded in step 4.
|
/* Update this line with the URL of your checkbox image */
.switches .pd-checkbox [type=”checkbox”]:checked + label span:last-child::after {
background-image: url(https://);
/* Update this line with the URL of your “X” image */
.switches .pd-checkbox span:last-child::after {
background: url(https://);
padding: 0;
margin: 0;
box-sizing: border-box;
list-style: none;
cursor: pointer;
#pardot-form p {
margin-left:0;
padding-left:0;
/* hide the checkbox */
[type=”checkbox”] {
position: absolute;
left: -9999px;
/* Position the checkbox label */
.switches .pd-checkbox label {
display: flex;
align-items: center;
justify-content: space-between;
/* Style the switch */
.switches .pd-checkbox label.inline span:last-child {
position: relative;
width: 50px;
height: 26px;
border-radius: 15px;
box-shadow: inset 0 0 5px rgba(0, 0, 0, 0.4);
background: #434257;
transition: all 0.3s;
.switches .pd-checkbox label.inline span:last-child::before,
.switches .pd-checkbox label.inline span:last-child::after {
content: “”;
position: absolute;
.switches .pd-checkbox span:last-child::before {
left: 1px;
top: 1px;
width: 24px;
height: 24px;
background: #FFF;
border-radius: 50%;
z-index: 1;
transition: transform 0.3s;
/* Style the “X” switch */
.switches .pd-checkbox span:last-child::after {
top: 50%;
right: 8px;
width: 12px;
height: 12px;
transform: translateY(-50%);
background-size: 12px 12px;
/* Style the “ON” switch */
.switches .pd-checkbox [type=”checkbox”]:checked + label span:last-child {
background: #00d084;
.switches .pd-checkbox [type=”checkbox”]:checked + label span:last-child::before {
transform: translateX(24px);
.switches .pd-checkbox [type=”checkbox”]:checked + label span:last-child::after {
width: 14px;
height: 14px;
left: 8px;
background-size: 14px 14px;
|
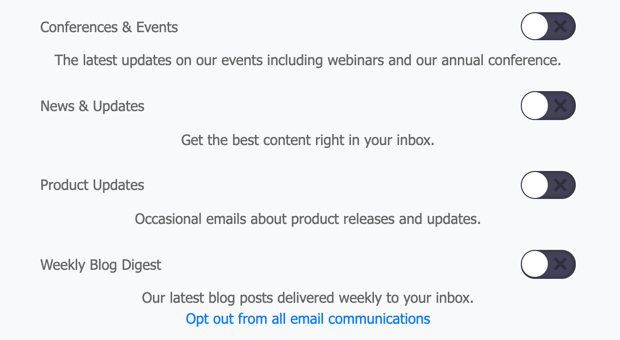
Now your page would look something like this, with the checkboxes turned into toggles.
Optional: Add any additional CSS
I added some additional CSS to my page to style the labels, list descriptions and options for my page. Here’s the CSS I added.
|
#pardot-form .no-label{
text-align:center;
margin-top:35px;
#pardot-form .no-label a {
text-decoration:underline;
#pardot-form label {
font-weight:500;
font-size:15px;
.pd-email {
margin:20px 0;
#pardot-form .description {
text-align:left;
display:block;
#pardot-form li.pd-checkbox {
background-color:#FFF;
margin-bottom:5px;
border:solid 1px #ebebeb;
padding:0px 20px 20px 20px;
border-radius:5px;
-moz-border-radius:5px;
-webkit-border-radius:5px;
#pardot-form .label-wrapper {
color:#444444;
#pardot-form {
color:#737373;
#pardot-form .form-field {
text-align:left;
#pardot-form input.text {
border:solid 1px #ebebeb;
padding:10px;
border-radius:5px;
-moz-border-radius:5px;
-webkit-border-radius:5px;
color:#737373;
#pardot-form .no-label {
text-align:center;
#pardot-form .no-label a {
color:#737373;
|
The final result
Here’s what my final page looks like.
See the Pen
Pardot Preferences Page With Toggles by Jenna Molby (@jennamolby)
on CodePen.
This Pardot article written by:
Jenna Molby
Jenna is a Salesforce Certified Pardot Specialist, Salesforce Certified Pardot Consultant and Salesforce Marketing Champion 2020. Jenna is a marketing operations leader with over ten years of B2B and B2C experience working on both the agency and client-side.
Original Pardot Article: https://jennamolby.com/how-to-add-toggles-to-your-pardot-preferences-page/
Find more great Pardot articles at https://jennamolby.com/
Pardot Experts Blog
We have categorized all the different Pardot articles by topics.
Pardot Topic Categories
- Account Based Marketing (ABM) (7)
- Business Units (14)
- ChatGPT / AI (3)
- Completion Actions (5)
- Connectors (10)
- Custom Redirects (4)
- Data Cloud (3)
- Demand Generation (8)
- Dynamic Content (7)
- Einstein Features (11)
- Email Delivery (17)
- Email Open Rates (3)
- Pardot A/B Testing (2)
- Email Mailability (16)
- Do Not Email (1)
- Double Opt-in (2)
- Opt Out / Unsubscribe (14)
- Email Preferences Page (6)
- Engagement Studio (16)
- Industries (1)
- Non Profit (1)
- Landing Pages (9)
- Lead Generation (1)
- Lead Management (13)
- Lead Routing (3)
- Lead Scoring (16)
- Leads (3)
- Marketing Analytics – B2BMA (9)
- Marketing Automation (1)
- Marketing Cloud (3)
- Marketing Cloud Account Engagement (4)
- Marketing Cloud Growth (2)
- New Pardot Features (6)
- Opportunities (2)
- Optimization (2)
- Pardot Admin (65)
- Duplicates (1)
- Marketing Ops (1)
- Pardot Alerts (1)
- Pardot API (2)
- Pardot Automations (3)
- Pardot Careers (12)
- Pardot Certifications (4)
- Pardot Consulting (1)
- Pardot Cookies (4)
- Pardot Custom Objects (3)
- Pardot Email Builder (8)
- Pardot Email Templates (10)
- HML (6)
- Pardot Events (17)
- Pardot External Actions (1)
- Pardot External Activities (4)
- Pardot Forms (29)
- Form Handlers (8)
- Pardot Integrations (21)
- Data Cloud (2)
- Slack (1)
- Pardot Lead Grading (5)
- Pardot Lead Source (2)
- Pardot Lightning (1)
- Pardot Migration (1)
- Pardot Nurture / Drip Campaigns (2)
- Pardot Personalization (3)
- Pardot Profiles (1)
- Pardot Releases (18)
- Pardot Sandboxes (2)
- Pardot Segmentation (5)
- Pardot Strategy (7)
- Pardot Sync (2)
- Pardot Sync Errors (1)
- Pardot Tracker Domains (5)
- Pardot Training (3)
- Pardot Vs Other MAPs (4)
- Pardot Website Tracking (2)
- Reporting (22)
- Salesforce and Pardot (31)
- Marketing Data Sharing (2)
- Pardot Users (3)
- Salesforce Automation (5)
- Salesforce Flows (2)
- Salesforce Campaigns (22)
- Salesforce CRM (3)
- Record Types (1)
- Salesforce Engage (3)
- Salesforce Queues (2)
- Security and Privacy (1)
- Tags (3)
- The Authors (540)
- Cheshire Impact (9)
- Greenkey Digital (55)
- Invado Solutions (37)
- Jenna Molby (9)
- Marcloud Consulting (6)
- Nebula Consulting (67)
- Pardot Geeks (44)
- Salesforce Ben | The Drip (242)
- SalesLabX (16)
- Slalom (4)
- Unfettered Marketing (51)
- Uncategorized (1)
- Website Tracking (2)
- Website Search (1)
More Pardot Articles
See all posts
This Pardot article written by:
Jenna Molby
Jenna is a Salesforce Certified Pardot Specialist, Salesforce Certified Pardot Consultant and Salesforce Marketing Champion 2020. Jenna is a marketing operations leader with over ten years of B2B and B2C experience working on both the agency and client-side.
Original Pardot Article: https://jennamolby.com/how-to-add-toggles-to-your-pardot-preferences-page/
Find more great Pardot articles at https://jennamolby.com/


