How to Set up Pardot Resubscribe – Let Prospects Opt Back In
- September 22, 2022
- Opt Out / Unsubscribe, Pardot Resubscribe
The Pardot August ‘19 release brought Automated Resubscribe – the ability for Prospects to opt back in once opted-out. In short, this prompts prospects to send themselves a resubscribe email when they fill out a form, which confirms their subscription and verifies their identity.
Pardot released a setting less than a year ago, that allows marketers to opt prospects back in by overwriting the ‘Email Opt Out’ field, from true to false (opted-out to not opted-out). Previously, a checked opted-out field wouldn’t override, to protect email preferences. This further enhancement means Prospects can essentially self-service, and therefore, is one more pain point in email preference management ticked off. The Pardot team can finally retire the 7000 points racked up on the IdeaExchange.
The Resubscribe Customer Experience
What this feature means in practical terms for your customer experience:
- Form Prompt: a warning message appears on Pardot forms (if an opted-out email address is entered in the email field).
- Resubscribe Email: sends a resubscribe autoresponder email (using a template you set).

How to Set Up Resubscribe in Pardot
Here’s a quick summary of what you need to do to get your account prepared:
- Create Resubscribe Email Template
- Enable Prospect Resubscribe in your account settings
The new Pardot merge language (HML) is a pre-requisite for this setup. Find out more here.
Step 1: Create Resubscribe Email Template
The automated resubscribe email needs to be an email template. This email should explain why they are receiving the email, and inviting them to click on the confirmation link.
When you create the email template, you need to include the resubscribe link. You can do this in two ways:
Merge Tag via the Merge Field Picker (if you have HML enabled):


Or, via the Email Builder hyperlink pop-up. The resubscribe link can be selected from the dropdown menu:

Tip: you should consider embedding the resubscribe link as an eye-catching button in your email template, to ensure it’s not missed.
Step 2: Enable Prospect Resubscribe
Next, head to your Pardot Settings (‘Account Settings’ in Pardot Classic).
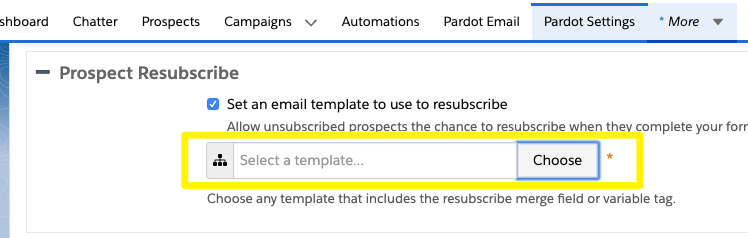
Click the ‘edit’ button, and scroll down (the ‘Prospect Resubscribe’ section is only visible on the edit screen).
Check the checkbox, and select your email template.
After you’ve save, the prompt message will be automatically activated for your Pardot forms. When an opted out prospect enters their email address, Pardot will detect their opted-out status and show them the message below:
Step 3: Customise Your Form Message (Optional)
Do you need a different message to appear on a specific form? Or translate the message on localised forms?
You have the ability to amend the message at the form level, using the ‘Resubscribe’ tab in the Pardot Form Wizard (new in the January 2020 release).
Summary
This post has covered how to set up and activate automated Prospect resubscribe. Now, Prospects have the ability to self-service, and opt themselves back in – one more pain point in email preference management ticked off!
This Pardot article written by:
Salesforce Ben | The Drip
Lucy Mazalon is the Head Editor & Operations Director at Salesforceben.com, Founder of THE DRIP and Salesforce Marketing Champion 2020.
Original Pardot Article: https://www.salesforceben.com/the-drip/how-to-set-up-pardot-resubscribe-let-prospects-opt-back-in/
Find more great Pardot articles at www.salesforceben.com/the-drip/
Pardot Experts Blog
We have categorized all the different Pardot articles by topics.
Pardot Topic Categories
- Account Based Marketing (ABM) (7)
- Business Units (14)
- ChatGPT / AI (3)
- Completion Actions (5)
- Connectors (10)
- Custom Redirects (4)
- Data Cloud (3)
- Demand Generation (8)
- Dynamic Content (7)
- Einstein Features (11)
- Email Delivery (17)
- Email Open Rates (3)
- Pardot A/B Testing (2)
- Email Mailability (16)
- Do Not Email (1)
- Double Opt-in (2)
- Opt Out / Unsubscribe (14)
- Email Preferences Page (6)
- Engagement Studio (16)
- Industries (1)
- Non Profit (1)
- Landing Pages (9)
- Lead Generation (1)
- Lead Management (13)
- Lead Routing (3)
- Lead Scoring (16)
- Leads (3)
- Marketing Analytics – B2BMA (9)
- Marketing Automation (1)
- Marketing Cloud (3)
- Marketing Cloud Account Engagement (4)
- Marketing Cloud Growth (2)
- New Pardot Features (6)
- Opportunities (2)
- Optimization (2)
- Pardot Admin (65)
- Duplicates (1)
- Marketing Ops (1)
- Pardot Alerts (1)
- Pardot API (2)
- Pardot Automations (3)
- Pardot Careers (12)
- Pardot Certifications (4)
- Pardot Consulting (1)
- Pardot Cookies (4)
- Pardot Custom Objects (3)
- Pardot Email Builder (8)
- Pardot Email Templates (10)
- HML (6)
- Pardot Events (17)
- Pardot External Actions (1)
- Pardot External Activities (4)
- Pardot Forms (29)
- Form Handlers (8)
- Pardot Integrations (21)
- Data Cloud (2)
- Slack (1)
- Pardot Lead Grading (5)
- Pardot Lead Source (2)
- Pardot Lightning (1)
- Pardot Migration (1)
- Pardot Nurture / Drip Campaigns (2)
- Pardot Personalization (3)
- Pardot Profiles (1)
- Pardot Releases (18)
- Pardot Sandboxes (2)
- Pardot Segmentation (5)
- Pardot Strategy (7)
- Pardot Sync (2)
- Pardot Sync Errors (1)
- Pardot Tracker Domains (5)
- Pardot Training (3)
- Pardot Vs Other MAPs (4)
- Pardot Website Tracking (2)
- Reporting (22)
- Salesforce and Pardot (31)
- Marketing Data Sharing (2)
- Pardot Users (3)
- Salesforce Automation (5)
- Salesforce Flows (2)
- Salesforce Campaigns (22)
- Salesforce CRM (3)
- Record Types (1)
- Salesforce Engage (3)
- Salesforce Queues (2)
- Security and Privacy (1)
- Tags (3)
- The Authors (547)
- Cheshire Impact (9)
- Greenkey Digital (55)
- Invado Solutions (37)
- Jenna Molby (9)
- Marcloud Consulting (6)
- Nebula Consulting (67)
- Pardot Geeks (44)
- Salesforce Ben | The Drip (249)
- SalesLabX (16)
- Slalom (4)
- Unfettered Marketing (51)
- Uncategorized (1)
- Website Tracking (2)
- Website Search (1)
More Pardot Articles
See all posts


