Pardot Technical Setup Steps – and Why They’re Important
- November 11, 2022
- Pardot Tracker Domains, Salesforce Ben | The Drip

Technical setup is the foundation of any Pardot implementation. From website tracking code, first-party tracking, tracker domains, email authentication, IP whitelisting, to enabling the Pardot Lightning app – these steps are important, or you risk having problems coming back to bite you in the future!
Without understanding why they’re important, some organizations skip items due to a lack of time, knowledge, or push back from IT departments. This guide will give you the ‘what’ and the ‘why’ about these five key technical setup items.
Good news is that most of the setup can be done from Marketing Setup, which is Salesforce Setup designed for marketing admins, streamlining the steps you need to take. Some admin tasks still need to be done via Salesforce Setup (if you don’t have System Administrator access, then you will need to ask your Salesforce admin for support).
1. Add a Tracker Domain (CNAME)
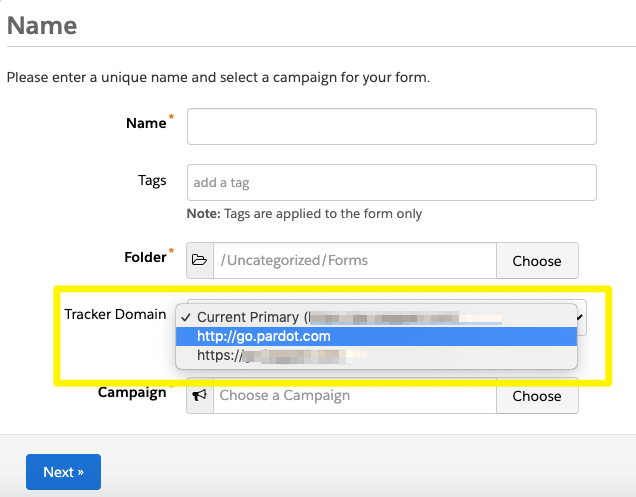
What: Use a CNAME records for rewriting links to show they belong to your organization (vanity URLs) – in other words, being able to use ‘yoursite.com’ for marketing assets instead of ‘go.pardot’ (the default).
- Pardot Settings → Domain Management. You will see which tracker domain is set as primary, and whether these have been validated.
- If they’re not validated, fetch the keys to do the implementation.
- Ensure that SSL Status is Enabled and HTTPS Status is HTTPS.
- Ensure that one custom domain (i.e. not go.pardot) is selected as the primary.


Why: Brand Pardot-hosted assets will lead to prospects trusting the landing page, email links, etc. when the URLs contain your brand name, not “go.pardot”.
Picture all the content that’s on your website (‘content’ refers to forms, landing pages, emails, files, etc). Some of the content will be hosted by you, via your CMS (Content Management System) and others will be hosted through Pardot, eg. Pardot forms.
If Tracker Domains are not set up and validated, then when a user goes to create an asset (eg. a Pardot form), the form will take the ‘go.pardot’ domain, which is the default available with every Pardot account. Your client will want the URL to read ‘yoursite.com’ instead of ‘go.pardot’ to appear legitimate.
Secondly, Pardot rolled out a security update in 2022, which means that certain types of forms have the potential to stop functioning– emphasis added for a reason.
These steps are essential in order for first-party tracking to work properly (the next step).

2. Enable First-party Tracking
What: First-party cookies are created by the website that you’re browsing, and will only track visitor behavior on that website (i.e. when a visitor leaves the website, they don’t continue to track their activity). If you followed step 1, you’re ready to enable first-party tracking.
- Navigate to Pardot Settings → Account Settings. Click Edit then scroll down to the settings related to First-Party Tracking: “Use first-party tracking”, “Use third-party cookies with first-party tracking”, “Use third-party tracking”.
- Check “Use first-party tracking” and keep “Use third-party cookies with first-party tracking” checked. This is for while you transition your website tracking codes.

Note: When you save the page, the settings will show as: “Use first-party tracking”, “Use third-party cookies with first-party tracking”, and “Block third-party tracking”.

3. Navigate to Pardot Settings → Domain Management. Click the cog icon beside your primary tracker domain → Edit.
4. Select a default campaign (i.e. Website Tracking).

5. Scroll down to find the Tracking Code Generator. If you have a campaign specific to the domain (i.e. if you have multiple websites) then you can override the default campaign.
6. The code you need to paste into your website appears in the box below.

Why: With major browsers gradually blocking third-party cookies, marketers are increasingly turning to first-party tracking. First-party cookies are created by the website that you’re browsing, and will only track visitor behavior on that website (i.e. when a visitor leaves the website, they don’t continue to track their activity). You’ll gain:
- Future-proofed website tracking.
- More ownership over the tracked data.
3. Implement Website Tracking Code
What: Each Pardot campaign has a unique tracking code that tracks visitor and prospect activity when added to your web pages. If you followed step 2, you will have the code ready to copy from the Tracking Code Generator.
Why: Marketing automation is all about listening for certain behavior, and taking actions based on the signals prospects make.
Your website is a place that prospects will browse, and you can choose to increase their score whenever they visit a page, or use page actions for specific, high-value pages.
The advice is to not add the tracking code to every page of your website – especially not the home page. This is to prevent prospect scores from inflating, and losing meaningful insight among the mass.
4. Implement Email Authentication
What: Achieve better email deliverability when sending emails via Pardot (Account Engagement). Adding DKIM and SPF records to your domain validates the emails you send are from an authorized server.
Go to Pardot Settings → Domain Management to find out whether these have been validated, or to fetch the keys to do the implementation. You can hand the keys to the person responsible for the company’s domain/hosting platform/CPanel – they will know what to do if you refer them to this page.

Why: Deliverability refers to whether you will be able to get into the recipient’s inbox. Regardless of whether that prospect is mailable/have given their consent, this does not guarantee you will be able to reach its destination. The factors that determine deliverability are not consistent (some factors will vary depending on the time and situation) but implementing email authentication eliminates one factor you do have control over, and therefore, increases your chances of deliverability.
SPF refers to a process that validates an email is sent from an authorized server, which prevents spam. DKIM allows a sender to claim responsibility for a message that is to be validated by the recipient via a “public key” (if your sending domain has the key, then it’s definitely your brand sending the email); ‘spoofing’ is when spammers will imitate different brands to make themselves appear more legitimate.
5. Whitelist (Allowlist) Pardot IPs
What: Whitelisting your Pardot IP ensures that emails you send from Pardot can get through your company’s spam filters.
Go to Pardot Settings → Account Settings. Scroll down to find Sending IPs. Pass these to your IT team to take care of adding these ranges to your organization’s whitelist (allowlist).

Note: The image above shows a demo org, which does not allow email sending.
Why: This is optional, however, if you find that test emails continually go into your junk folder, then it’s time to consider whitelisting (allowlisting).
6. Enable the Pardot Lightning App
What: The Pardot Lightning app signaled a major milestone in Pardot transitioning onto the Salesforce platform, bringing Pardot (Account Engagement) into the Salesforce Lightning Experience (LEX). Over time, Pardot Lightning has not only applied to just the user experience (UX), but also to Pardot’s infrastructure (the data model – technically, under the hood).
First things first: From Marketing Setup → Setup Assistant, “flick the switch” to turn on Pardot Lightning App in Salesforce.

Salesforce users don’t automatically gain access to the Pardot Lightning app. They need to have either a Salesforce or Identity license assigned to their user record.
Identity licenses came into effect for Pardot users when single sign-on (SSO) was enforced. Pardot leverages Salesforce’s robust SSO framework, however, this means that all users must sign into Salesforce. This left a gap for users that had previously been Pardot-only users, never with a Salesforce license (not the cheapest licenses on the market!). Identity licenses allow these Pardot-only users to gain access to the Pardot Lightning app via Salesforce login.
| License Type | Salesforce | Identity |
| Permission Sets | CRM User or Sales Cloud User AND b2bma_canvas. | Account Engagement User AND b2bma_canvas. |
Note: Account Engagement User only grants access to the Pardot Lightning app.
- From Salesforce Setup, search in the quick find box for Manage Connected Apps. Find b2bma_canvas.
- Click Manage Profiles or Manage Permission Sets to select the users that need access. Profiles are “bigger” groups than permission sets, so you will “scoop” up more users by selecting profiles first; however, permission sets will give you more flexibility (i.e. not every user in a particular profile should have access, so permission sets are the best option).
- Search in the quick find box for App Manager. Find the Pardot Lightning app.
- Click User Profiles to select the profiles (groups of users) that need access.
- Click Navigation Items to add/remove the tabs in the Pardot Lightning app.

Why: As we mentioned, over time, Pardot Lightning has not only applied to just the user experience (UX), but also to Pardot’s infrastructure (the data model – technically, under the hood).
- All Pardot innovation (new features, enhancements) will be Pardot Lightning-only, which is why using the Pardot Lightning App is key.
- Pardot Lightning offers greater functionality that can tap into all that the wider Salesforce platform offers!
Summary
Technical setup is the foundation of any Pardot implementation. From website tracking code, first-party tracking, tracker domains, email authentication, IP whitelisting, to enabling the Pardot Lightning app – these steps are important, or you risk having problems coming back to bite you in the future!
For more details on the ‘how’ to implement these technical setup items, refer to the official implementation guide which details exactly how to carry out these steps.
This Pardot article written by:
Salesforce Ben | The Drip
Lucy Mazalon is the Head Editor & Operations Director at Salesforceben.com, Founder of THE DRIP and Salesforce Marketing Champion 2020.
Original Pardot Article: https://www.salesforceben.com/the-drip/pardot-technical-setup-steps/
Find more great Pardot articles at www.salesforceben.com/the-drip/
Pardot Experts Blog
We have categorized all the different Pardot articles by topics.
Pardot Topic Categories
- Account Based Marketing (ABM) (7)
- Business Units (14)
- ChatGPT / AI (3)
- Completion Actions (5)
- Connectors (10)
- Custom Redirects (4)
- Data Cloud (3)
- Demand Generation (8)
- Dynamic Content (7)
- Einstein Features (11)
- Email Delivery (17)
- Email Open Rates (3)
- Pardot A/B Testing (2)
- Email Mailability (16)
- Do Not Email (1)
- Double Opt-in (2)
- Opt Out / Unsubscribe (14)
- Email Preferences Page (6)
- Engagement Studio (16)
- Industries (1)
- Non Profit (1)
- Landing Pages (9)
- Lead Generation (1)
- Lead Management (13)
- Lead Routing (3)
- Lead Scoring (16)
- Leads (3)
- Marketing Analytics – B2BMA (9)
- Marketing Automation (1)
- Marketing Cloud (3)
- Marketing Cloud Account Engagement (4)
- Marketing Cloud Growth (2)
- New Pardot Features (6)
- Opportunities (2)
- Optimization (2)
- Pardot Admin (65)
- Duplicates (1)
- Marketing Ops (1)
- Pardot Alerts (1)
- Pardot API (2)
- Pardot Automations (3)
- Pardot Careers (12)
- Pardot Certifications (4)
- Pardot Consulting (1)
- Pardot Cookies (4)
- Pardot Custom Objects (3)
- Pardot Email Builder (8)
- Pardot Email Templates (10)
- HML (6)
- Pardot Events (17)
- Pardot External Actions (1)
- Pardot External Activities (4)
- Pardot Forms (29)
- Form Handlers (8)
- Pardot Integrations (21)
- Data Cloud (2)
- Slack (1)
- Pardot Lead Grading (5)
- Pardot Lead Source (2)
- Pardot Lightning (1)
- Pardot Migration (1)
- Pardot Nurture / Drip Campaigns (2)
- Pardot Personalization (3)
- Pardot Profiles (1)
- Pardot Releases (18)
- Pardot Sandboxes (2)
- Pardot Segmentation (5)
- Pardot Strategy (7)
- Pardot Sync (2)
- Pardot Sync Errors (1)
- Pardot Tracker Domains (5)
- Pardot Training (3)
- Pardot Vs Other MAPs (4)
- Pardot Website Tracking (2)
- Reporting (22)
- Salesforce and Pardot (31)
- Marketing Data Sharing (2)
- Pardot Users (3)
- Salesforce Automation (5)
- Salesforce Flows (2)
- Salesforce Campaigns (22)
- Salesforce CRM (3)
- Record Types (1)
- Salesforce Engage (3)
- Salesforce Queues (2)
- Security and Privacy (1)
- Tags (3)
- The Authors (540)
- Cheshire Impact (9)
- Greenkey Digital (55)
- Invado Solutions (37)
- Jenna Molby (9)
- Marcloud Consulting (6)
- Nebula Consulting (67)
- Pardot Geeks (44)
- Salesforce Ben | The Drip (242)
- SalesLabX (16)
- Slalom (4)
- Unfettered Marketing (51)
- Uncategorized (1)
- Website Tracking (2)
- Website Search (1)
More Pardot Articles
See all posts
This Pardot article written by:
Salesforce Ben | The Drip
Lucy Mazalon is the Head Editor & Operations Director at Salesforceben.com, Founder of THE DRIP and Salesforce Marketing Champion 2020.
Original Pardot Article: https://www.salesforceben.com/the-drip/pardot-technical-setup-steps/
Find more great Pardot articles at www.salesforceben.com/the-drip/


