Salesforce Lead Object Best Practices
- March 13, 2023
- Lead Management, Lead Routing, Lead Scoring, Leads, Salesforce Ben | The Drip
Alongside Accounts, Opportunities and Contacts, Leads are one of the Standard Salesforce Objects, having their unique related functionalities, behavior, and of course, considerations.
In this post, we will deep dive into a few ways to ensure you make the most out of your Salesforce Lead object with out-of-the-box functionality, as well as point-and-click configuration.
What Are Leads In Salesforce?
The most common explanation is that a Lead in your Salesforce instance represents a prospect – an individual that has a certain interest in what your company is selling.
For example, let’s say you’re downloading this awesome AppExchange managed package that you want to test in one of your sandboxes. At this point, you’ve become a Lead for the vendor of that application, and you may be offered more resources about the functionality, or even a customized proposal. However, this is only one of the potential sources for Leads.
Salesforce Leads are a great way to follow the progression of your pipeline and interaction across multiple teams, such as marketing, business development, and sales.
1. Web-to-Lead (And Other Lead Capture Methods)
I’ve already shared one example of how a Lead can potentially end up in a company’s Salesforce instance, but as I mentioned, there are plenty others.
Another one is the Web-to-Lead functionality. Salesforce provides it as an out-of-the-box option for you to display to potential customers visiting your website, acting as a form they input data in for your team to contact them at a later time. Usually, this takes the form of a call to action, for example ‘Contact Us!’.
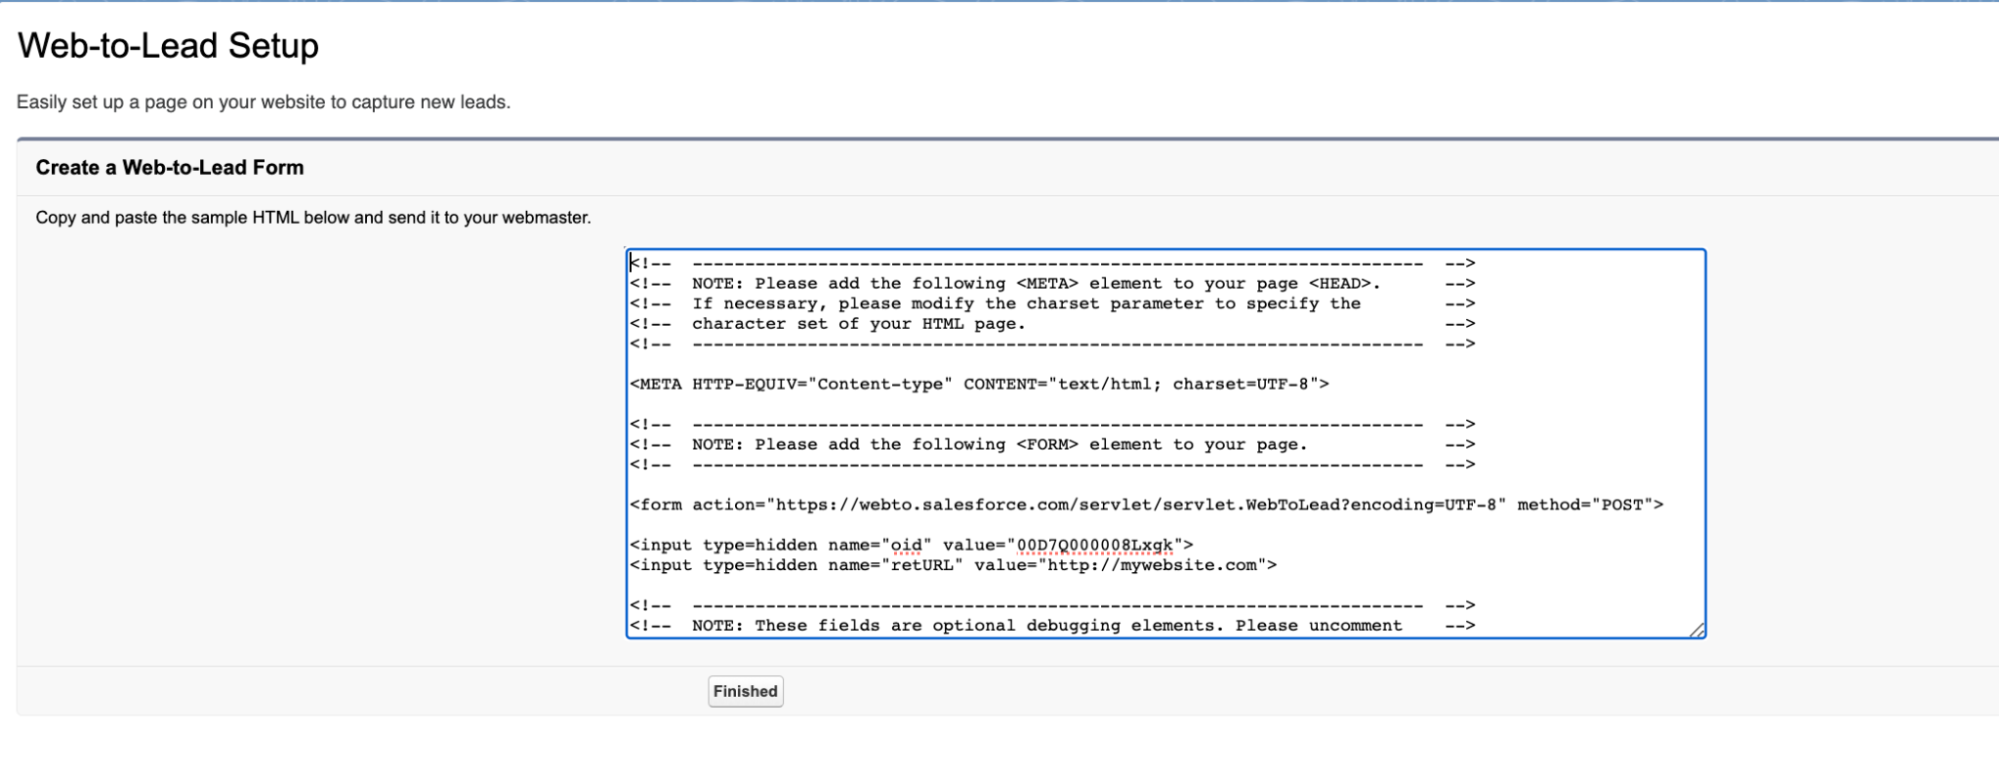
Getting into a bit more technical detail, Salesforce helps you generate a snippet of HTML code with the fields of your choice – be them standard or custom ones, that you can then insert into your web page(s). At this time, there is a limit of 500 Leads that can be generated from the Web-to-Lead form over a 24 hour period. You will be notified if the limit is reached, and no data will be lost. Make sure to take a look at the guidelines of implementing Web-to-Lead.
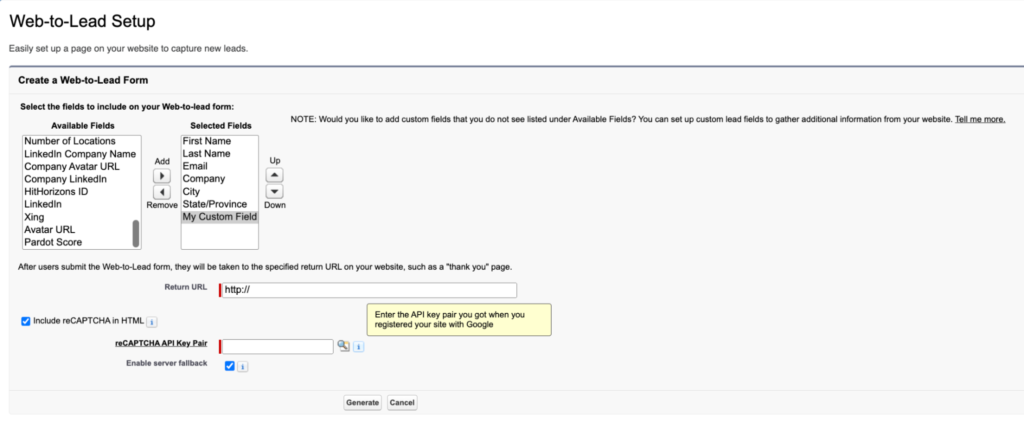
While this functionality might seem simple and somewhat rudimentary, it’s not quite the case – especially to start with. You can take it multiple steps further by enabling reCAPTCHA, setting Lead Auto-Response Rules for the prospects, building Validation Rules to ensure the incoming data is correct, working with your web developer to elevate the design of the form for the website, or make certain fields mandatory in the interface.
As with anything you’re looking forward to using to solve a business requirement, there are pros and cons. I advise you to investigate these thoroughly for your particular use case before deciding between Web-to-Lead, Pardot Forms (if you are a Pardot customer), or a third-party tool.
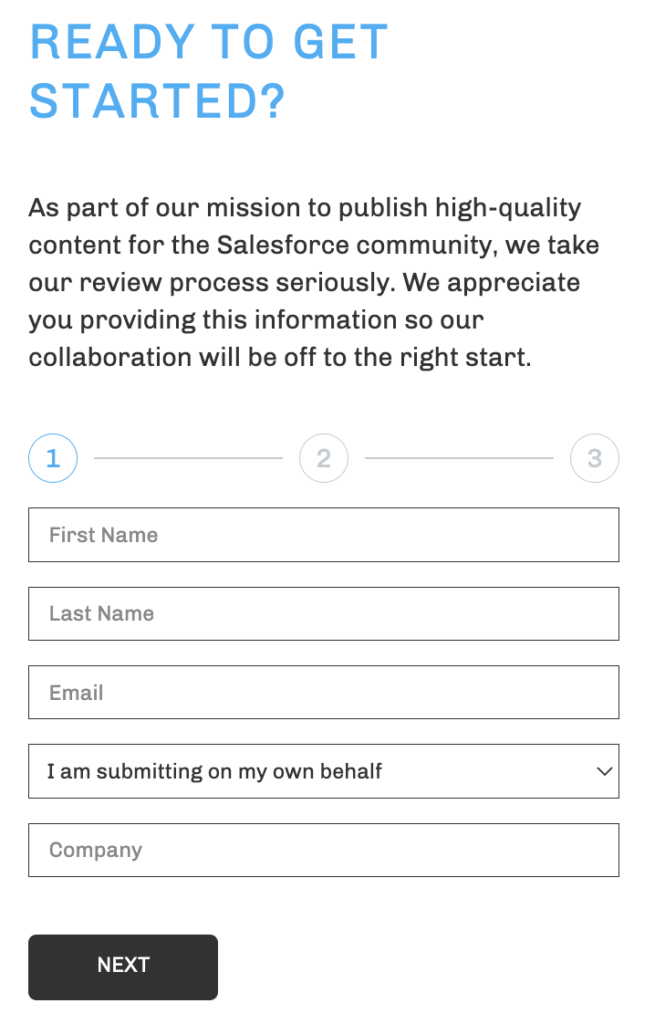
You can check out an example of a custom Web-to-Lead form on our website. We invite you to complete it if you have an idea for a blog post on salesforceben.com.
Check out a few additional resources about form options below:
2. Standard Company Field
As a Salesforce Admin working with Leads, you should know about the use of the Company field, and why it is so important in the end-to-end process that Salesforce made it mandatory right from the get-go.
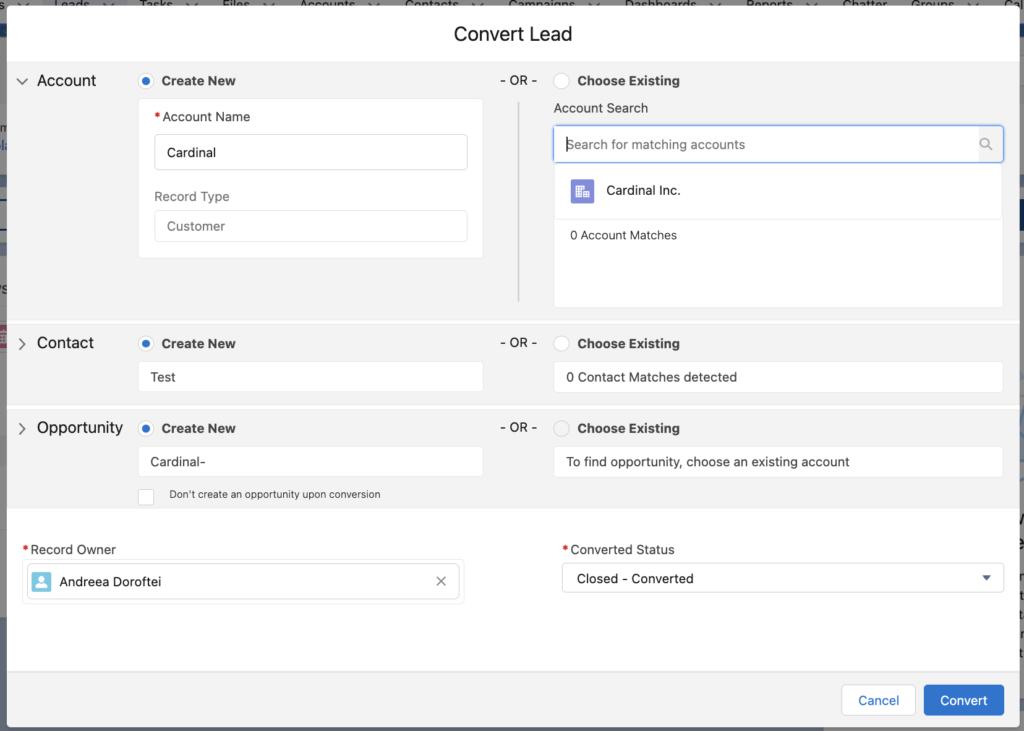
Long story short, as we will cover more on Lead conversion later in the post, the Company field will end up being the name of the Account the newly created Contact will be attached to.
During the conversion process, even though there isn’t a perfect Account Match found, having a variation of the name of the Company in this field removes the need for the user to spend a lot of time searching for the Account they should convert to (if it’s an existing one).
If it is a new Account, this simply speeds up the conversion itself, as the future Account’s name is already there. It might not seem like a lot, but the clicks add up, having the potential to result in some unhappy users.
Additionally, if your organization is working with both Business and Person Accounts, the Company field comes into play once again – a Lead which has value in the Company field will be converted into a Business Account, while one without it will be converted into a Person Account.
In this situation, the Company field is no longer mandatory upon Lead creation, and if mistakes happen, the Account will have to be then changed to the correct type.
Finally, it will certainly be much better in the long run if the Company field data is as accurate as possible, regardless of where the Lead comes from, as it will overall make the Lead process much smoother.
3. Importing Leads
Regardless of your experience in the Salesforce ecosystem, I’m sure that there are still instances where you either perform or oversee some kind of data import. Just like other Salesforce objects, Leads can easily be imported into Salesforce using one of the plethora of available tools.
Depending on the import use case at hand permissions will have to be tweaked, but for inserting new Leads in Salesforce the Import Leads permission should be assigned. Before embarking on the import journey or looking to enable power users to do so, don’t forget to check the permissions needed for each scenario.
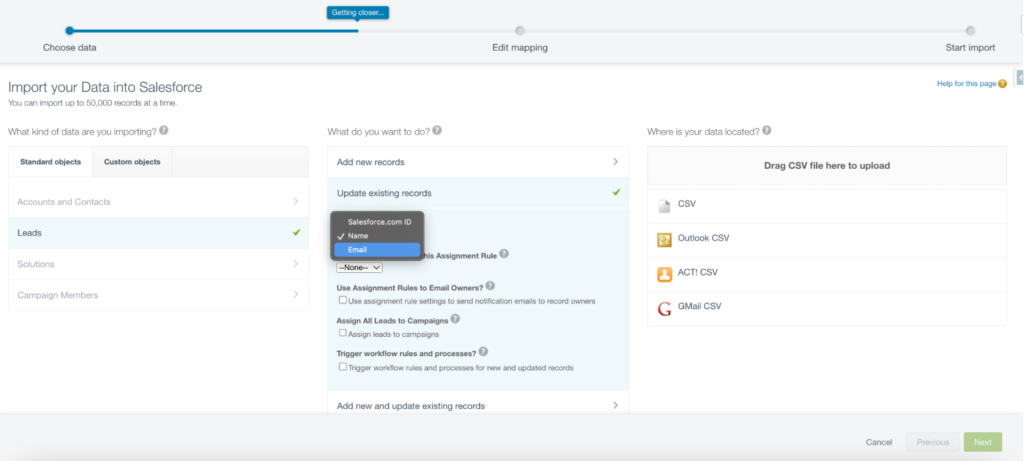
My personal preference when importing Leads is to use the Data Import Wizard – it’s readily accessible in Salesforce Setup, as long as the volume doesn’t go above 50K records. Of course, there might be other considerations, such as wanting to control the batch size, that would prompt me to use Data Loader instead.
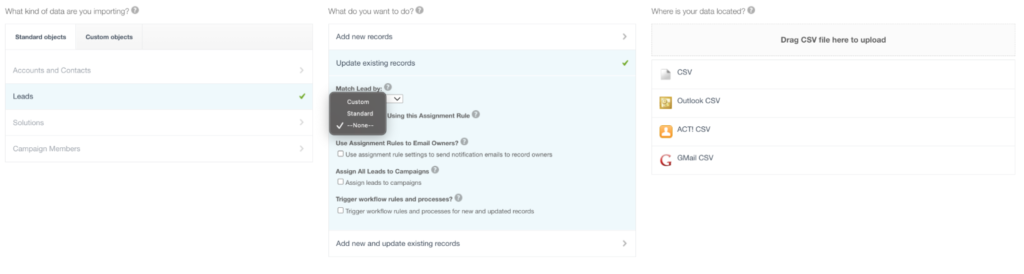
You will need your CSV file ready before starting the data import. If you’re looking forward to updating existing records, then make sure to pay attention to the unique identifier for the Leads. For Data Import Wizard (as shown below) you can use either the ID, name or email, while Data Loader requires the record ID.
For more information on importing Leads in relation to Campaigns, and to find out what options there are to generally import records into Salesforce, make sure to take a look at the articles below:
- Deduplicate Salesforce Leads
A great way to ensure that Business Development Reps, or other teams working with Leads do not work simultaneously with the same person is only to allow that Lead to exist once, based on unique identifiers or combinations between multiple data points.
On the more technical side, having duplicate records across Salesforce synced to other systems can be hard to clean up and may lead to significant inconsistencies across the board. Surely, no subscriber likes to receive the same email multiple times just because there are duplicates in your system.
Duplicate Rules and Matching Rules are the out-of-the-box Salesforce functionalities that can easily help you prevent these issues. To begin with, you can use the standard ones that you can tweak the behavior for, after which you can start building custom ones specific to your organization. Check out our Complete Guide to Salesforce Duplicate Rules for examples of custom Duplicate Rules and more insight!
For example, the Standard Lead Matching Rule equation is the following, which covers quite a lot of the possible scenarios:
(First Name AND Last Name AND Title AND Company)
OR (First Name AND Last Name AND Email)
OR (First Name AND Last Name AND Phone AND Company)
OR (First Name AND Last Name AND Mailing Street AND (City OR ZIP OR Phone))
OR (First Name AND Last Name AND Mailing Street AND Title)
OR (First Name AND Last Name AND Title AND Email)
OR (First Name AND Last Name AND Phone)
Additionally, both the Standard Lead Matching Rule, and the Contact Matching Rule, can check for any existing Contacts/Leads before a new Contact/Lead is created. It is to ensure the same person is not in Salesforce twice on either of the objects. You can also report in detail on the duplicate items by creating a Custom Report Type leveraging the Duplicate Record Items.
Let’s quickly block users from creating duplicate records by updating the Standard Lead Duplicate Rule action!
5. Lead Source
The Lead Source field is exactly what it sounds like – the channel where the respective Lead came from. This is an out-of-the-box picklist field with a few predefined values that you can pick and choose from, or you can create your very own ones.
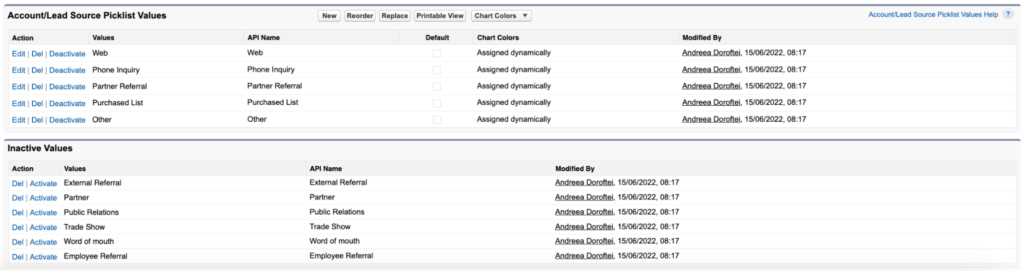
This field is available not only on Leads, but also on Contacts, Accounts, and Opportunities, making it a walk in the park to know exactly which channels sourced the most Leads that ended up in Closed Won Opportunities.
If you decide to fully leverage the Lead Source field for your organization, make sure that every channel which creates Leads in your Salesforce instance will input this information correctly – be it Web-to-Lead, Imports, or even Pardot (Account Engagement).
Find out everything you need to know about Lead Source from our dedicated blog post, and don’t forget to have a look at the articles below:
6. Lead Assignment and Routing
Lead Assignment in Salesforce refers to the way the Lead Owner is set for the record in order for them to start interacting with the prospect, and hopefully convert them into an Opportunity. This process can be automated in quite a few ways with different tools; however, out-of-the-box Salesforce functionality can help admins set up quite a complex model through the use of Lead Assignment Rules.
While I could go on and on about Lead Assignment Rules, there are a few significant things you should consider from the get-go:
- Familiarize yourself with the limits, which apply to both Lead, and Case Assignment Rules.
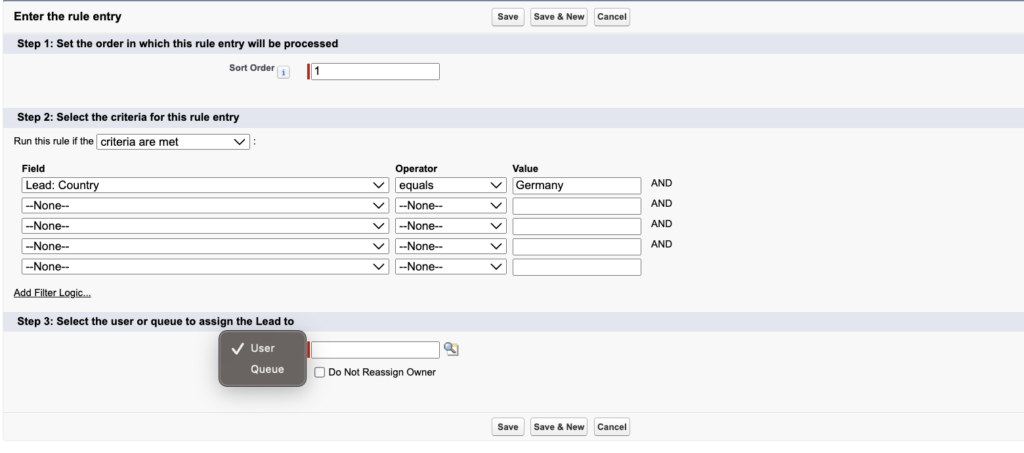
- Decide when to assign Leads to a User, and a Queue. Ask yourself: Should multiple users be allowed to work on and be notified about Leads that need the same criteria? Would it be faster and more scalable for you to update and deploy the Lead Assignment Rules when a user leaves the company, or would you rather manage a Queue?
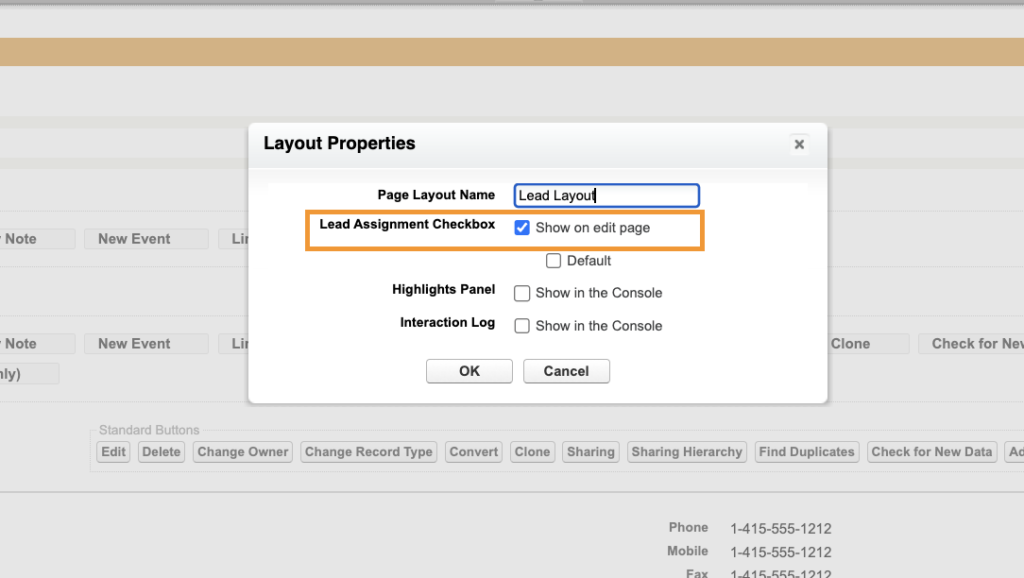
- Should users be able to apply the active Lead Assignment Rule on demand when creating or editing a record? If the answer is yes, then you should ensure the checkbox is visible on the edit page.
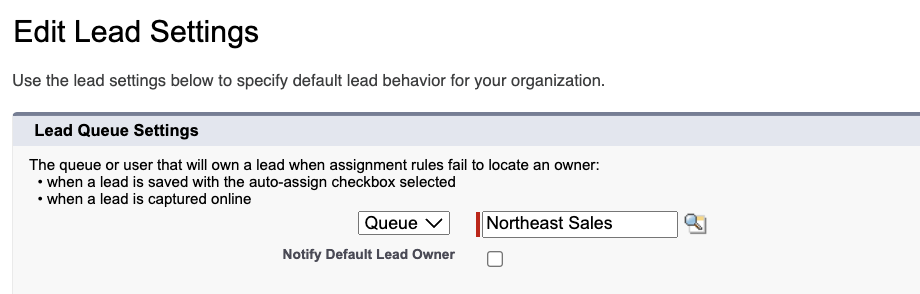
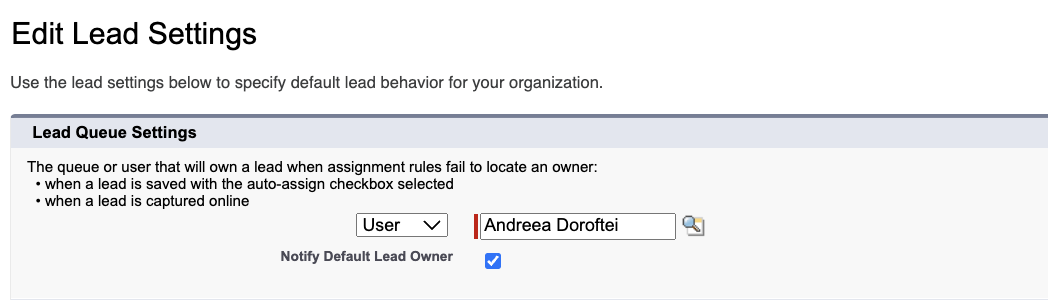
- If none of the Lead Assignment Rule criteria is met, then the Lead will be assigned to the Default Lead Owner. This user or queue can be defined in the Lead Settings, and you can decide the notification behavior.
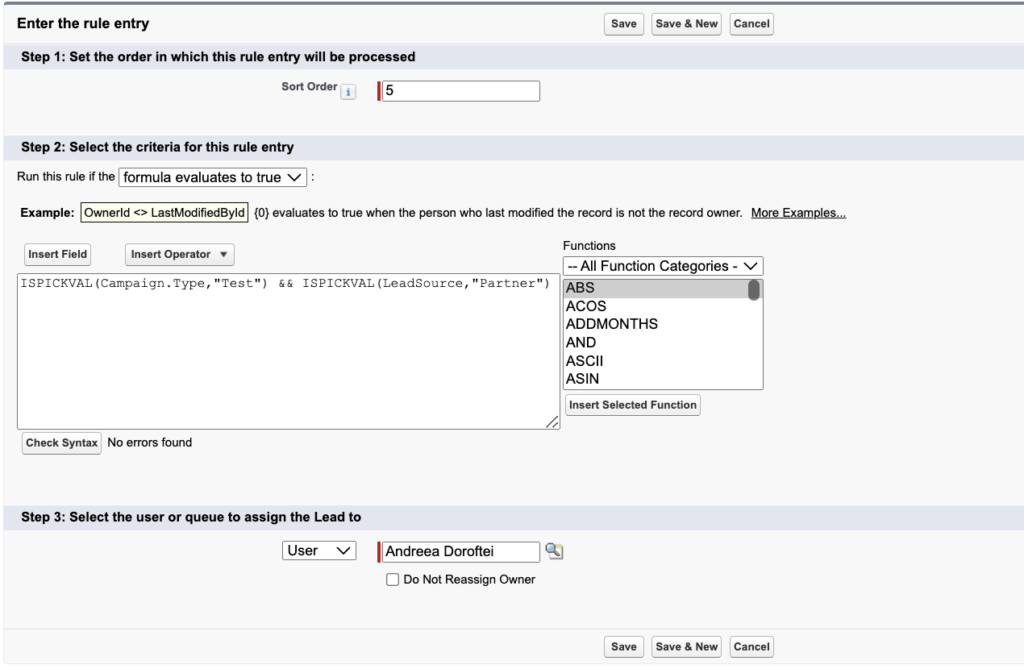
- The criteria and order of your Lead Assignment Rule Entries. Perhaps the most complex part is to ensure you cover all potential scenarios and set their order appropriately. You can define the criteria and filter logic, or write a formula that should evaluate to true for the rule entry to be applied for each of them.
Since we covered the Lead imports earlier, it’s important to note that Assignment Rules can be triggered through imports, both within Data Import Wizard and Data Loader. One thing to pay close attention to in Data Import Wizard (if you have multiple Assignment Rules defined) is choosing the correct one – in my case, “Standard” is the active one. If you choose the inactive one by mistake, it will be applied, and Leads will be wrongfully assigned.
Additionally, you can leverage the Salesforce Lead Assignment Rules to build a more dynamic assignment mechanism, such as Round Robin Assignment. If you would rather evaluate a third-party solution to empower your business users, have more control over the assignment, or support more complex scenarios, there are quite a few available on the market. You can read more about a few easy-to-implement ones here.
As Assignment Rules may become quite complicated, make sure to take a look at our other articles about the Lead Routing and Distribution topics:
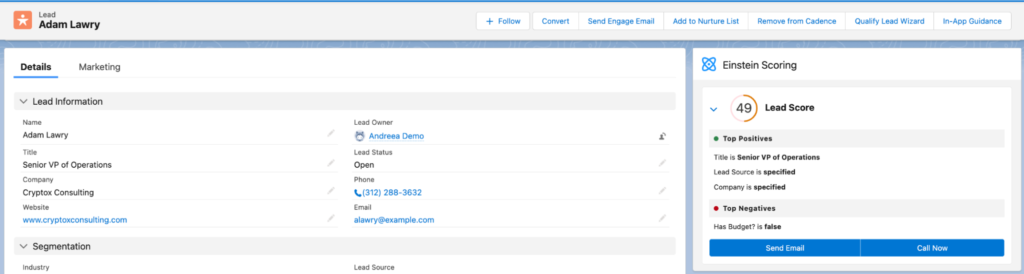
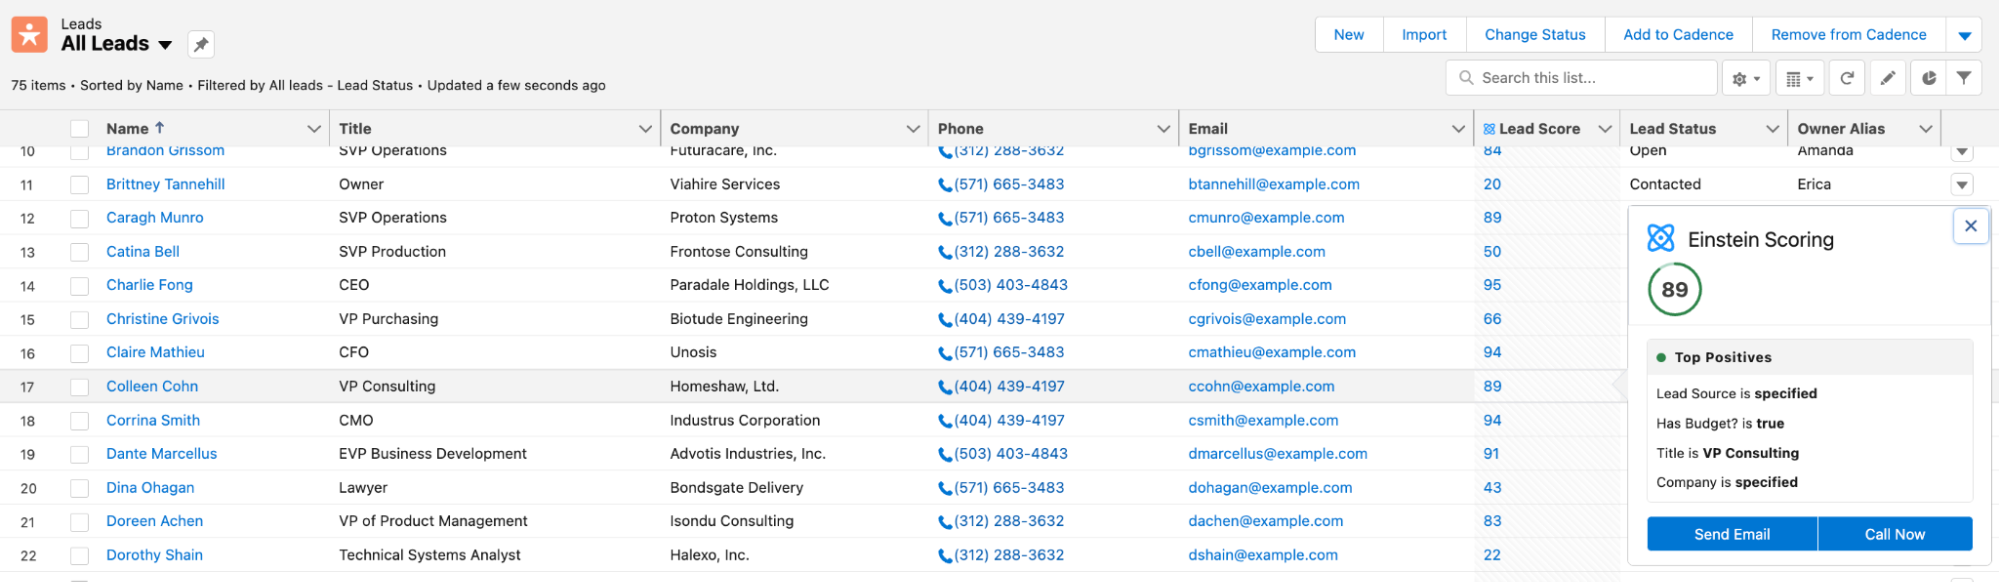
7. Lead Scoring and Rating
Both Lead Scoring and Rating play a significant role in ensuring that the best Leads not only reach the team who will further qualify them, but that they will also be equipped to easily prioritize the hottest ones accordingly.
Ultimately, it is your choice how to implement any of these data points to use in automations, email marketing, and more. While you could simply build a formula field for an easy scenario (for example, based on straightforward criteria) you can also take it a step further with Pardot Scoring and Grading, and Einstein Lead Scoring available with Sales Cloud Einstein.
8. Lead Conversion
The Lead Conversion process in Salesforce represents the successful progression of a prospect into an Account, Contact, and/or Opportunity. This step can also represent the handover from a business development team to the sales team.
Over time, Lead Conversion can become quite an important process within your Salesforce instance. With the possibility to automate it in-house based on criteria, measure your team’s conversion rates as well as time a Lead spends in the funnel, and of course, how much revenue the Opportunities created from Leads actually bring in. If you haven’t already, make sure to also read through and complete the dedicated Leads & Opportunities module on Trailhead.
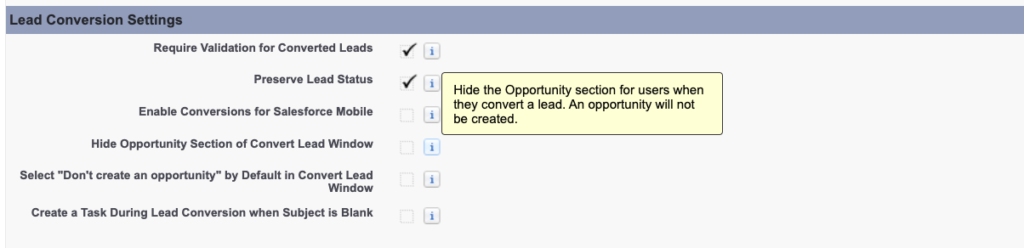
When it comes to best practices about Lead Conversion, make sure to check the following items off your list:
- Lead Settings: Depending on the conversion behavior you’re opting for, there are some key settings to check on the Lead Settings page in Setup. For example, you can automatically have the “Don’t create an opportunity” box checked, so that users will not create new Opportunities by mistake.
- Permissions: Make sure that the users going through this process have all the appropriate permissions, such as Convert Leads, Create and Edit on Leads, Accounts, Contacts, and Opportunities. Additionally, users who should be able to report and perhaps edit Leads that have already been converted (such as marketing teams), the View and Edit Converted Lead permission is needed as well.
- Lead Convert Settings: These are the way to map out custom fields between Leads, Accounts, Opportunities, and Contacts upon conversion. Let’s say you create a custom field on the Lead, and you would also like all Accounts coming from Leads to get this value. There is no need for custom automation in this case, as this can be achieved directly on this page as long as the field exists both on the Lead and the other object!
- Not all the Leads will be converted: It is expected that not all the Leads in your database will become customers or be converted into Contacts, and you need to ensure that the data reflects that. While a user might forget to manually go back to a Lead and mark it as “Not Qualified”, you could set up a scheduled automation to perform this task after a certain amount of time passes after the last activity date.
9. “Hidden” Lead Fields
This is one of my favorite things about Leads ever since I started building reports, as these fields are not as advertised as I believe they should be – especially for newer Salesforce Admins to simply learn about from the start. They can prove to be a tremendous help, both when analyzing the data, or when building specific automations.
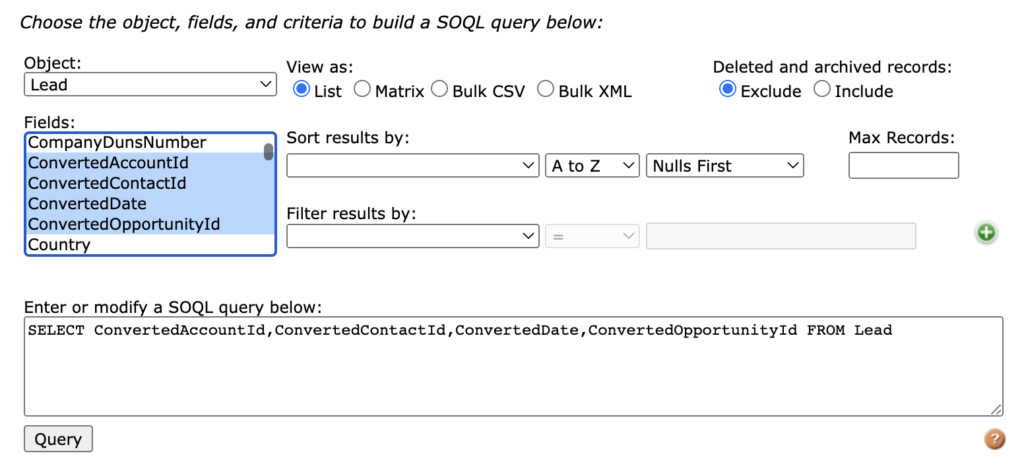
- ConvertedAccountId: The new or existing Account the Lead is converted towards.
- ConvertedContactId: The new or existing Contact the Lead is converted into.
- ConvertedOpportunityId: The new or existing Opportunity the Lead is related to during the conversion process. This field might be blank if the user performing the conversion decides not to create an Opportunity, or chooses an existing one.
- ConvertedDate: The date the Lead Conversion happened on.
- IsConverted: Boolean field letting you know if the Lead is converted or not.
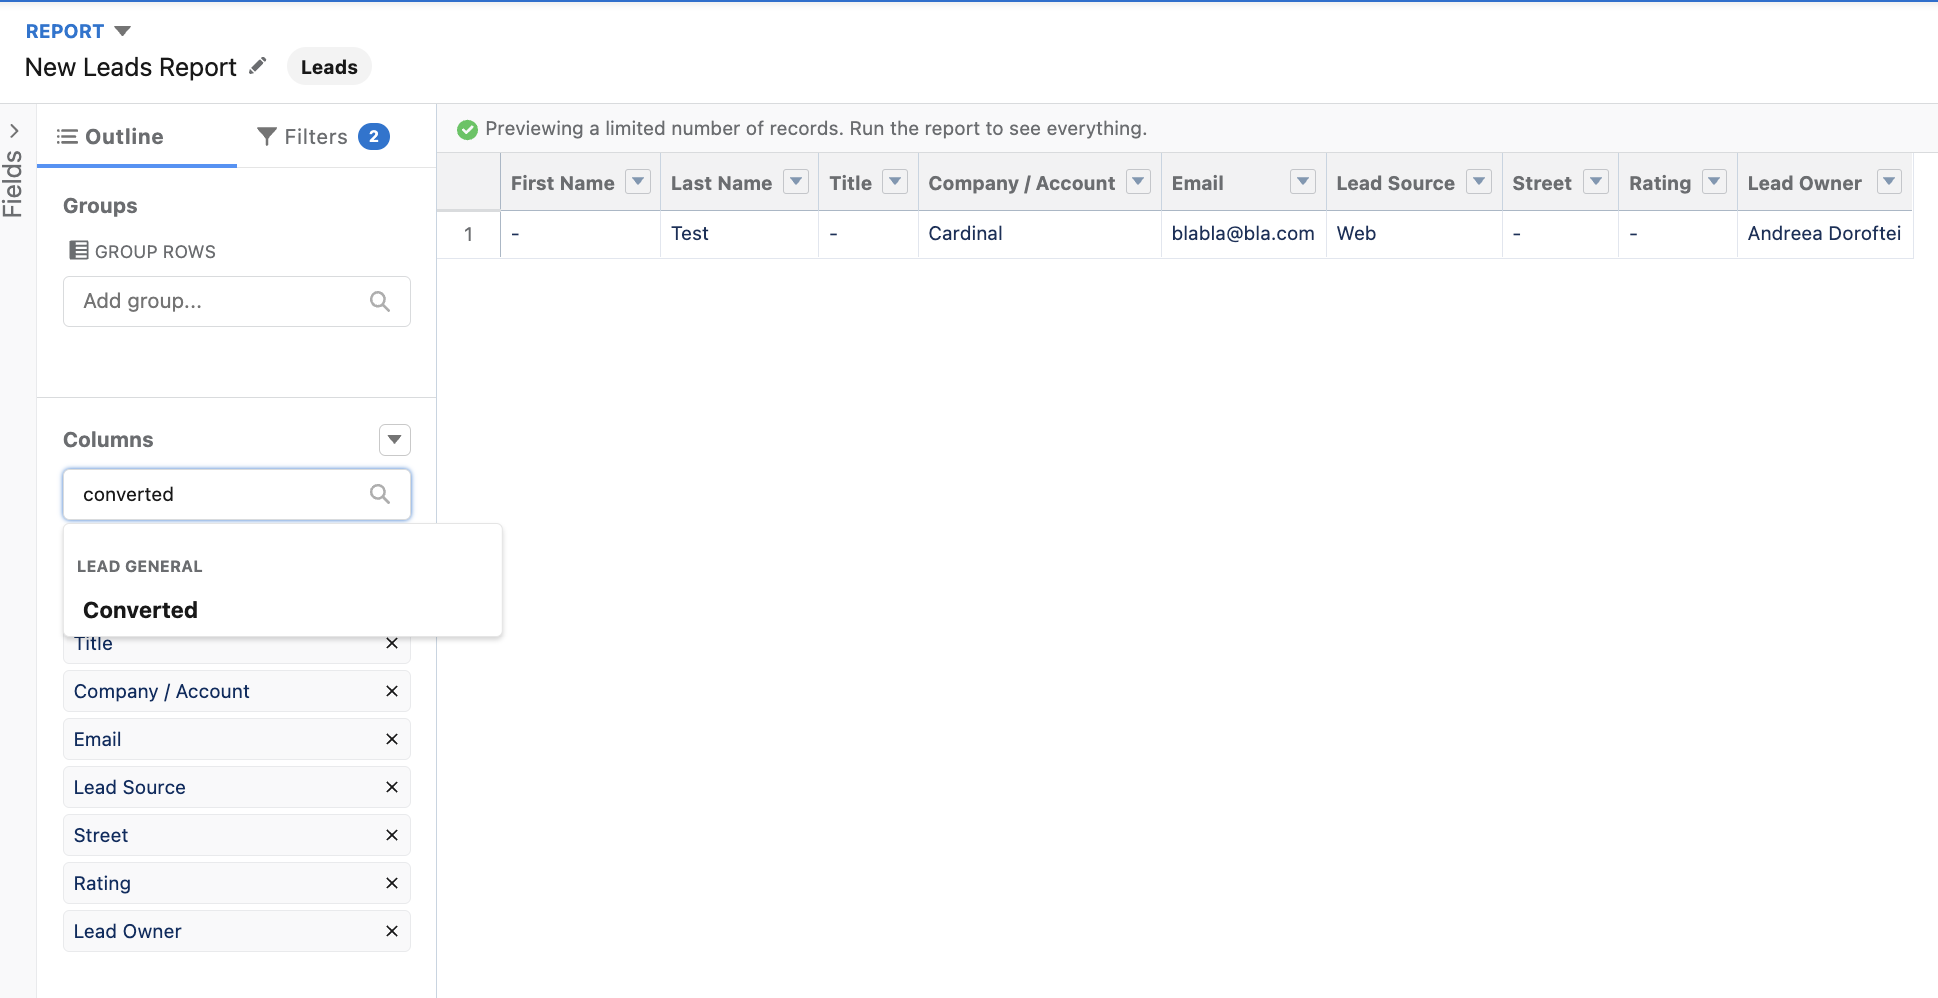
All these fields are available in the Standard Lead with converted lead information Report Type, while IsConverted is also available in the Standard Leads Report Type. For user experience purposes, you will not find the API names while building the reports. Instead, you will find the Id fields for the related Objects as well as extra information (e.g. Opportunity Amount), Converted, and Converted Date.
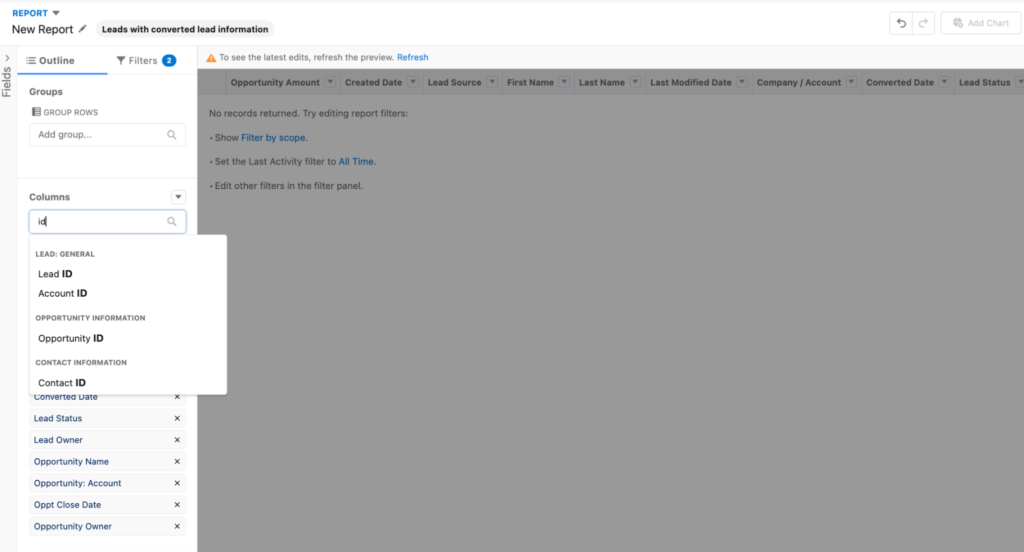
An example of a very useful report is the count of Leads converted by Day, Month, or let’s say, Fiscal Quarter. There’s extra nothing you need to do except for building the actual report, as everything you need is already available!
10. Enhance The Lightning Record Pages
Because neither users nor admins enjoy a cluttered page when opening a Salesforce record, tailoring the experience is key to ensuring maximum productivity and easy access to the important information.
It goes without saying that using new Salesforce functionality is always fun, especially when it offers such granular control as Dynamic Forms and Dynamic Actions do. As you might have heard, Dynamic Forms is available on Leads nowadays. It is the perfect way to start saying goodbye to the Page Layouts in Lightning Experience in favor of displaying either individual fields, or entire Field Sections based on another field’s value or other attributes.
You can still leverage Validation Rules to ensure data quality, even with this setup – especially for updates performed through API. Similar to how you control the field UI behavior on the layout, you can do so on the Record Page now as well.

11. Analytics
Last but certainly not least, reporting is something that you should always consider for such critical objects – and quite frankly, at the end of every implementation (where possible), to measure success or adoption by directly leveraging Salesforce data.
Even though they will not cater to all possible use cases, the Standard Salesforce Reports, and Dashboards can help you produce insightful analytics for your stakeholders to rapidly access in Salesforce. Check out a few useful tips and tricks here!
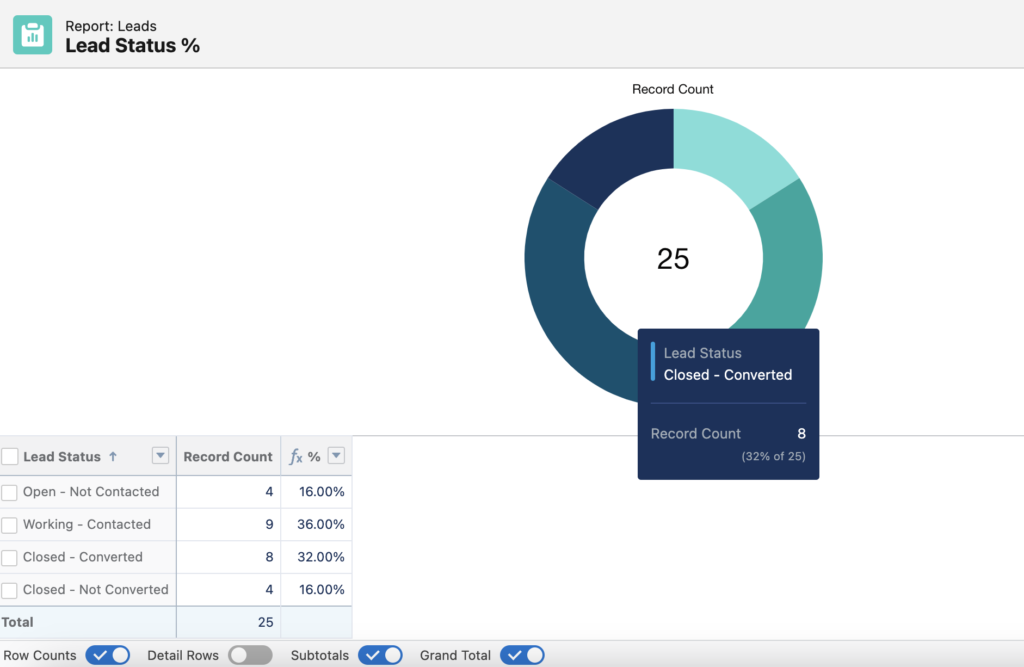
Don’t forget to use summary, or row-level formulas within the report itself to create a calculated value depending on the use case. You can produce a Report using the PARENTGROUPVAL() function at a specified grouping level to obtain the percent of Leads in each Status. This removes the need for users to hover over the chart if they need to see the actual percentage of the total, while allowing them to follow the volume of Leads which haven’t yet been actioned.
Final Thoughts
Following recommended best practices or leveraging out-of-the-box functionality for Leads is a great way to ensure a smooth implementation and experience. By no means should you believe that there will never be a need to build custom solutions for your very particular business use cases.
In the end, the important thing is to always be up to date with the considerations, Salesforce releases, and why not even third-party tools, which can help alleviate one or more challenges that you or your users are facing when working with the Salesforce Lead Object.
This Pardot article written by:
Salesforce Ben | The Drip
Lucy Mazalon is the Head Editor & Operations Director at Salesforceben.com, Founder of THE DRIP and Salesforce Marketing Champion 2020.
Original Pardot Article: https://www.salesforceben.com/salesforce-best-practices-lead-object/
Find more great Pardot articles at www.salesforceben.com/the-drip/
Pardot Experts Blog
We have categorized all the different Pardot articles by topics.
Pardot Topic Categories
- Account Based Marketing (ABM) (7)
- Business Units (14)
- ChatGPT / AI (3)
- Completion Actions (5)
- Connectors (10)
- Custom Redirects (4)
- Data Cloud (3)
- Demand Generation (8)
- Dynamic Content (7)
- Einstein Features (11)
- Email Delivery (17)
- Email Open Rates (3)
- Pardot A/B Testing (2)
- Email Mailability (16)
- Do Not Email (1)
- Double Opt-in (2)
- Opt Out / Unsubscribe (14)
- Email Preferences Page (6)
- Engagement Studio (16)
- Industries (1)
- Non Profit (1)
- Landing Pages (9)
- Lead Generation (1)
- Lead Management (13)
- Lead Routing (3)
- Lead Scoring (16)
- Leads (3)
- Marketing Analytics – B2BMA (9)
- Marketing Automation (1)
- Marketing Cloud (3)
- Marketing Cloud Account Engagement (4)
- Marketing Cloud Growth (2)
- New Pardot Features (6)
- Opportunities (2)
- Optimization (2)
- Pardot Admin (65)
- Duplicates (1)
- Marketing Ops (1)
- Pardot Alerts (1)
- Pardot API (2)
- Pardot Automations (3)
- Pardot Careers (12)
- Pardot Certifications (4)
- Pardot Consulting (1)
- Pardot Cookies (4)
- Pardot Custom Objects (3)
- Pardot Email Builder (8)
- Pardot Email Templates (10)
- HML (6)
- Pardot Events (17)
- Pardot External Actions (1)
- Pardot External Activities (4)
- Pardot Forms (29)
- Form Handlers (8)
- Pardot Integrations (21)
- Data Cloud (2)
- Slack (1)
- Pardot Lead Grading (5)
- Pardot Lead Source (2)
- Pardot Lightning (1)
- Pardot Migration (1)
- Pardot Nurture / Drip Campaigns (2)
- Pardot Personalization (3)
- Pardot Profiles (1)
- Pardot Releases (18)
- Pardot Sandboxes (2)
- Pardot Segmentation (5)
- Pardot Strategy (7)
- Pardot Sync (2)
- Pardot Sync Errors (1)
- Pardot Tracker Domains (5)
- Pardot Training (3)
- Pardot Vs Other MAPs (4)
- Pardot Website Tracking (2)
- Reporting (22)
- Salesforce and Pardot (31)
- Marketing Data Sharing (2)
- Pardot Users (3)
- Salesforce Automation (5)
- Salesforce Flows (2)
- Salesforce Campaigns (22)
- Salesforce CRM (3)
- Record Types (1)
- Salesforce Engage (3)
- Salesforce Queues (2)
- Security and Privacy (1)
- Tags (3)
- The Authors (547)
- Cheshire Impact (9)
- Greenkey Digital (55)
- Invado Solutions (37)
- Jenna Molby (9)
- Marcloud Consulting (6)
- Nebula Consulting (67)
- Pardot Geeks (44)
- Salesforce Ben | The Drip (249)
- SalesLabX (16)
- Slalom (4)
- Unfettered Marketing (51)
- Uncategorized (1)
- Website Tracking (2)
- Website Search (1)
More Pardot Articles
See all posts


This Pardot article written by:
Salesforce Ben | The Drip
Lucy Mazalon is the Head Editor & Operations Director at Salesforceben.com, Founder of THE DRIP and Salesforce Marketing Champion 2020.
Original Pardot Article: https://www.salesforceben.com/salesforce-best-practices-lead-object/
Find more great Pardot articles at www.salesforceben.com/the-drip/