
The Engagement Studio Program (ESP) is my all-time favorite application in Account Engagement (probably because it’s the most intuitive)!
The user interface is simple to navigate, and you can create the structure of your program without having all the elements upfront (email templates, forms, etc.).
Let’s walk through a basic email program to learn about the components of Engagement Studio.
1. Program Setup
Go to the waterdrop to get started. Here are a couple of pointers:
- When choosing a folder, resist the urge to save your program in the uncategorized folder. (It can become a heaping mess quickly!)
- Shift the start and end times to earlier in the day. The default time runs until 4 pm, which is too late in the day (I think).
- For most programs, you should leave “Allow prospects to enter program more than once” unchecked. This ensures that prospects only get an email from your ESP on time. For instance, you likely only want to send a welcome email once. An example of when you may check the box is an email triggered from a purchase, and that purchase could happen multiple times.
2. Rule
The canvas is where you can build your program using the (+) icon to add elements. Each element has a specific function or feature. Click on the “+” to choose an element.
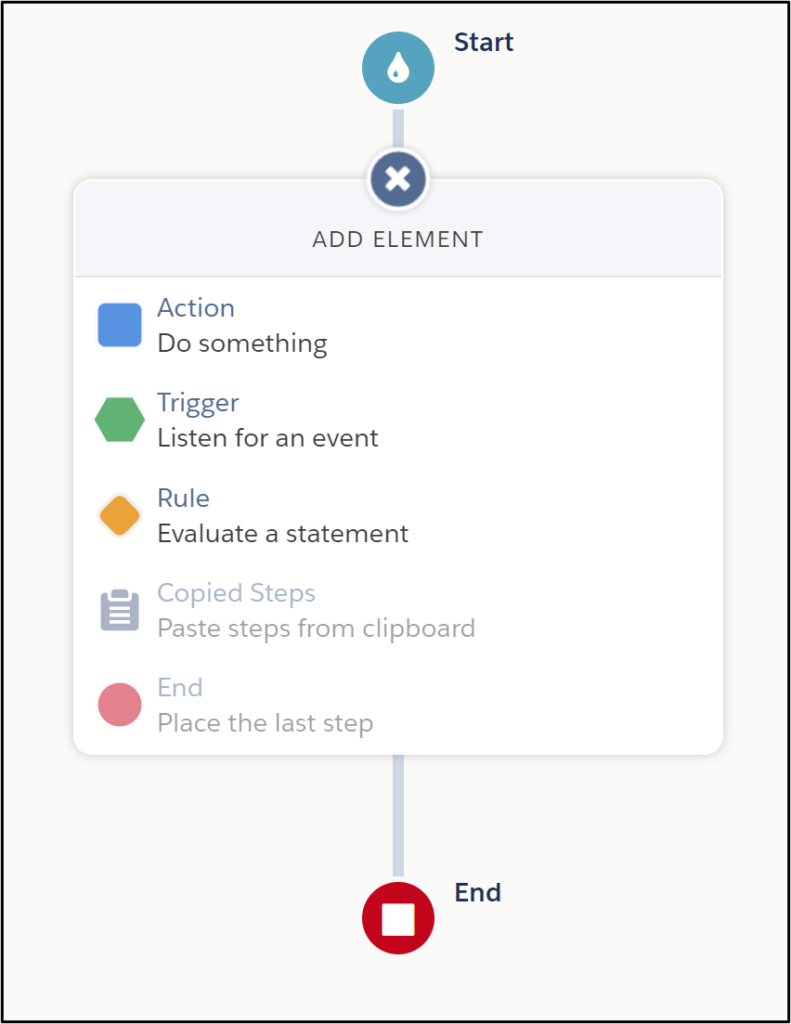
In the short video, I’m starting with the Rule element for any prospects from Minnesota.
3. Action
Now that I have split my paths between Minnesota and non-Minnesota prospects, I will send a few emails. I want to send Minnesota prospects two emails and non-Minnesota prospects one email. Notice how I can create two different paths even though I don’t have the email templates yet.
4. Trigger
At this moment, the emails will send immediately. You need to add wait periods to prevent emails from consecutively sending after another. I use the Trigger element to look for prospect engagement (such as clicks).
In the short video, I have wait periods holding prospects for seven days. You have another waiting option as well.
5. Stop
You can add a stop if desired. Stops sometimes make the ESP appear cleaner because they don’t rejoin other branches.
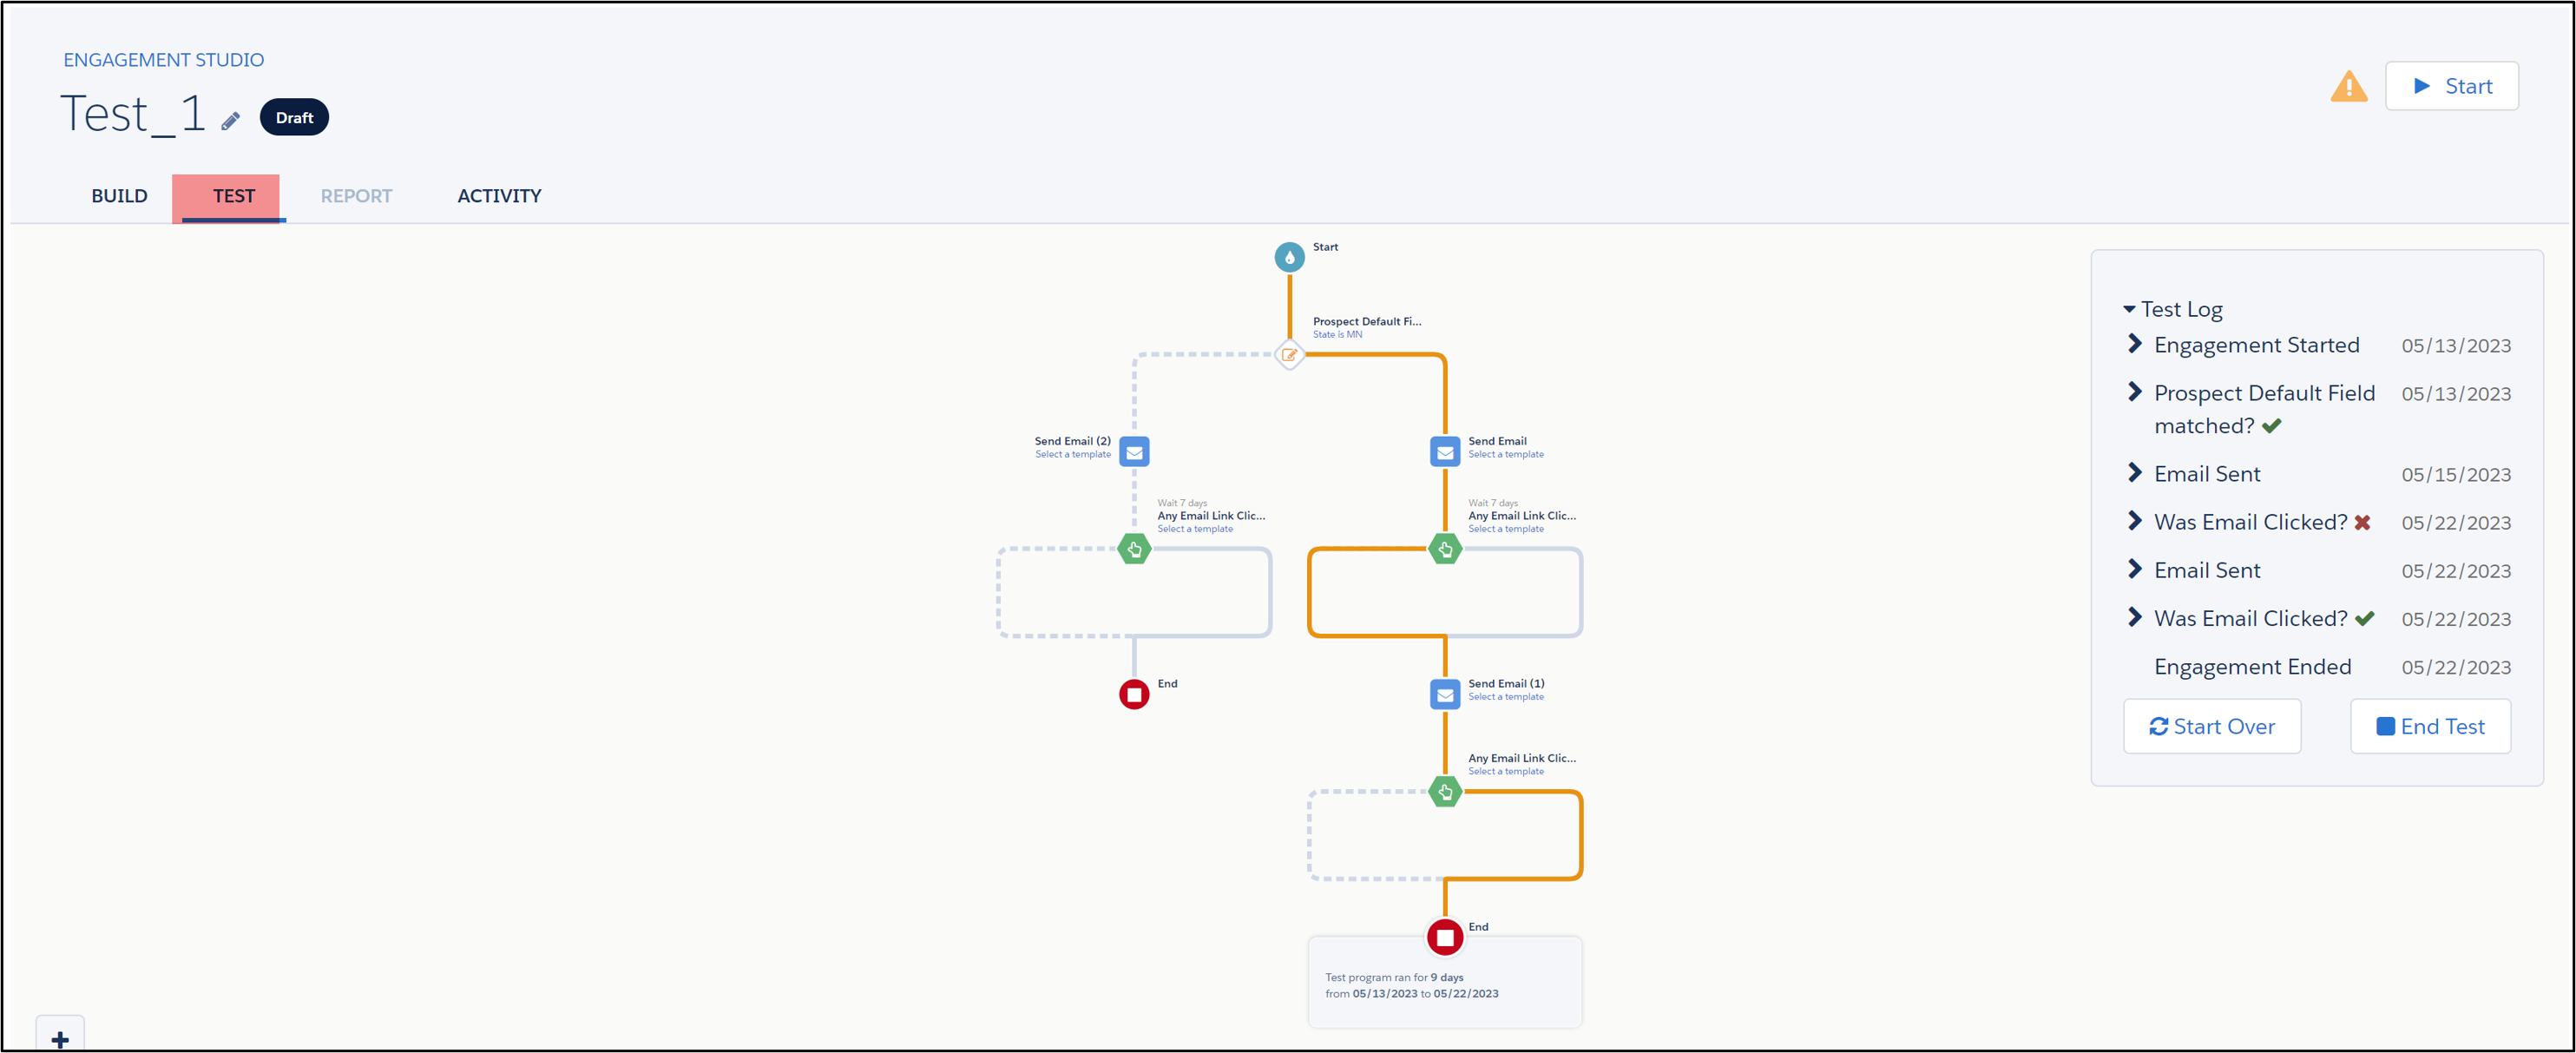
Testing
Once you have built your ESP, it’s time to test. Testing helps you understand the timing that a program member experiences. Go to the Test tab in the ESP.
You can also test from a specific date.
See the information panel populate on the right to show the action and date of each step (gives you a sanity check!)
Activate your ESP
Now you are ready to activate your ESP. Click the Start button in the upper right corner of your ESP. If you are missing any elements, the system will warn you before beginning.
Once started, it takes up to an hour to initiate the first step. You can pause the ESP when you need to edit any aspect of the program.
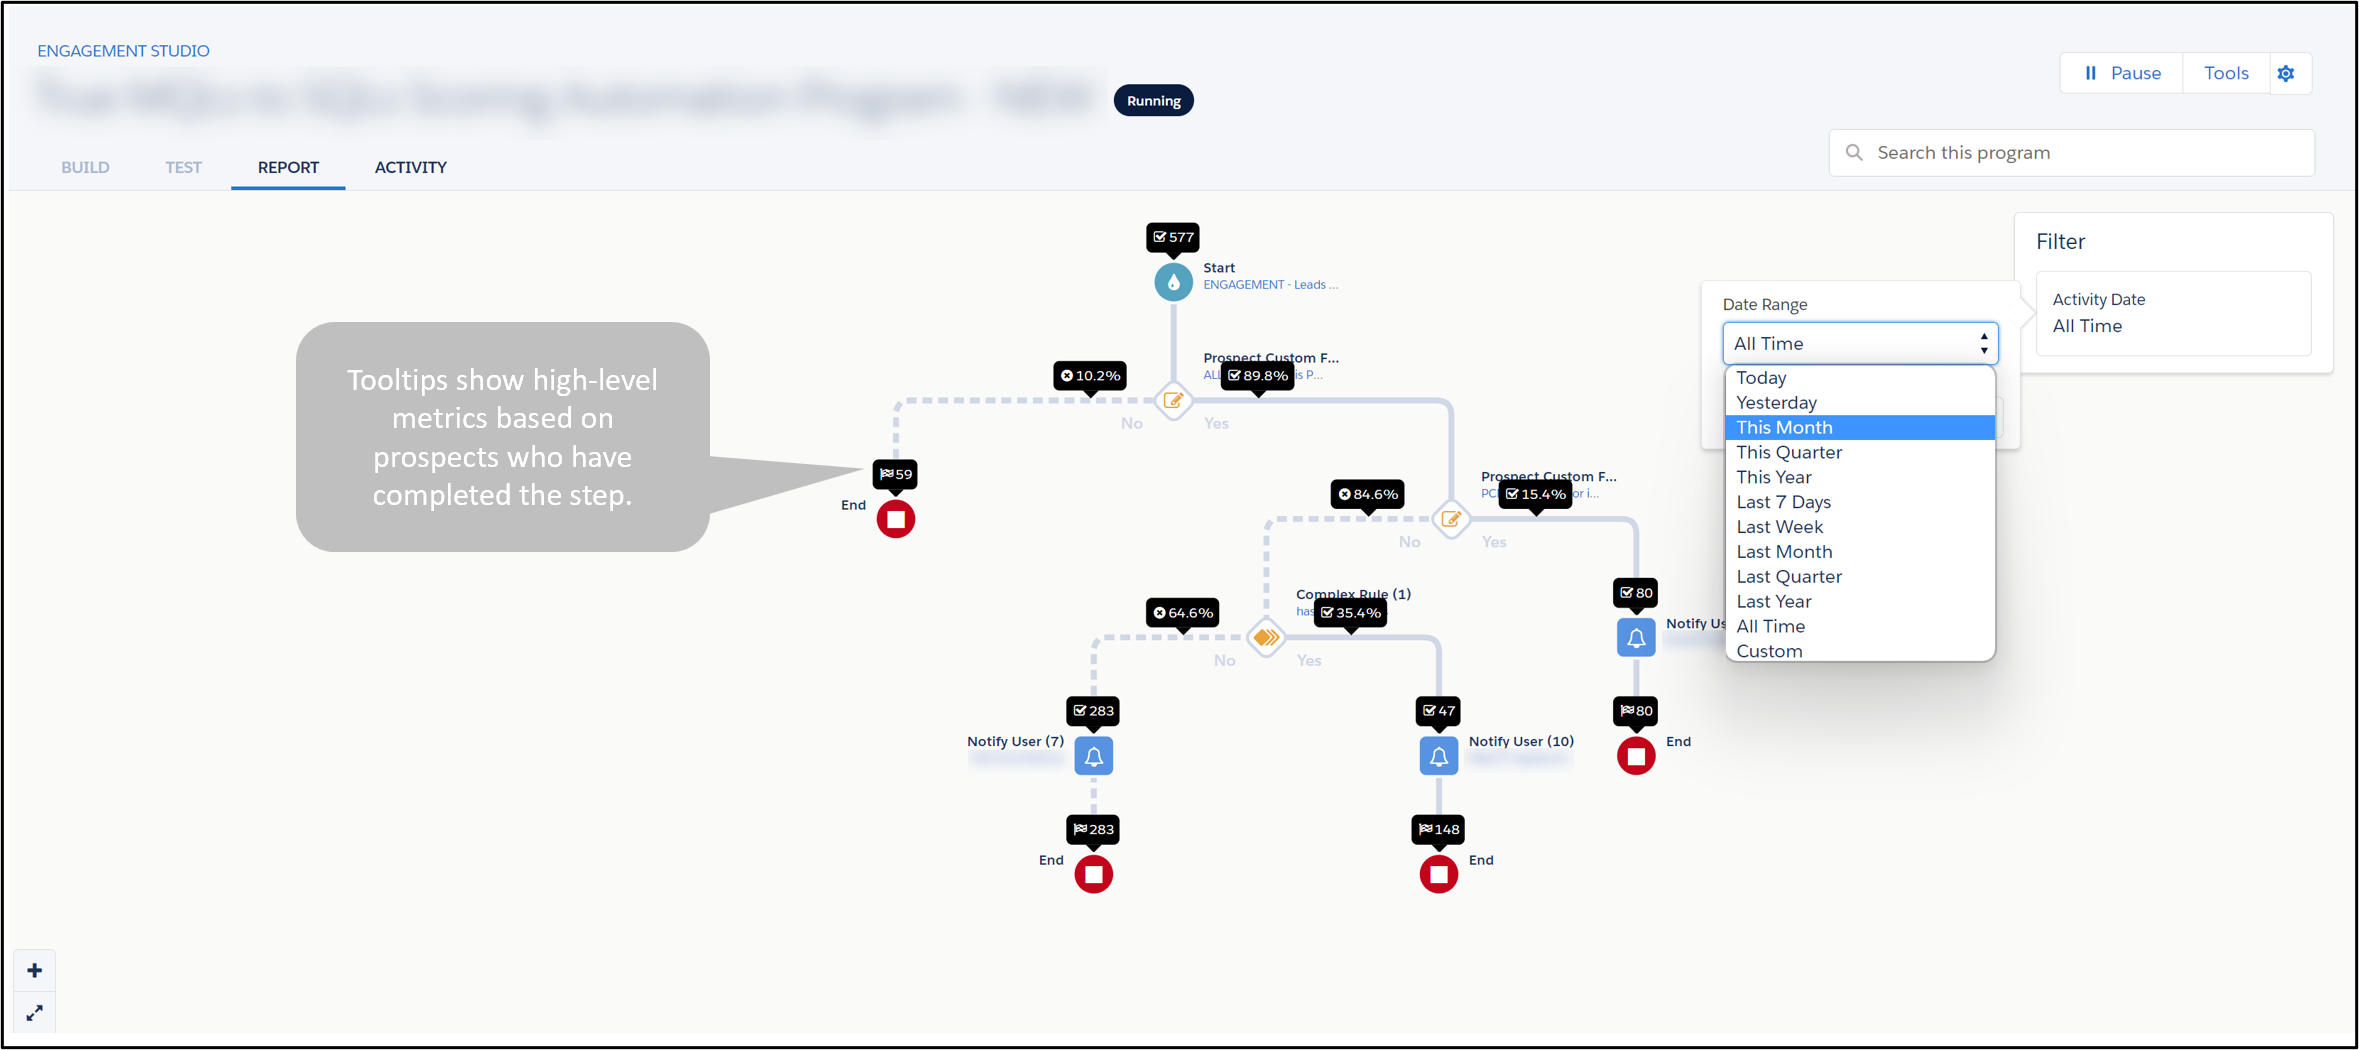
Reports
Review program metrics in the Report tab of a running or paused program to gauge how well your engagement program nurtures your prospects.
You can also download your program report as a CSV file. Click Tools and then CSV Export. The export contains all versions of your program, including the total number of prospects started and completed, percentage completed, step type, step name, and asset name. Read more about Engagement Studio Reporting.
Considerations
- Pausing the program pauses all aspects of the ESP, including the wait times.
- When you remove a Prospect from the recipient list, the ESP removes them from the whole program.
- Prospects added back to an ESP will continue from where they left off.
- The ESP will become inactive when no new Prospects are added to or processed in a program for 30 days.
- Prospects that are Opted-out or Do Not Email will still go through Engagement Studio but will not receive any emails. The best practice is to use suppression lists for unavailable Prospects because actions like “Add to Campaign” will still fire (but emails won’t be sent).
- ESP allows only one Prospect per email address per program. The ESP only sends one email when multiple Prospects have the same email address.
- Set your ESP to stop after a specific date. Otherwise, your program will continue to nurture new Prospects.
- When a form is on a Landing Page, form views and completions appear in the Landing Page report, not the form report. Therefore, use a Landing Page Trigger instead of a form Trigger.
For more considerations, read this Salesforce documentation.
Looking for more?
Here’s my favorite ESP to re-engage prospects. I like how it emails Prospects three times, then stops (instead of peppering Prospects with countless of emails).
Resources
Nurture Leads with Engagement Studio
Engagement Studio Scheduled Email Step FAQ (Account Engagement)
This Pardot article written by: Jen Kazin
Greenkey Digital
Unlock the Power of Pardot. Don’t spend tens of thousands of dollars on marketing systems to simply… send emails.
Original Pardot Article: https://greenkeydigital.com/engagement-studio/?utm_source=rss&utm_medium=rss&utm_campaign=engagement-studio
Find more great Pardot articles at https://greenkeydigital.com/
Pardot Experts Blog
We have categorized all the different Pardot articles by topics.
Pardot Topic Categories
- Account Based Marketing (ABM) (7)
- Business Units (14)
- ChatGPT / AI (3)
- Completion Actions (5)
- Connectors (10)
- Custom Redirects (4)
- Data Cloud (3)
- Demand Generation (8)
- Dynamic Content (7)
- Einstein Features (11)
- Email Delivery (17)
- Email Open Rates (3)
- Pardot A/B Testing (2)
- Email Mailability (16)
- Do Not Email (1)
- Double Opt-in (2)
- Opt Out / Unsubscribe (14)
- Email Preferences Page (6)
- Engagement Studio (16)
- Industries (1)
- Non Profit (1)
- Landing Pages (9)
- Lead Generation (1)
- Lead Management (13)
- Lead Routing (3)
- Lead Scoring (16)
- Leads (3)
- Marketing Analytics – B2BMA (9)
- Marketing Automation (1)
- Marketing Cloud (3)
- Marketing Cloud Account Engagement (4)
- Marketing Cloud Growth (2)
- New Pardot Features (6)
- Opportunities (2)
- Optimization (2)
- Pardot Admin (65)
- Duplicates (1)
- Marketing Ops (1)
- Pardot Alerts (1)
- Pardot API (2)
- Pardot Automations (3)
- Pardot Careers (12)
- Pardot Certifications (4)
- Pardot Consulting (1)
- Pardot Cookies (4)
- Pardot Custom Objects (3)
- Pardot Email Builder (8)
- Pardot Email Templates (10)
- HML (6)
- Pardot Events (17)
- Pardot External Actions (1)
- Pardot External Activities (4)
- Pardot Forms (29)
- Form Handlers (8)
- Pardot Integrations (21)
- Data Cloud (2)
- Slack (1)
- Pardot Lead Grading (5)
- Pardot Lead Source (2)
- Pardot Lightning (1)
- Pardot Migration (1)
- Pardot Nurture / Drip Campaigns (2)
- Pardot Personalization (3)
- Pardot Profiles (1)
- Pardot Releases (18)
- Pardot Sandboxes (2)
- Pardot Segmentation (5)
- Pardot Strategy (7)
- Pardot Sync (2)
- Pardot Sync Errors (1)
- Pardot Tracker Domains (5)
- Pardot Training (3)
- Pardot Vs Other MAPs (4)
- Pardot Website Tracking (2)
- Reporting (22)
- Salesforce and Pardot (31)
- Marketing Data Sharing (2)
- Pardot Users (3)
- Salesforce Automation (5)
- Salesforce Flows (2)
- Salesforce Campaigns (22)
- Salesforce CRM (3)
- Record Types (1)
- Salesforce Engage (3)
- Salesforce Queues (2)
- Security and Privacy (1)
- Tags (3)
- The Authors (547)
- Cheshire Impact (9)
- Greenkey Digital (55)
- Invado Solutions (37)
- Jenna Molby (9)
- Marcloud Consulting (6)
- Nebula Consulting (67)
- Pardot Geeks (44)
- Salesforce Ben | The Drip (249)
- SalesLabX (16)
- Slalom (4)
- Unfettered Marketing (51)
- Uncategorized (1)
- Website Tracking (2)
- Website Search (1)
More Pardot Articles
See all posts


This Pardot article written by: Jen Kazin
Greenkey Digital
Unlock the Power of Pardot. Don’t spend tens of thousands of dollars on marketing systems to simply… send emails.
Original Pardot Article: https://greenkeydigital.com/engagement-studio/?utm_source=rss&utm_medium=rss&utm_campaign=engagement-studio
Find more great Pardot articles at https://greenkeydigital.com/